> For the complete documentation index, see [llms.txt](https://docs.umbraco.com/llms.txt). Markdown versions of documentation pages are available by appending `.md` to page URLs; this page is available as [Markdown](https://docs.umbraco.com/umbraco-cloud/build-and-customize-your-solution/handle-deployments-and-environments/deployment/local-to-cloud.md).
# Deploying Changes
How to Deploy changes between a local machine and an environment with Umbraco Deploy using either a Git GUI or CLI
In this article, you can learn more about deploying your code changes and metadata from a local instance to your Cloud environment.
Local changes in your Umbraco Cloud project are automatically detected and synced with your Git client for seamless collaboration.
There are two ways this can be done. You can push the changes using a Git UI or your terminal. This guide will show how you can use both ways to deploy your local changes to Umbraco Cloud.
## Prerequisites
* A clone of your Cloud project.
* A [Git UI](https://git-scm.com/downloads/guis) or a Terminal.
* Created some Document Types and Data Types with corresponding `.uda` files.
* The files are located in the `/umbraco/Deploy/Revision` folder.
## Deploying using a Git UI
Once you have created some Documents and Data types, follow the steps below to deploy your local changes using a Git UI. The guide will use [Fork](https://git-fork.com/) as the Git UI, however you can use your own preferred Git UI.
1. Go to your Git UI.
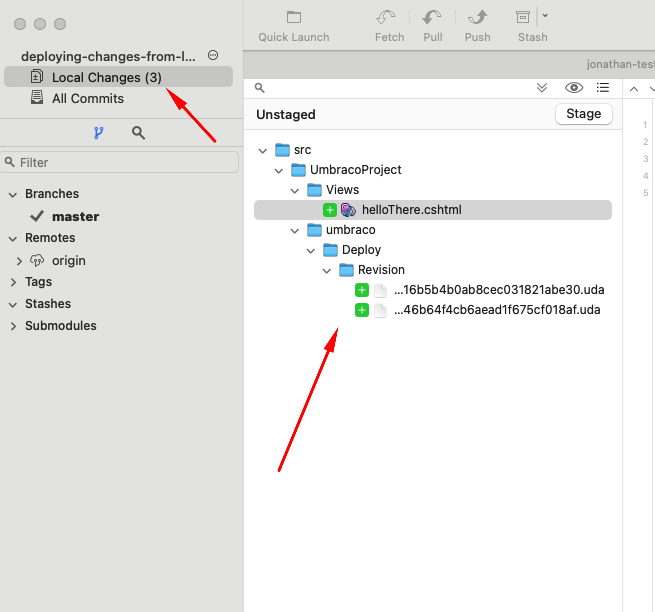
2. Check for local changes in your UI.
Local changes in Git UI.
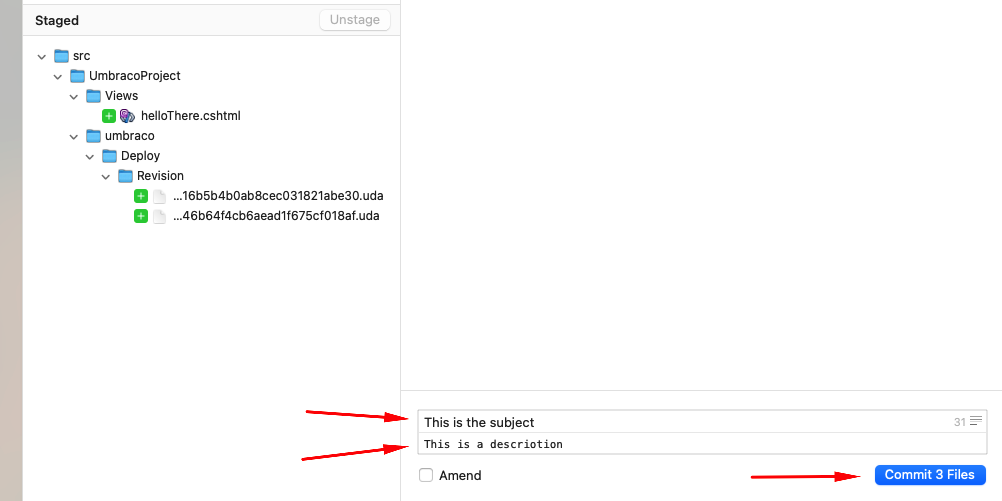
3. Prepare changes, so they are ready to be committed.
4. Write a commit subject
5. Write a description of the commit.
6. Commit the files.
Ready the files for commit.
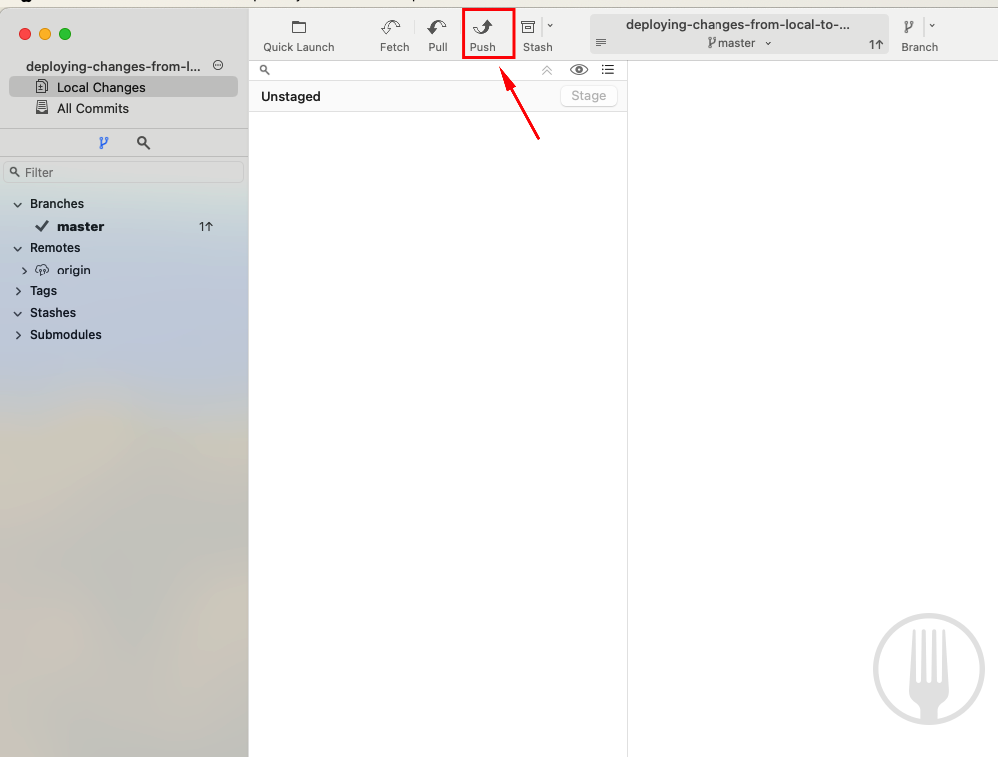
4. Push the files to your cloud project in the UI.
Push changes to Umbraco Cloud.
The deployment will kick in and the new Documents and Data Types you have created locally are now automatically created on the remote environment.
After deploying changes locally to your Cloud environment, use the Umbraco Cloud portal's **'Deploy changes to ..'** button for subsequent deployments to other environments. For more information, see the [Deploying between Cloud Environments](/umbraco-cloud/build-and-customize-your-solution/handle-deployments-and-environments/deployment/cloud-to-cloud.md) article.
## Deploying local changes using the terminal
To deploy your local changes from local to Umbraco Cloud using a terminal follow the steps below:
1. Navigate to your local projects folder using the `cd YourProjectName` command in the terminal.
2. Check for pending changes in your project with `git status`.
3. Add the pending changes with `git add -`.
4. Commit the staged files using `git commit -m "Adding updated schema changes"`.
5. Push the changes to Umbraco Cloud using `git push`.
1. Do a `git pull` if the push is rejected.
If you have to pull down, make sure to see if any of these commits contain changes to the schema (anything in `umbraco/Deploy/Revision/`).
To validate your local site and ensure compatibility with the updated schema, use the [**Deploy Dashboard**](https://docs.umbraco.com/umbraco-cloud/deployments/deploy-dashboard) in the **Settings** section of the Umbraco backoffice.
Here, you can see the status of ongoing or completed deployment processes. The status will show whether an operation has been triggered and is in progress has been completed, or has failed.
The dashboard will show the status based on the marker files on the disk, for example, `deploy-progress`. From the **Deploy** Dashboard, it is also possible to trigger different processes.
---
# Agent Instructions
This documentation is published with GitBook. GitBook is the documentation platform designed so that both humans and AI agents can read, navigate, and reason over technical content effectively. Learn more at gitbook.com.
## Querying This Documentation
If you need additional information that is not directly available in this page, you can query the documentation by asking a question.
Perform an HTTP GET request on the following URL with the `ask` and `goal` query parameters:
```
GET https://docs.umbraco.com/umbraco-cloud/build-and-customize-your-solution/handle-deployments-and-environments/deployment/local-to-cloud.md?ask=&goal=
```
`ask` is the immediate question: it should be specific, self-contained, and written in natural language.
`goal` is what the user is ultimately trying to achieve, the reason they need the answer. Sharing it helps GitBook give you a better, more relevant answer. A goal is most helpful when it describes the outcome the user wants rather than restating the question. For example, with `ask=how do I create an API token`, a goal like `automate deployments from our CI pipeline` lets GitBook tailor the answer to that use case.
The response will contain a direct answer to the question and relevant excerpts and sources from the documentation.
Use this mechanism when the answer is not explicitly present in the current page, you need clarification or additional context, or you want to retrieve related documentation sections.