> For the complete documentation index, see [llms.txt](https://docs.umbraco.com/llms.txt). Markdown versions of documentation pages are available by appending `.md` to page URLs; this page is available as [Markdown](https://docs.umbraco.com/umbraco-cloud/optimize-and-maintain-your-site/manage-product-upgrades/product-upgrades/minor-upgrades.md).
# Minor and Patch Upgrades
This article explains how Minor and Patch upgrades work in Umbraco Cloud.
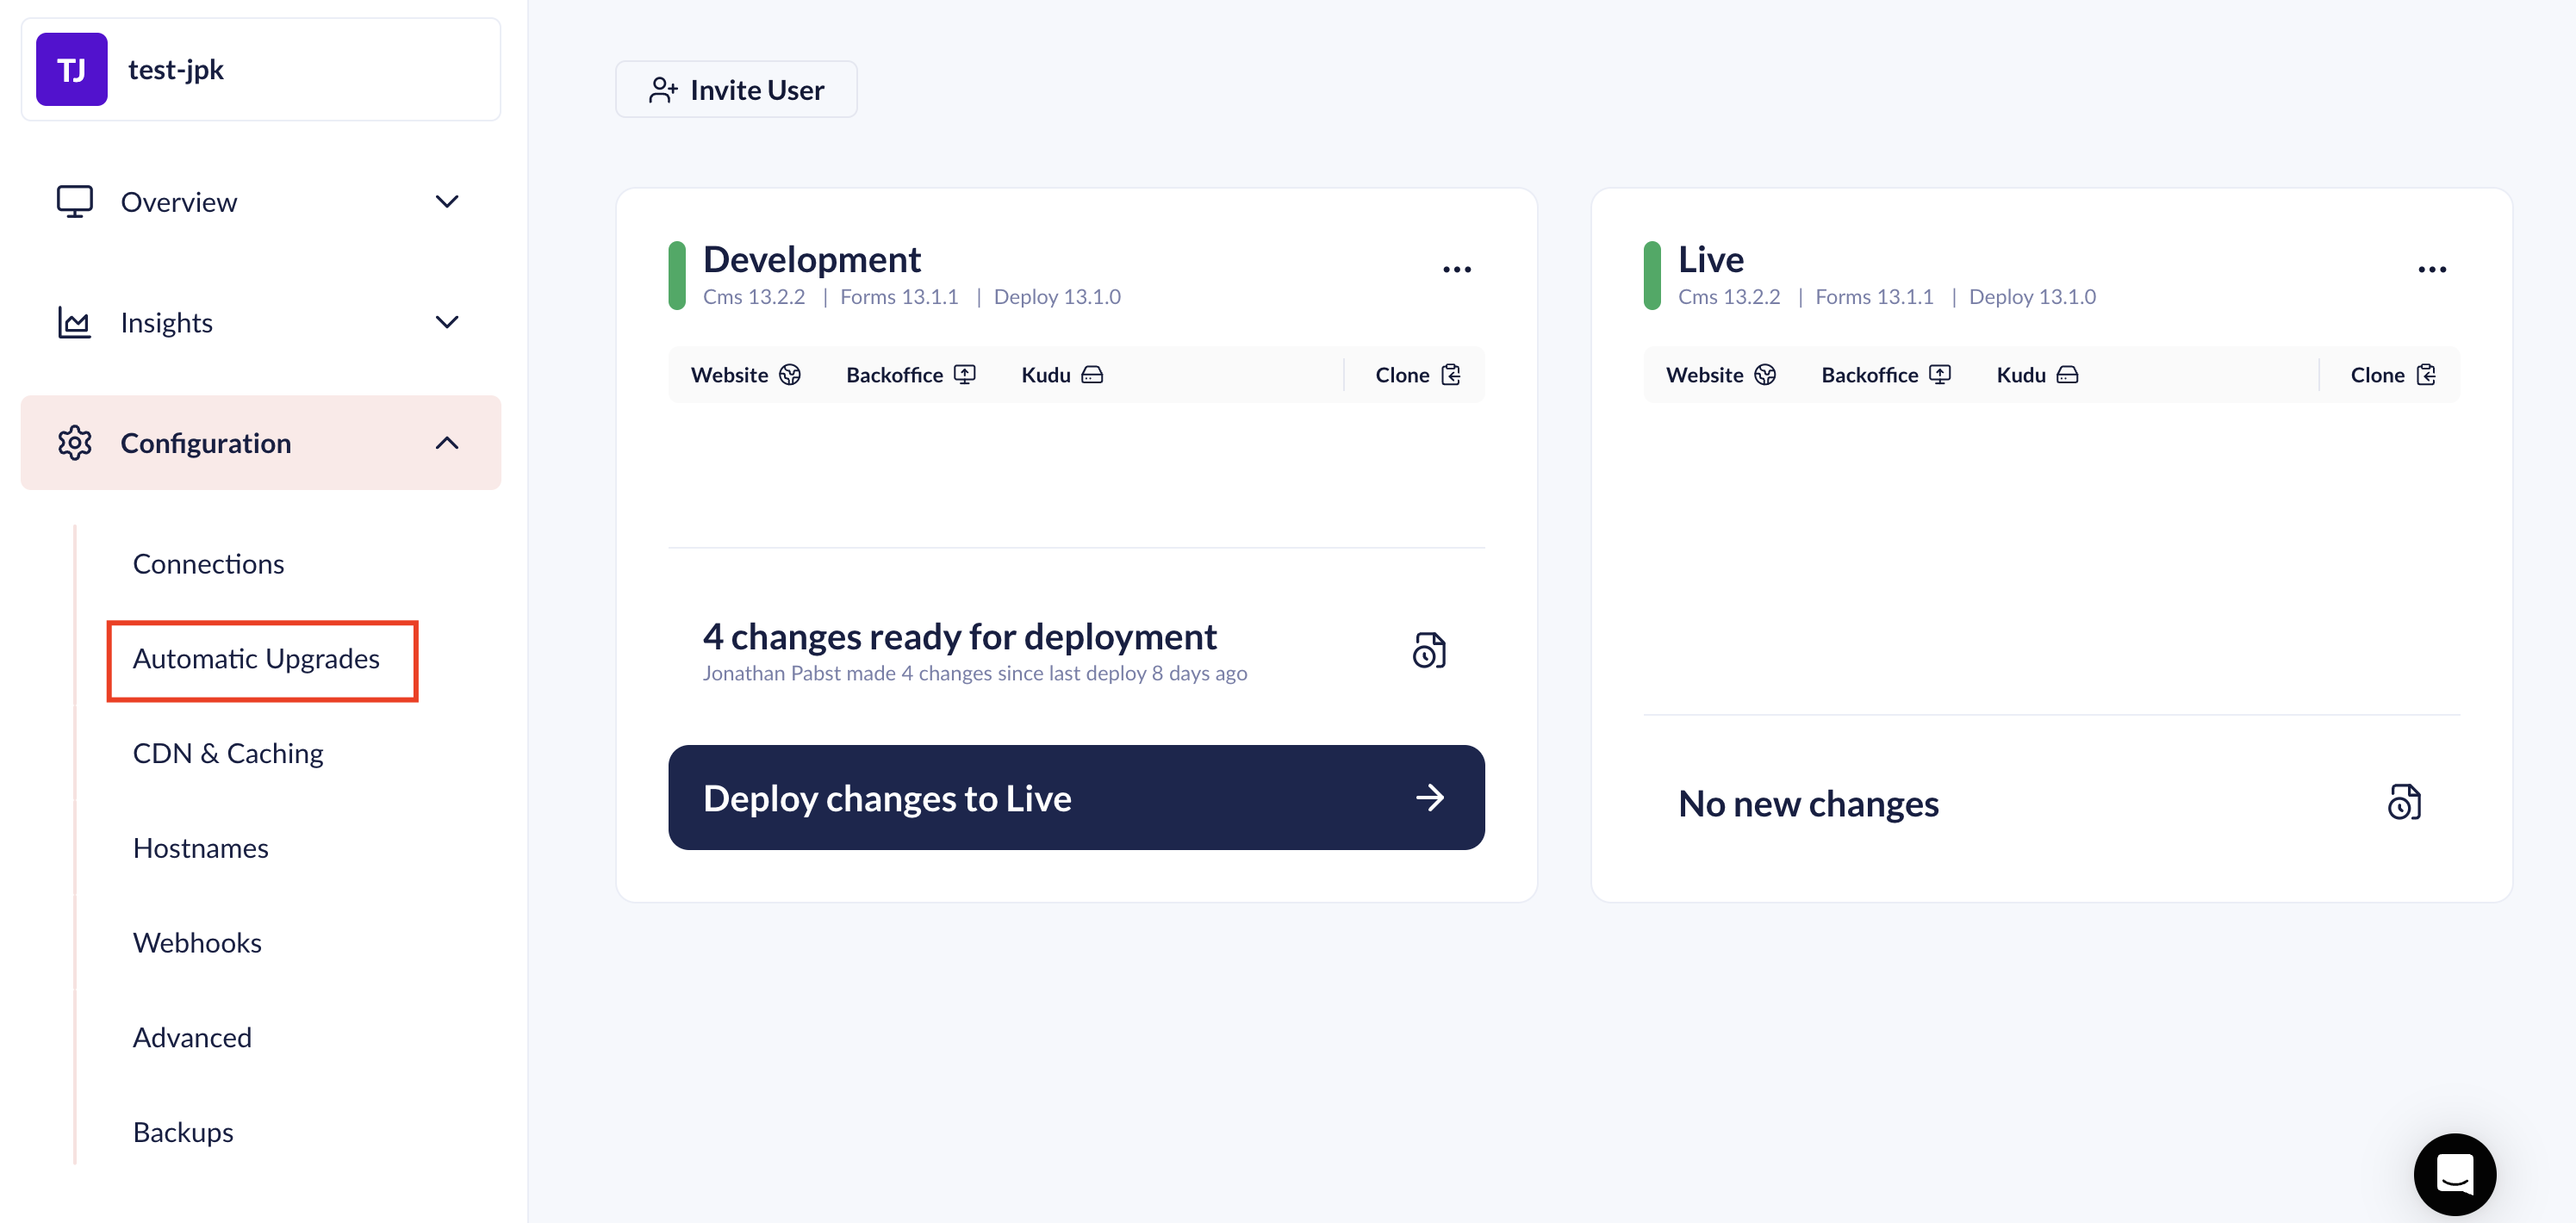
Both minor and patch upgrades can be managed from the **Configuration** -> **Automatic Upgrades** page in the Cloud Portal.
* [Automatic Minor Upgrades](#automatic-minor-upgrades)
* [Automatic Patch Upgrades](#automatic-patch-upgrades)
* [Upgrade from the Cloud Portal](#upgrade-from-the-cloud-portal)
* [Manual Upgrades](#manual-upgrades)
## Automatic Minor Upgrades
To enable automatic minor upgrades, follow these steps:
1. Go to your Umbraco Cloud project.
2. Navigate to **Configuration** -> **Automatic Upgrades**.
Settings Umbraco Cloud
3. Enable **Automatic Minor Upgrades**.
Enable Minor Upgrades
With automatic upgrades enabled, all products on Umbraco Cloud will automatically be upgraded. This includes Umbraco CMS, Umbraco Forms, and Umbraco Deploy. Your project does not need to be running the latest minor version for automatic upgrades to work. The project will be upgraded to the latest minor version when it is released.
If you create a new project on Umbraco Cloud automatic upgrades are enabled by default.
{% hint style="info" %}
Use a secondary mainline environment to test upgrades before sending them to Live. While automatic upgrades and upgrades started from the Cloud Portal do not require a second environment, omitting one means upgrades apply directly to Live.
{% endhint %}
A secondary mainline environment is included in all Umbraco Cloud plans, except Starter. Find pricing details for Umbraco Cloud Starter plans on our [website](https://umbraco.com/products/umbraco-cloud/pricing).
## Automatic Patch Upgrades
By default, all Umbraco Cloud projects are automatically upgraded when new patch versions are released. This includes security patches and ensures all sites run the most stable and secure versions.
You can toggle **Automatic Patch Upgrades** on or off from the same **Configuration** -> **Automatic Upgrades** page.
{% hint style="danger" %}
When you disable automated patch upgrades, you are responsible for keeping your project up to date. Falling behind on patches may affect your eligibility for support. It can also expose your project to known security vulnerabilities.
{% endhint %}
{% hint style="warning" %}
Umbraco reserves the right to patch critical vulnerabilities. This ensures the Umbraco Cloud platform remains stable and secure.
{% endhint %}
## Upgrade from the Cloud Portal
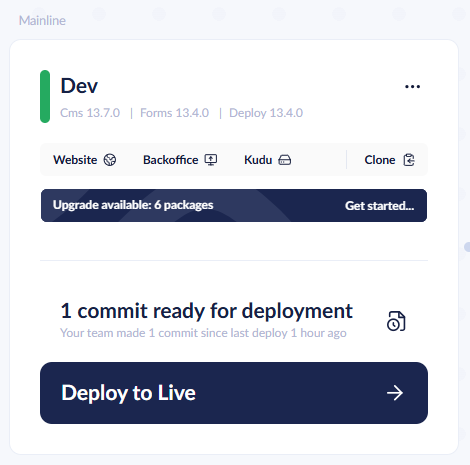
When a newer version of a product is available for your project, an **Upgrade available** banner is shown in the Cloud Portal. The banner appears on the left-most mainline environment card. Project administrators select **Get started** on the banner to review and start the upgrade.
The Upgrade available banner on an environment card
The banner offers any higher minor or patch version within the major version your project runs. Major version upgrades are never offered by the banner. See the [Major Upgrades](/umbraco-cloud/optimize-and-maintain-your-site/manage-product-upgrades/product-upgrades/major-upgrades.md) article for how to upgrade to a new major version.
The following products are upgraded through the banner:
* Umbraco CMS
* Umbraco Forms
* Umbraco Deploy
* Umbraco Deploy Contrib
* Umbraco Cloud CMS
* Umbraco ID
* Azure Blob Storage provider
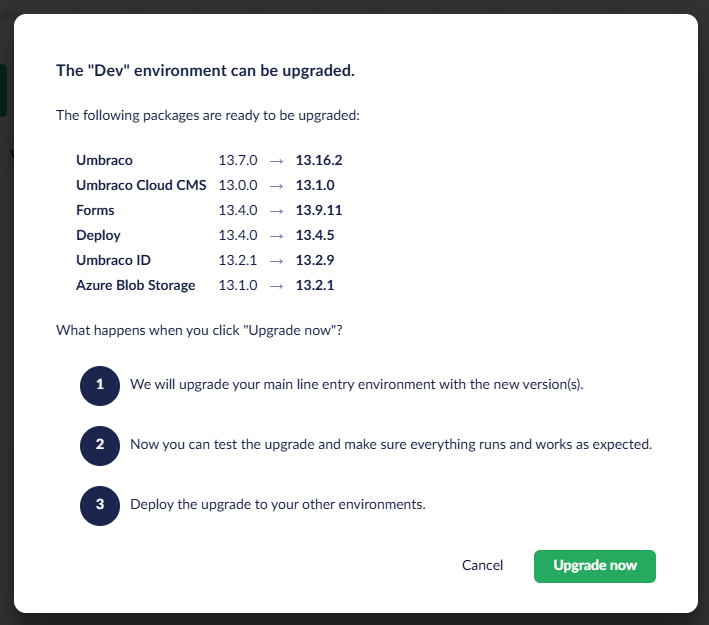
All eligible products are upgraded in a single run. The banner names one or two products, or shows a package count when more are available. The confirmation dialog lists every package with its current and target version.
The confirmation dialog listing the packages to upgrade
The upgrade is applied to the left-most mainline environment only. Test the upgrade there, and then deploy the changes to the next environments yourself. Pending changes between environments do not block the upgrade. The upgrade commit is added on top of the pending changes and is included in the next deployment.
{% hint style="warning" %}
Projects with a single Live environment can also upgrade from the banner. As there is no other environment to test on, the upgrade is applied directly to Live. The site restarts during the upgrade. The confirmation dialog warns about the restart and links to the version-specific upgrade notes.
{% endhint %}
The banner is independent of the **Automatic Minor Upgrades** and **Automatic Patch Upgrades** settings. Selecting **Get started** is an explicit action, and the upgrade runs even when automatic upgrades are disabled.
### When a version is not offered
A newer version can exist on NuGet without being offered by the banner. The banner only offers versions that meet the following conditions:
* The project runs on a supported Umbraco version.
* The release has been marked ready on Umbraco Cloud.
* The release was created within the last year.
The banner is hidden while an upgrade is in progress, and for up to three hours after an upgrade stops reporting progress. Umbraco Heartcore projects and baseline child projects do not see the banner.
## Manual Upgrades
A manual upgrade involves a more hands-on approach, where the upgrade process is initiated and controlled by the user or development team. This allows for greater flexibility and oversight, enabling teams to test and adapt the upgrade to their specific needs and configurations. A manual upgrade provides an opportunity to thoroughly test the new version in a controlled environment before applying it to live production environments. This ensures compatibility and minimizes disruptions.
For more information about manual upgrades, see the [Manual upgrade of Umbraco CMS](/umbraco-cloud/optimize-and-maintain-your-site/manage-product-upgrades/product-upgrades/manual-upgrades/manual-cms-upgrade.md) article.
## Troubleshooting Automated Minor Upgrades
Umbraco Cloud supports performing minor upgrades to your projects automatically. The feature is available when a new minor version of Umbraco is released (for example 10.5.0 or 10.6.0).
The upgrade will resolve most issues it encounters, but some Umbraco configurations may need manual intervention. This is usually related to custom code that depends on APIs that have changed or been removed in the new minor version.
If anything fails during this process, you can reach out for support using the in-app chat in the bottom right corner. We will assist you through the upgrade process if any issues arise.
## Database Upgrade Failing
Symptoms and feedback are given from the upgrade process: **Unable to run the Umbraco installer**
The first step in the process, after having updated all the files, is to call the Umbraco install engine. This is done in order to get its database updated to support the new version. As this step is the first time the site gets requested after the updated files are run, it may fail. The reason is often code that is incompatible with the upgraded files.
It can be code that references APIs that have been deprecated, or code that has some strong references to specific versions. If the error is clear, it will be shown on the screen. It will be a typical ASP.NET error message also called a Yellow Screen of Death (YSOD). You should request the site, and check the error it shows. If the error isn't descriptive, then it is time to clone the repository to your local machine and fix the issue. The usual suspects would be:
* The code you have running is referencing an API that has been changed, is being modified, is obsolete, or removed.
* The `web.config` had assembly bindings for a specific DLL version that doesn't exist anymore. During the upgrade process, we do update the references we are shipping, but there might be something missing.
Once you have the site running locally, you should push your changes to the repository. This will update the site, and it should now be in a running state.
The upgrade process left off when it needed three more steps. These three steps now need to be done manually.
1. Complete the installer
* To complete the installer, you should visit the site: `https://dev-YOURSITEALIAS.euwest01.umbraco.io`. This will show you the installer screen, where you should insert your backoffice credentials and follow the process. It will run through a few steps, and later Umbraco will be updated to the latest version.
2. Export the metadata files.
* The second thing you need to do is to regenerate the metadata files used for transferring items like document types, data types, and media types. This is done by accessing the Power tools (Kudu) on the project, opening the cmd prompt, and browsing to the wwwroot/data folder. Once there, you need to enter `echo > deploy-export`. This will generate the required files for the upgraded site to work with Umbraco Deploy.
3. The last thing to do is to go to the `/site/locks` folder (still through Kudu) and rename the file called `upgrading` to `upgraded-minor` - rename the file by typing `ren upgrading upgraded-minor`. This will indicate to Umbraco Cloud, that the left-most environment is now ready to deploy all its changes to the next environment.
Before deploying the upgrade to the next environment, you should verify that everything looks as expected on the left-most environment.
---
# Agent Instructions
This documentation is published with GitBook. GitBook is the documentation platform designed so that both humans and AI agents can read, navigate, and reason over technical content effectively. Learn more at gitbook.com.
## Querying This Documentation
If you need additional information that is not directly available in this page, you can query the documentation by asking a question.
Perform an HTTP GET request on the following URL with the `ask` and `goal` query parameters:
```
GET https://docs.umbraco.com/umbraco-cloud/optimize-and-maintain-your-site/manage-product-upgrades/product-upgrades/minor-upgrades.md?ask=&goal=
```
`ask` is the immediate question: it should be specific, self-contained, and written in natural language.
`goal` is what the user is ultimately trying to achieve, the reason they need the answer. Sharing it helps GitBook give you a better, more relevant answer. A goal is most helpful when it describes the outcome the user wants rather than restating the question. For example, with `ask=how do I create an API token`, a goal like `automate deployments from our CI pipeline` lets GitBook tailor the answer to that use case.
The response will contain a direct answer to the question and relevant excerpts and sources from the documentation.
Use this mechanism when the answer is not explicitly present in the current page, you need clarification or additional context, or you want to retrieve related documentation sections.
.png?alt=media&token=9ced31ef-e491-476e-a84a-90b2a423555f)