Details a package supporting the replacement of Umbraco's default physical file storage for an alternative based on Azure Blob Storage.
Umbraco.StorageProviders and Umbraco.StorageProviders.AzureBlob are open-source packages supported by Umbraco that allow you to replace the default physical file storage for an alternative. An implementation that uses for media and image caching is provided.
For details on usage, to review, or contribute to the code, see the .
Extending the Umbraco platform through the composition of packages and integrations.
Within this Umbraco DXP (Digital Experience Platform) area of the Umbraco documentation, you'll find topics related to extending Umbraco CMS via packages and integrations.
Umbraco is used in solutions in both a "platform" and "composable" DXP context. With the former, Umbraco has responsibility for both content management and delivery, with extensions added as NuGet packages. In a composable DXP, Umbraco is often a stand-alone service that takes part in an overall architecture. In these cases, Umbraco CMS is focused on the management of content exposed via APIs for delivery.
Umbraco is also used in a hybrid DXP context. Here, some features are added directly to the Umbraco platform, like Umbraco Forms or Umbraco Commerce. However, Umbraco still acts as a component in a wider architecture.
In all situations, backoffice integrations with third-party services are an important part of providing an intuitive, unified editor experience.
Our aim is to support the different ways of using Umbraco in a DXP context and provide resources for building integrations with Umbraco.
Packages and integrations
Packages for Umbraco are installed as .
Integrations provide functionality via a third-party service's API, whereas packages extend the functionality of the CMS (management or delivery).
Umbraco Commercial Products
Umbraco makes available four licensed add-ons that are available for purchase. They each have their dedicated documentation area:
We aim to make all commercial products available as new major versions in alignment with the releases of Umbraco CMS. A new major version of Umbraco, running on the latest version of , is expected every six months. At or around the same time, compatible Forms, Deploy, Workflow and Commerce releases will also be made available, along with .
We align version numbers across the products. So when running for example Umbraco CMS 12, the same major version of the commercial products should be used.
Umbraco Marketplace
The Umbraco Marketplace is a public website used to showcase Umbraco packages. These are commercial and open-source extensions available for use in Umbraco solutions. On the marketplace, you can browse and search for packages, understand their usage, and review their suitability for your project.
The marketplace is available at .
Within the , you'll find details aimed at package developers looking to list their Umbraco CMS extensions and integrations.
Umbraco Packages
We create and support open-source packages designed to improve the experience of creating integrations and developing Umbraco solutions as a DXP.
Within the packages section of the documentation you'll find information on using a component called . This package is designed for the purpose of simplifying custom integrations with third-party services that use a OAuth flow for authentication and authorization.
Umbraco Integrations
Finally, Umbraco HQ develops and makes available open-source integrations. These add functionality to the Umbraco CMS to support working with third-party services.
These integrations are helpful starting points for anyone looking to integrate such services into their Umbraco solution.
When we have released an integration for a particular provider and use case that matches your needs, they are available for use directly. If we don't meet your particular requirement, we welcome feedback at the Issue Trackers. As all are open-source, they can be used as references for building similar integrations with related services.
Source code and issue trackers are found in the following GitHub repositories:
Within the , you'll find details on installing and working with the integration packages developed by Umbraco HQ.
Commercial Products, Relations, and Dependencies
Describes the Umbraco commercial products, their dependencies and relations.
The following diagram shows the Umbraco commercial products, their dependencies, and the relations between them. Depending on your setup, you may need one or more of the additional packages shown here when working with them.
Explanatory notes:
Umbraco.Licensing supports the older licensing mechanism for Umbraco's products, including Forms and Deploy, when used on Umbraco Cloud.
Umbraco.Licenses is the newer component supporting subscription licensing, used for Forms, Workflow, Commerce, and Deploy version 12 and above when used on-premise.
Configure Licenses
Commercial Umbraco products require a valid license to run in production environments. This article covers how to install, configure, and validate licenses for Umbraco's commercial products.
Product-Specific License Information
For product-specific information including what a license covers, pricing, and how to purchase:
CommerceTools
Details an integration available for CommerceTools, built and maintained by Umbraco HQ.
This integration provides a product and category picker, with data sourced from a installation.
Package Links
Introduction
Finding, reviewing and listing Umbraco packages at the Umbraco Marketplace
The Umbraco Marketplace is a public website used to showcase Umbraco packages. These commercial and open-source extensions to the Umbraco CMS are available for use in Umbraco solutions. On the website, you can browse and search for packages, read details about their installation and usage, and review their suitability for your project.
The website is available at .
Website Features
The Marketplace website is a read-only display of packages available to extend Umbraco. The information displayed combines what is available at nuget.org, augmented with additional details provided by the package owners.
Each package is listed within a category, grouping together packages meeting needs within a particular area. Information such as version number, Umbraco compatibility, description, screenshots, and video are available. A keyword search is also available as well as browsing and filtering packages within each category or list.
We provide links for each package to the NuGet details, and other locations if available, such as the source code, documentation, and issue tracker.
Listing Your Package
If you are a package developer wanting to make your work available for Umbraco website developers, review the listing your package article.
Package Telemetry Data
Umbraco installations that have opted into providing basic or detailed telemetry data will indicate which packages are installed. We use that information to order packages by "Most Active Installs".
To understand how to ensure your package is ranking correctly by this measure, consider the details provided about package telemetry data usage.
Umbraco commercial products use configuration-based licenses. These are installed by adding your license key to the appsettings.json file.
Umbraco Forms also supports file-based licenses, but starting from version 17, it will only support license keys. For more information, see the announcement.
For version 14 and above, licenses are configured under Umbraco:Licenses:Products:
Open the root directory for your project.
Locate and open the appsettings.json file.
Add your license key to Umbraco:Licenses:Products:<ProductName>:
For versions 10-13, licenses are configured under Umbraco:Licenses:
Open the root directory for your project files.
Locate and open the appsettings.json file.
You might run into issues when using a period in the product name when using environment variables. Use an underscore in the product name instead, to avoid problems.
Verifying the License Installation
You can verify that your license is successfully installed by logging into your project's backoffice:
Navigate to the Settings section.
Look for the Licenses dashboard.
Verify the license status displayed on the dashboard.
The dashboard will show the status of all installed commercial product licenses.
Configuring UmbracoApplicationUrl
The website domain used for validating the license is determined from your Umbraco instance. To ensure the correct one is used, you can configure the UmbracoApplicationUrl.
When to Configure UmbracoApplicationUrl
If you are running on a single domain for both your frontend and backend environments, it's not necessary to configure a UmbracoApplicationUrl.
If you have different domains for your frontend and backend, then it's advised that you configure an UmbracoApplicationUrl set to your backoffice URL. This helps the licensing engine know which URL should be used for validation checks. Without this configuration setting, the licensing engine will try and work out the domain to validate from the HTTP request object. This can lead to errors when switching between domains.
How to Configure UmbracoApplicationUrl
An UmbracoApplicationUrl can be configured in your appsettings.json file:
Configuring UmbracoApplicationUrl on Umbraco Cloud
If you are hosting on Umbraco Cloud, you will find that the configuration described above won't be reflected in your environment. The reason for this is that Umbraco Cloud sets this value as an environment variable set to the Cloud project domain (<your project>.umbraco.io). This overrides what is set via the appsettings.json file.
There are two options in this case:
Either the domains for each of your Cloud environments can be added to your license.
Or, for more control and to ensure this value is set correctly for other reasons, you can apply the configuration via code.
For example, in your Program.cs:
In practice, you may want to make this configuration more flexible. You can read the value from another configuration key, removing the need to hard-code it and have it set as appropriate in different environments. You can also move this code into a composer or an extension method if you prefer not to clutter up the Program.cs file.
Validating a License Without an Outgoing Internet Connection
Some Umbraco installations will have a highly locked down production environment, with firewall rules that prevent outgoing HTTP requests. This will interfere with the normal process of license validation.
On start-up, and periodically whilst Umbraco is running, the license component will make an HTTP POST request to https://license-validation.umbraco.com/api/ValidateLicense.
If it's possible to do so, the firewall rules should be adjusted to allow this request.
If such a change is not feasible, there is another approach you can use.
Setting Up License Relay
You will need to have a server, or serverless function, that is running and can make a request to the online license validation service. That needs to run on a daily schedule, making a request and relaying it onto the restricted Umbraco environment.
Configure a random string as an authorization key in configuration. This is used as protection to ensure only valid requests are handled. You can also disable the normal regular license checks - as there is no point in these running if they will be blocked:
Ensure you use the latest product version, so the package dependency on Umbraco.Licenses is updated to 13.1.0 or later.
Your Internet-enabled server should make a request of the following form to the online license validation service:
The response should be relayed exactly via an HTTP request to your restricted Umbraco environment:
A header with a key of X-AUTH-KEY and the value of the authorization key you have configured should be provided.
This will trigger the same processes that occur when the normal scheduled validation completes ensuring your product is considered licensed.
This integration is currently only available for Umbraco 8.
How To Use
From your CommerceTools account, retrieve the following details and add them as application settings to your websites web.config file.
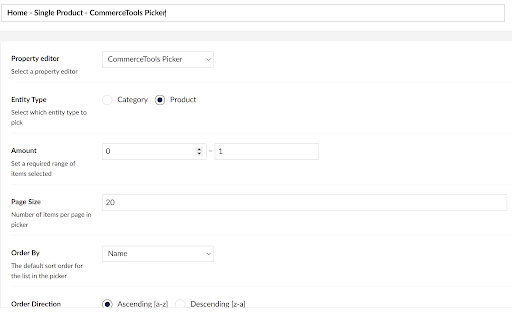
In the Umbraco backoffice, navigate to Settings > Data Types and create a new Data Type based on the available CommerceTools Picker.
The picker can be configured for selection of categories or products, defined as single or multiple picker, as well as other options:
Data type configuration
When rendering product or category information, a property value converter will provide a strongly typed collection or object with the following fields available:
Details an integration available for ActiveCampaign, built and maintained by Umbraco HQ.
This integration provides a form picker and rendering component for forms managed within an ActiveCampaign CRM: Customer Relationship Management account.
To ensure compatibility, check the Dependencies tab on NuGet for the required Umbraco CMS version. For example, see .
Authentication
All requests to the ActiveCampaign API are authenticated by providing an API key. The API key is included as an HTTP header called Api_Token.
If the configuration is incomplete, the user will receive an error message.
Configuration
To connect to your ActiveCampaign account, the following configuration is required:
Backoffice usage
To use the form picker, a new Data Type needs to be created based on the ActiveCampaign Form Picker property editor.
The settings in appsettings.json will be used for sending the required HTTP header for authorization, and for retrieving the account name used for rendering the form.
Front-end rendering
A strongly typed model will be generated by the property value converter. An HTML helper is available, to render the form on the front end.
Ensure that your template has a reference to the following using statement:
Assuming a property based on the created Data Type with the alias activeCampaignForm has been created, render the form using:
ActiveCampaign with Umbraco Forms
Details an integration available for ActiveCampaign with Umbraco Forms, built and maintained by Umbraco HQ.
This integration provides a custom workflow, allowing form entries to be mapped to an ActiveCampaign contact record. The record can be used to create a new contact or to associate a contact with an existing Customer Relationship Management (CRM) account.
Package Links
inriver
Details an integration available for inriver, built and maintained by Umbraco HQ.
This integration provides a custom product picker for selected products in the Product Information Management (PIM) system. It also includes a value converter providing a strongly typed model for rendering and a sample rendering component.
Package Links
HubSpot with Umbraco Forms
Details an integration available for HubSpot with Umbraco Forms, built and maintained by Umbraco HQ.
This integration provides a custom workflow for Umbraco Forms. The workflow settings allow form entries to be mapped to a HubSpot contact record. When the form is submitted, the details are stored within the Customer Relationship Management (CRM) platform.
Package Links
CookieBot
Details an integration available for Cookiebot, built and maintained by Umbraco HQ.
This integration provides an implementation model for the banner and declaration.
Package Links
Package Telemetry Data
How package telemetry data collected from Umbraco installations is used to order packages
Umbraco installations that have opted into providing basic or detailed telemetry data will indicate which packages are installed. We use that information to order packages by "Most Active Installs".
Package Popularity
We have two measures that we can use to rank packages by popularity:
All requests to the ActiveCampaign API are authenticated by providing an API key. The API key is included as an HTTP header called Api-Token.
If the configuration is incomplete, the user will receive an error message.
Configuration
An ActiveCampaign contact has four main properties: email, first name, last name, and phone.
To connect to your ActiveCampaign account, the following configuration is required:
The email property is mandatory by default through ActiveCampaign API rules. The required rule can be extended to the other properties, by explicitly specifying that in the required property of each ContactFields node.
Working with the integration
To use it, follow these steps:
Attach the ActiveCampaign Contacts Workflow to a form.
Configure the mappings between the contact properties and the form fields.
Select an account if you want to associate the contacts, and/or map any contact custom fields.
When a form is submitted on the website, the workflow will execute. Based on the provided email it will create or update an ActiveCampaign account. If custom fields mappings have been provided, the contact payload will contain custom fields values.
If an account has been provided in the workflow setup, then an association with the account will be created.
To ensure compatibility, check the Dependencies tab on NuGet for the required Umbraco CMS version. For example, see Umbraco.Cms.Integrations.PIM.Inriver.
Authentication
Accessing the resources from inriver through the REST API requires an API key, which will be included with each request using the X-InRiver-APIKey header.
To retrieve your API key and instance of your environment, follow these steps:
Access your inriver account.
Go to the Users section of the Control Center.
Generate an API key.
Configuration
The following configuration is required for working with the inriver API:
Backoffice usage
To use the product picker, a new datatype should be created based on the inriver Entity Picker property editor.
If the configuration is not valid, an error message will be displayed.
Otherwise, you will be able to toggle between the inriver entity types of your environment and pick which columns you want to be displayed.
Select the entity type which you need to fetch data from, and retrieve the list of fields and linked entities for it.
Front-end rendering
A strongly typed model will be generated by the property value converter. An HTML helper is available to render the product on the front end.
Make sure your template has a reference to the following using statement:
Assuming a property based on the created Data Type with the alias inriverProductPicker has been created, render the product using:
You can override the sample rendering component with one of your own by specifying a new path for the view.
The following configuration is required for the Cookiebot scripts to be loaded correctly:
Templating
The package is a reusable Razor class library that will allow editors to load the Cookiebot Banner and Declaration scripts.
The banner script needs to be inserted as the first script of the website, by placing it within the <head></head> tag using this syntax:
The Declaration script can be added to whatever page you want, using this syntax:
Both scripts "pick up" CBID from the website's configuration file and update the details accordingly.
Custom Implementations
This integration demonstrates how an Umbraco package can be used as an integration with a script-based provider, using partial views and the IConfiguration interface.
You can use this package as a reference for creating integrations with other providers using scripts:
Create a new Razor class library for your integration.
Add partial views where you insert your custom script code.
Inject the IConfiguration interface into your view: @inject Microsoft.Extensions.Configuration.IConfiguration Configuration.
Use Configuration[YOUR_SETTINGS_PATH:KEY] to retrieve the required configuration values.
Add umbraco-marketplace.json file with Marketplace details of the package.
Total Number of NuGet Downloads (obtained from nuget.org)
Number of Active Installs (obtained from CMS package telemetry over the past 14 days)
Both of these are available for website users to select when filtering the list of packages they are reviewing.
"Number of Active Installs" is used as the measure for "Most popular" packages shown on the Marketplace home page.
How Number of Active Installs is Collected
Umbraco installations that have opted into sending telemetry data will send information periodically to a central collection service. This may include information about packages that are installed.
On a regular basis this information is aggregated and stored in the database that serves the Marketplace API and website.
Package Identification
Packages are identified in the telemetry service based on one of the following:
The package name provided in a package manifest file or manifest filter.
The name of the folder within /App_Plugins/ that the package creates.
The most reliable way of matching up a package between the Marketplace and the telemetry data is if the package NuGet Id is provided. This can be included in your manifest file or filter if your package depends on Umbraco 12 or above.
If you use a manifest filter and take a dependency on a lower version of Umbraco, the PackageManifest.PackageId isn't available. You can still have set it for Umbraco installations that run Umbraco 12 using reflection. An example of this technique can be found within the open-source Umbraco AuthorizedServices package.
Even if the package Id is provided in your package manifest, only installations of Umbraco 12 and up will use it for telemetry reporting. Older versions will use the package name or folder.
If the package name or folder is used, this may not be the same as the NuGet package ID. If not, we need to ensure your package is stored along with the alternate name that is used in the CMS and telemetry data.
It's no longer possible to supply this via the umbraco-marketplace.json file. The field by which this was supplied has been deprecated in the schema and if provided will no be longer imported. This was due to the risks of two package developers providing the same alternate names.
Instead we maintain this list at HQ. You may own a package that appears to not rank as expected via the "most active installs" measure. If you suspect it's due to the telemetry data not being correctly allocated, let us know. We can make the necessary updates such that it's popularity is properly reflected. You can reach us at [email protected] and tell us the name used for your package in the package manifest or folder.
What if I don't have a client-side component?
Some packages may not have either a package.manifest.json file nor create a folder in /App_Plugins/. This would normally be the case if the package is providing only server-side functionality, and is written purely in C#.
For these cases there's an option to add and register a manifest filter that ensures the name and Id is set.
An example is shown here:
The class needs to be registered as part of the application startup, via a composer or an extension method as shown here:
using System.Collections.Generic;
using Umbraco.Cms.Core.Manifest;

namespace Umbraco.Community.MyPackage
{
    internal sealed class PackageManifestFilter : IManifestFilter
    {
        public void Filter(List<PackageManifest> manifests) =>
            manifests.Add(new PackageManifest
            {
                PackageId = "MyPackage",
                PackageName = "My Package",
            });
    }
}
using Umbraco.Cms.Core.DependencyInjection;
using Umbraco.Extensions;

namespace Umbraco.Community.MyPackage
{
    public static class UmbracoBuilderExtensions
    {
        public static IUmbracoBuilder AddMyPackage(this IUmbracoBuilder builder)
        {
            builder.ManifestFilters().Append<PackageManifestFilter>();
            return builder;
        }
    }
}
Add your license key to Umbraco:Licenses:<ProductName>:
To ensure compatibility, check the Dependencies tab on NuGet for the required Umbraco CMS version. For example, see Umbraco.Forms.Integrations.Crm.Hubspot.
Authentication
The package supports authentication using the OAuth protocol.
The first time the workflow is used, the installation needs to be authorized. That can be done by following these steps:
Click the prompted link which will redirect to the HubSpot authentication page for the Umbraco Forms HubSpot app.
Log into the HubSpot account and agree to the permissions that the app requires.
Permission is required in order to be able to read and write contact information.
After agreeing to the permissions a redirect happens to a website hosted at https://hubspot-forms-auth.umbraco.com.
Copy the authorization code issued by HubSpot.
Paste it into the field indicated within the Umbraco Forms installation.
Behind the scenes, this will make a request to HubSpot which will return two tokens - an access and a refresh token. The former will be provided in further API calls to HubSpot to authenticate the request. The latter will be stored via Umbraco's key/value service and will be used to retrieve a new access token when it expires.
A button is available to clear the authentication with HubSpot. Following this, the authentication process needs to be repeated before the integration can be used again.
When the OAuth authentication method is being used, the API call to retrieve the token is proxied via an endpoint on the same website. This allows the Umbraco Forms HubSpot app secret key to remain a secret.
Working with the integration
Follow the steps outlined below to start working with the integration:
Add the "Save Contact to HubSpot" workflow to a form.
Configure the mappings between the form and HubSpot fields.
Select the HubSpot workflow
Defining mappings
When a form is submitted on the website, the workflow will execute and create a new contact record in your HubSpot account. It will be populated using the information mapped from the fields in the form submission.
Hubspot contacts
Contact Updates
By default, the integration creates a new contact record in HubSpot for each form submission. If HubSpot detects a conflict during the attempt to create a new record, the create process will be skipped. A conflict could be that a record with the same email address already exists.
However, you can configure the integration to update existing contacts instead.
To enable contact updates, add the following setting to your website's appsettings.json file:
When AllowContactUpdate is set to true and HubSpot detects a conflict with an existing record, the integration will perform instead an update request. As a result, the contact details will be updated.
Google Search Console
Details an integration available for Google Search Console, built and maintained by Umbraco HQ.
This integration provides an extension for Umbraco CMS. It provides details on indexed URLs managed in Google Search Console.
To ensure compatibility, check the Dependencies tab on NuGet for the required Umbraco CMS version. For example, see .
Authentication
The package uses the OAuth2 security protocol for authentication. After the authorization process completes successfully, the access token and the refresh token will be saved into the Umbraco database.
All requests to the Google Search Console API will include the access token in the authorization header.
Self Hosted OAuth Configuration
The easiest way to configure the integration is to make use of an application Umbraco has pre-configured with Google. With this in place, the authorization flow will go through a proxy website Umbraco maintains before redirecting back to your Umbraco backoffice.
From version 1.1.0, we introduced an alternate approach that requires a little more setup. It removes the need for relying on any services from Umbraco when using the integration.
To use this you need to setup your own app with Google and use an extended configuration like this:
The authorization mode is toggled by the UseUmbracoAuthorization flag, which by default is set to true meaning that previous versions are not impacted.
Authorization specific methods are exposed by the and implemented by two services:
The used service is provided using the AuthorizationImplementationFactory method, depending on the type of authorization selected.
If you are selecting your own authorization flow that uses the AuthorizationService, the redirect URL will be this one: /umbraco/api/Googleauthorization/oauth, from . Make sure to set to correct URL in the settings of the website and in the configuration of your Google app.
The authorization controller uses the window.postMessage interface for cross-window communications when redirecting from the Google Search Console authorization server.
Working With the URL Inspection Tool
The URL Inspection Tool is accessible from each content node via the URL Inspection content app.
If you haven't connected your Google account yet, you can authorize your Umbraco application by using the Connect button. This will prompt the Google authorization window and at the end of the process, you will receive the access token and the refresh token.
You can also choose to remove access to Google Search Console API by triggering the Revoke action. This will remove the access token and the refresh token from the database.
Before you can retrieve data from the Search Console API you need to register the domain of your Umbraco website. This is done at the .
After Google has verified your ownership, the URL Inspection tool will provide the proper results. Otherwise, a "permission denied" error will be shown.
The URL Inspection Tool API
The URL Inspection Tool API expects three parameters, two mandatory:
InspectionUrl - a fully-qualified URL to inspect. It must be under the property specified in "siteUrl".
SiteUrl - the URL of the property as defined in the Search Console.
LanguageCode - optional; the default value is "en-US".
More information can be found .
Zapier with Umbraco Forms
Details an integration available for Zapier with Umbraco Forms, built and maintained by Umbraco HQ.
This integration is an add-on to the Zapier CMS integration and provides necessary components for handling form submissions based on the registered subscription hooks.
A Zap is an automated workflow that connects apps and services together. Each Zap consists of a trigger and one or more actions.
Package Links
Minimum version requirements
To ensure compatibility, check the Dependencies tab on NuGet for the required Umbraco CMS version. For example, see .
Version 4.0.0 and up
Version 4.0.0 of the integration adds some breaking changes to the Zaps creation flow with the new API endpoints and the Web Components-based Umbraco backoffice.
As a result, users on Umbraco 14+ will need to use version 3.0.0 of the Umbraco Zapier application.
Version 3.0.0 of the Umbraco app is available in the Zapier marketplace via the following invitation:
Zapier allows only one version of the application to be public. Because the current version is used by instances running Umbraco <= 13, the latest version can be installed through the invite URL above.
Authentication
For this integration, the authentication is managed on Zapier's side by using the Umbraco Marketplace app.
The Umbraco app manages two types of events:
New Form Submission - triggers when a form is submitted.
New Content Published - triggers when new content has been published.
The trigger event to be used by this integration is New Form Submission.
When creating the Zap trigger, you will be prompted to enter a username, password, and URL for your Umbraco website.
It is also possible to use an API key. If the following setting is present, the API key-based authentication will take precedence and will be used for authorization.
If no API key is present, the Umbraco application will validate the credentials entered and return a message in case the validation fails.
To enhance security, you can specify a User Group that the user connecting needs to be a part of. This can be achieved by adding the following setting to the configuration file:
Categories
Details integrations with third party services, built and maintained by Umbraco HQ.
Umbraco HQ has developed and made available integrations with different SaaS (Software as a Service) providers. These are all open-source and add functionality to Umbraco CMS to support working with third-party services.
Analytics
Automation
Commerce
Customer Relationship Management (CRM)
Digital Asset Management (DAM)
Product Information Management (PIM)
Search
emerchantpay with Umbraco Forms
Details an integration available for emerchantpay with Umbraco Forms, built and maintained by Umbraco HQ.
This integration provides a custom workflow for handling online payments using a hosted payment page provided by emerchantpay.
Package Links
Aprimo
Details an integration available for Aprimo, built and maintained by Umbraco HQ.
This integration provides a custom Media Picker for digital assets managed in an Aprimo workspace. It can be used as a property editor for content. A value converter providing a strongly typed model for rendering is available, along with a sample rendering component.
Package Links
Semrush
Details an integration available for Semrush, built and maintained by Umbraco HQ.
This integration provides a keywords search tool powered by .
Package Links
Zapier
Details an integration available for Zapier, built and maintained by Umbraco HQ.
This integration provides a dashboard interface that allows users to visualize registered subscription hooks. When a Zap is turned on, the subscription hook is saved into the database; turning off the Zap will remove the registered subscription hook.
When content gets published, the content type is looked up in the subscription hooks list from the database. If a record is found, a POST request will be sent to the webhook URL with details of the current node. This will cause the Zap's trigger to be invoked, triggering the assigned actions of the Zap.
A Zap is an automated workflow that connects apps and services together. Each Zap consists of a trigger and one or more actions.
Provides a means of including the cookie policy banner and declaration available from Cookiebot.
This example can be used as a reference for creating a package "wrapper" around a script-based integration, allowing listing on the Umbraco Marketplace.
Zapier
A dashboard interface that allows users to visualize registered subscription hooks for content types and to call Zapier triggers when content gets published.
Zapier with Umbraco Forms
A dashboard interface allowing users to visualize registered subscription hooks for their Umbraco Forms and to call Zapier triggers when forms are submitted.
CommerceTools
A product and category picker that can be added as a property editor for content. Contains a value converter providing a strongly typed model for rendering.
Only Umbraco 8.
emerchantPay with Umbraco Forms
A custom workflow for handling online payments using a hosted payment page provided by emerchantpay.
Shopify
A product picker that can be added as a property editor for content. It includes a value converter providing a strongly typed model for rendering.
ActiveCampaign
A form picker and rendering component for ActiveCampaign forms.
ActiveCampaign with Umbraco Forms
A custom workflow that allows form entries to be mapped to an ActiveCampaign contact and is stored within the Customer Relationship Management (CRM) platform.
Dynamics
A form picker and rendering component for Dynamics 365 forms.
Hubspot
A form picker and rendering component for Hubspot forms.
Hubspot with Umbraco Forms
A custom workflow that allows form entries to be mapped to a HubSpot contact record, and then stored within the Customer Relationship Management (CRM) platform.
Aprimo
A media picker for digital assets managed in an Aprimo workspace.
inriver
A products picker that can be added as a property editor for content, with a value converter providing a strongly typed model for rendering.
Algolia
Indexing hooks and a custom dashboard for managing search indices in Algolia.
Google Search Console
A tool allowing programmatic access to URL-level data for properties managed in Google Search Console and the indexed version of a URL.
Semrush
A search engine optimization tool available as a content app, helping editors research and use appropriate keywords for their content.
To get started with emerchantpay a merchant needs to be onboarded. This will allow you to get a merchant ID and obtain the keys required by the integration.
To begin the onboarding process and obtain the merchant account, you need to fill out this form.
Afterwards, a member of the emerchantpay team will reach out to you.
Authentication
All requests to emerchantpay API are authenticated by providing the merchant's username and password.
If the configuration is incomplete, the user will receive an error message.
Configuration
The below configuration is required. It consists of authentication settings, merchant specific details and customizable payment fields. Some configuration items are stored as an array of strings or a dictionary, and parsed using a specific service.
Working with the integration
Follow the steps below to start using the integration.
Attach the emerchantpay Gateway workflow to a form.
Map the following values with matching form fields:
Amount
Currency
Number of Items
Record Status
Record Payment Unique ID
Consumer Details
Configure the event handlers for payment successfully processed, failed, or canceled.
A consumer has the following properties available that can be mapped against form fields:
Email
FirstName
LastName
Address1
Address2
ZipCode
City
State
Country
Phone
When a form is submitted on the website, the workflow will execute. Two data payloads will be sent to emerchantpay. One for creating or retrieving the details of a consumer and the other for creating a payment.
The response for the second request will provide the URL for the hosted payment page, and the user will be redirected there.
On completing the payment the emerchantpay API will return the user to the page provided in the matching event handler of the workflow.
To ensure compatibility, check the Dependencies tab on NuGet for the required Umbraco CMS version. For example, see Umbraco.Cms.Integrations.SEO.Semrush.
How To Use
Once the package is installed, the integration is made available in the Umbraco backoffice as a Content App.
The Content App is available for all types of content items as well as for all user groups.
A keyword search can be initiated using a content field as a starting point, or by entering a custom phrase. The results can be filtered for different metrics across markets.
Administrators are provided with additional features for managing the connectivity with their organization's account with Semrush.
For more detail on the integration, its purpose, and how2 it was built, see the accompanying blog post.
Self Hosted OAuth Configuration
The easiest way to configure the integration is to make use of an application Umbraco has pre-configured with Semrush. With this in place, the authorization flow will go through a proxy website Umbraco maintains before redirecting back to your Umbraco backoffice.
From version 1.2.0, we introduced an alternate approach that requires a little more setup. It removes the need for relying on any services from Umbraco when using the integration.
To use this you need to setup your own app with Semrush and use an extended configuration like this:
The authorization mode is toggled by the UseUmbracoAuthorization flag, which by default is set to true meaning that previous versions are not impacted.
The used service is provided using the AuthorizationImplementationFactory method, depending on the type of authorization selected.
If you are selecting your own authorization flow that uses the AuthorizationService, the redirect URL will be this one: /umbraco/api/semrushauthorization/oauth, from SemrushAuthorizationController. Make sure to set to correct URL in the settings of the website and in the configuration of your Semrush app.
The authorization controller uses the window.postMessage interface for cross-window communications when redirecting from the semrush authorization server.
Version 2.0.0 of the integration adds some breaking changes to the Zaps creation flow with the new API endpoints and the Web Components-based Umbraco backoffice.
As a result, users on Umbraco 14+ will need to use version 3.0.0 of the Umbraco Zapier application.
Zapier allows only one version of the application to be public. Because the current version is used by instances running Umbraco <= 13, the latest version can be installed through the invite URL above.
Authentication
For this integration, the authentication is managed on Zapier's side by using the Umbraco Marketplace app.
The trigger event to be used by this integration is New Content Published.
When creating the Zap trigger, you will be prompted to enter a username, password, and URL for your Umbraco website. Alternatively, you can use an API key.
If the following setting is present, the API key-based authentication will take precedence and will be the main method of authorization.
If no API key is present, the Umbraco application will validate the credentials entered and return a message in case the validation fails.
To enhance security, you can specify a User Group that the user connecting needs to be a part of. You can achieve this by adding the following setting in the configuration file.
Working With the Zapier Cms Integration
In the Content area of the backoffice, find the Zapier Integrations dashboard.
The dashboard is composed of two sections:
Content Properties - Zapier details and input fields for adding content configurations
Registered Subscription Hooks - a list of registered entities.
The Trigger Webhook action will send a test request to the Zap trigger, enabling the preview of requests in the Zap setup workflow.
To ensure compatibility, check the Dependencies tab on NuGet for the required Umbraco CMS version. For example, see Umbraco.Cms.Integrations.DAM.Aprimo.
Configuration
The following configuration is required to connect to the Aprimo Digital Asset Management (DAM) workspace:
Using the offline_access scope, the response from Aprimo API will contain a refresh token, with an expiration period of 10 days. This will keep the API access available for the front-end rendering of the images.
Backoffice usage
To use the Media Picker, a new Data Type should be created based on the Aprimo Media Picker property editor.
If the configuration is not valid, an error-tag will be displayed in the right upper corner of the configuration box.
Otherwise, you will be able to select one of the two available options for picking assets:
Aprimo API - items are retrieved using the API and an overlay of the property editor will display the list of available items in the Digital Asset Management (DAM) workspace.
Aprimo Content Selector - rich UI tool hosted on Aprimo Cloud where you can pick items using a familiar Aprimo interface.
Browser information
Before using the integration with Aprimo, make sure to use a browser that is supported by Aprimo Cloud. Without one you will not be able to authenticate, nor use the Content Selector.
Aprimo currently supports these browsers, but make sure to check this topic for an updated list:
Chrome for Windows and Macintosh
Edge (Windows 10 only)
Internet Explorer 9, 10, and 11
Safari 6, 6.1, 6.2, and 7.0 (Macintosh only)
Front-end rendering
A strongly-typed model will be generated by the property value converter. An HTML helper is available to render the asset on the front end.
Make sure your template has a reference to the following using statement:
Assuming a property based on the created Data Type with the alias aprimoMediaPicker has been created, render the media asset:
Properties available from the strongly-typed model:
Title
Thumbnail
Crops
Asset fields
Working with Crops
For the selected media asset you can retrieve the details of the crops using the MediaWithCrops object.
It contains:
Details of the original asset,
The list of available crops, and
A method to retrieve the crop URL based on name and width/height.
For example:
To get the URL for crop item with the name Social: @Model.MediaWithCrops.GetCropUrl("Social")
To get the URL for crop item with height 1080: @Model.MediaWithCrops.GetCropUrl(null, 1080)
Working with fields
The asset's fields are grouped in an object containing their label and a dictionary of values based on the available cultures for that asset.
For example, to get values for a field with the label Display Title:
To ensure compatibility, check the Dependencies tab on NuGet for the required Umbraco CMS version. For example, see .
Authentication
The package uses the OAuth protocol for authentication.
Additional Configuration
To connect to your Dynamics 365 instance, the following configuration is required:
The above settings are for demonstration purposes. They might change depending on your personalized instance Web API.
Self Hosted OAuth Configuration
The easiest way to configure the integration is to make use of an application Umbraco has pre-configured with Microsoft. With this in place, the authorization flow will go through a proxy website Umbraco maintains before redirecting back to your Umbraco backoffice.
From version 1.2.0, we introduced an alternate approach that requires a little more setup. It removes the need for relying on any services from Umbraco when using the integration.
To use this you need to setup your own app with Microsoft and use an extended configuration like this:
The authorization mode is toggled by the UseUmbracoAuthorization flag, which by default is set to true meaning that previous versions of the integration are not impacted.
The authorization specific methods are exposed by the and implemented by two services:
The used service is provided using the AuthorizationImplementationFactory method, depending on the type of authorization selected.
If you are selecting your own authorization flow that uses the AuthorizationService, the redirect URL will be this one: /umbraco/api/dynamicsauthorization/oauth, from . Make sure to set to correct URL in the settings of the website and in the configuration for your Dynamics app.
The authorization controller uses the window.postMessage interface for cross-window communications when redirecting from the Microsoft authorization server.
Backoffice usage
To use the form picker, a new Data Type needs to be created based on the Dynamics Form Picker property editor.
The settings in Web.config/appsettings.json will be used for sending authorization and data requests to the Dynamics API, through the 0Auth Proxy for Umbraco Integrations or directly.
The Connect button prompts the user with the Microsoft authorization window, which after a successful authentication will send the authorization code back.
The retrieved access token will be saved into the database and used for future requests.
Revoke action will remove the access token from the database and the authorization process will need to be repeated.
Front-end rendering
A strongly typed model will be generated by the property value converter. An HTML helper is available to render the form on the front end.
Ensure your template has a reference to the following using statement:
Assuming a property based on the created Data Type with the alias dynamicsForm has been created, render the form using:
The selected form is embedded either through an iframe or by using scripts.
HubSpot
Details an integration available for Hubspot, built and maintained by Umbraco HQ.
This integration provides a form picker and rendering component for forms managed within a Hubspot account.
To ensure compatibility, check the Dependencies tab on NuGet for the required Umbraco CMS version. For example, see .
Authentication
The package uses the OAuth protocol for authentication or private access tokens if you are using a private app installed on your HubSpot account.
Additional Configuration
To support multi-region HubSpot forms, the following configuration is required:
For example, in Europe, a setting of eu1 should be used.
Self Hosted OAuth Configuration
The easiest way to configure the integration is to make use of an application Umbraco has pre-configured with HubSpot. With this in place, the authorization flow will go through a proxy website Umbraco maintains before redirecting back to your Umbraco backoffice.
From version 2.1.0, we introduced an alternate approach that requires a little more setup. It removes the need for relying on any services from Umbraco when using the integration.
To use this you need to setup your own app with HubSpot and use an extended configuration like this:
The authorization mode is toggled by the UseUmbracoAuthorization flag, which by default is set to true meaning that previous versions are not impacted.
Authorization specific methods are exposed by the and implemented by two services:
The used service is provided using the AuthorizationImplementationFactory method, depending on the type of authorization selected.
If you are selecting your own authorization flow that uses the AuthorizationService, the redirect URL will be this one: /umbraco/api/hubspotauthorization/oauth, from . Make sure to set to correct URL in the settings of the website and in the configuration of your Hubspot app.
The authorization controller uses the window.postMessage interface for cross-window communications when redirecting from the Hubspot authorization server.
Backoffice usage
To use the form picker, a new Data Type should be created based on the HubSpot Form Picker property editor.
The settings will be checked and a message presented indicating whether authentication is in place.
If OAuth is being used for authentication the Connect button will be enabled. When clicked, you will be prompted by the HubSpot authorization window.
The retrieved access token will be saved into the database and used for future requests.
The Revoke action will remove the access token from the database and the authorization process will need to be repeated.
If a private access token is used a message will be displayed notifying that the access token is being used.
Front-end rendering
A strongly typed model will be generated by the property value converter. An HTML helper is available, to render the form on the front end.
Ensure your template has a reference to the following using statement:
Assuming a property based on the created Data Type with the hubSpotForm has been created, render the form using:
Details an integration available for Shopify, built and maintained by Umbraco HQ.
This integration provides a product picker and a value converter that creates a strongly typed model for rendering. Products can be retrieved from a Shopify store or through custom apps developed by Shopify Partners.
Package Links
Minimum version requirements
To ensure compatibility, check the Dependencies tab on NuGet for the required Umbraco CMS version. For example, see .
Authentication
The package supports two modes of authentication:
API Access Token
OAuth
API Access Token
Follow these steps to retrieve an API Access token:
Log into the admin interface of your shop by accessing https://{shop}.myshopify.com/admin.
Go to Apps > Develop apps.
Create a new App for the shop.
Once the app is installed the Admin API access token will be visible only once in the API credentials tab.
Use the access token and add it to your website's configuration file alongside settings for the API version and the name of the shop:
Shopify releases a new API version every 3 months at the beginning of the quarter. The latest stable version used for this integration is .
OAuth
If you prefer not to use an API token, an authentication flow using OAuth is also available.
To use this, ensure you do not have an API key in your configuration file.
Self Hosted OAuth Configuration
The easiest way to configure the integration is to make use of an application Umbraco has pre-configured with Shopify. With this in place, the authorization flow will go through a proxy website Umbraco maintains before redirecting back to your Umbraco backoffice.
From version 1.1.0, we introduced an alternate approach that requires a little more setup. It removes the need for relying on any services from Umbraco when using the integration.
To use this you need to setup your own app with Shopify and use an extended configuration like this:
The authorization mode is toggled by the UseUmbracoAuthorization flag, which by default is set to true meaning that previous versions of the integration are not impacted.
Authorization specific methods are exposed by the and implemented by two services:
The used service is provided using the AuthorizationImplementationFactory method, depending on the type of authorization selected.
If you are selecting your own authorization flow that uses the AuthorizationService, the redirect URL will be this one: /umbraco/api/shopifyauthorization/oauth, from . Please make sure to set to correct URL in the settings of the website and in the configuration of your Shopify app.
The authorization controller uses the window.postMessage interface for cross-window communications when redirecting from the Shopify authorization server.
CacheLevel
Added in version 1.3.0 of the integration.
The property cache level is set to Snapshot by default. This means that sites utilizing this integration can hit rate limits on the Shopify Admin API. More information on rate limits can be found in the Shopify Development Documentation under . The default value Snapshot has been retained for backward compatibility.
The values available are:
Snapshot (default)
Unknown
Element
The values correlate to the values available for property caching. More information on property caching is available in the article.
Backoffice usage
To use the products picker, a new Data Type should be created based on the Shopify Products Picker property editor.
The settings in Web.config will be checked and a message presented indicating whether authentication is in place.
If OAuth is being used for authentication, then the Connect button will be enabled. When clicked, the user will be prompted with the Shopify authorization window.
The retrieved access token will be saved into the database and used for future requests.
The Revoke action will remove the access token from the database and the authorization process will need to be repeated.
Front-end rendering
A will be generated by the property value converter. An HTML helper is available, to render the products on the front end.
Ensure your template has a reference to the following using statement:
Assuming a property based on the created Data Type with the alias shopifyProductPicker has been created, render the form using:
You can use the default rendering view and style using the existing CSS classes, or use it as inspiration for your views. The path to your custom view will be then passed as a parameter to the HTML helper method.
Enable the App Development feature if it is currently disabled.
Define the scopes for the Admin API: read_products.
To ensure compatibility, check the Dependencies tab on NuGet for the required Umbraco CMS version. For example, see .
Authentication
The communication with Algolia is handled through their , which requires an Application ID and an API key.
They are used to initialize the which handles indexing and searching operations.
Configuration
The following configuration is required for working with the Algolia API:
Algolia comes with a set of predefined API keys:
Name
Purpose
More details on other use cases for the Algolia API keys can be found in .
Working with the integration
The following details how you can work with the Algolia integration.
Go to the Settings section in the Umbraco CMS backoffice.
Locate the Algolia Search Management dashboard.
In this view, you will be able to create definitions for indices in Algolia.
Provide a name for the index for each indices.
Select the Document Types to be indexed.
Select the fields you want to include for each Document Type.
After creating an index, only the content definition is saved into the algoliaIndices table in Umbraco, and an empty index is created in Algolia.
The actual content payload is pushed to Algolia for indices created in Umbraco in two scenarios:
From the list of indices, the Build action is triggered, resulting in all content of specific Document Types being sent as JSON to Algolia.
Using a custom handler for which will check the list of indices for the specific Document Type, and update a matching Algolia object. The handler will only run for .
From the dashboard, you can also perform a search over one selected index, or remove it.
Each Umbraco content item indexed in Algolia is referenced by the content entity's GUID Key field.
Algolia record structure
An indexed Algolia record matching an Umbraco content item contains a default set of properties. It is augmented by the list of properties defined within the Umbraco dashboard.
Properties that can vary by culture will have a record property correspondent with this naming convention: [property]-[culture].
The list of default properties consists of:
ObjectID - GUIDfrom the content item'sKey` property
Name - with culture variants if any
Extending the Algolia indexing
Indexing the content for Algolia is based on the IDataEditor.PropertyIndexValueFactory property from Umbraco CMS, the indexed value of the property being retrieved using the GetIndexValues method.
The integration uses the same conversion process as Umbraco CMS uses for Examine, and apply a custom converter afterwards.
The is responsible for creating the record object that will be pushed to Algolia and the implementation of IAlgoliaSearchPropertyIndexValueFactory will return the property value.
To customize the returned value from Umbraco CMS you would need to use a custom converter specific to the particular indexed Umbraco property editor.
To extend the behavior, there are available options:
Version 2.3.0/3.1.0 and up
Starting with versions 2.3.0 and 3.1.0, Algolia comes with geolocation support for records. This comes following a .
You can read more about enabling Algolia's geolocation for records in their .
By default the integration comes with a NULL return value provider, but you can add your own by implementing the IAlgoliaGeolocationProvider interface, and register it as singleton:
Version 2.1.5 and up
As a resolution for that affects Umbraco.TinyMCE property editor in Umbraco 13, the IProperty object has been passed to the parse method of the converters.
A custom converter will look like this, allowing developers to add their implementation based on the content property:
Version 2.0.0 to 2.1.5
Starting with version 2.0.0, we provide a collection of converters for the following Umbraco property editors:
Umbraco.TrueFalse
Umbraco.Decimal
Umbraco.Integer
To create a new converter one should implement the IAlgoliaIndexValueConverter interface. Then specify the name of the property editor and add the new implementation. The new converter will then need to be added to the Algolia Converters collection.
To do so, follow these steps:
Create the new converter
Replace the default converter (if one exists) with the new one
Inject custom converters
Up to version 1.5.0
These implementations contain a custom converter for the Umbraco.MediaPicker3 property editor.
If a different implementation is required, you will need to follow these steps:
Inherit from AlgoliaSearchPropertyIndexValueFactory
Override the GetValue method
Add custom handlers to the dictionary
The following code sample demonstrates this approach:
Extension registration
CreateDate
CreatorName
UpdateDate
WriterName
TemplateId
Level
Path
ContentTypeAlias
Url - with culture variants if any
Any registered properties on the Document Type
Umbraco.MediaPicker3
Umbraco.Tags
Register your implementation in the composer
Search-Only API key
Public API key used on the front end for performing search queries.
Admin API key
Used in the Umbraco backoffice for create-, update- or delete operations on the indices.
public class UmbracoGeolocationProvider : IAlgoliaGeolocationProvider
{
    public async Task<List<GeolocationEntity>> GetGeolocationAsync(IContent content)
    {
        return new List<GeolocationEntity>
        {
            new GeolocationEntity { Latitude = 55.40638, Longitude = 10.38918 }
        };
    }
}
...
builder.Services.AddSingleton<IAlgoliaGeolocationProvider, UmbracoGeolocationProvider>();
 public class MyTagsConverter : IAlgoliaIndexValueConverter
 {
     public string Name => Core.Constants.PropertyEditors.Aliases.Tags;

     public object ParseIndexValues(IProperty property, IEnumerable<object> indexValues)
     {
         return new[] { "Umbraco", "is", "awesome" };
     }
 }
 public class MyTagsConverter : IAlgoliaIndexValueConverter
 {
     public string Name => Core.Constants.PropertyEditors.Aliases.Tags;

     public object ParseIndexValues(IEnumerable<object> indexValues)
     {
         return new[] { "Umbraco", "is", "awesome" };
     }
 }
public static class MyUmbracoExtensions
{
    public static IUmbracoBuilder AddMyAlgoliaConverters(this IUmbracoBuilder builder)
    {
        builder.AlgoliaConverters()
                .Remove<UmbracoTagsConverter>()
                .Append<MyTagsConverter>();

        return builder;
    }
}
Learn how to get your Umbraco packages listed on the Umbraco Marketplace.
Do you want to be listed on the official Umbraco Marketplace? Follow this guide to get your package or integration listed on the Umbraco Marketplace.
Requirements
Your package needs to live up to the following requirements to be listed on the Umbraco Marketplace:
The umbraco-marketplace tag is added to your NuGet package.
It meets the minimum Umbraco version requirement: Umbraco 8
The base package information is then sourced from NuGet, including the package name, icon, authors, description, readme, and project URL.
Only tag the installable component of your package. For example, if your package MyPackage references MyPackage.Core, only tag the former.
Additional Package Information
You may choose to add a umbraco-marketplace.json file to provide deeper information about your package.
This file must exist in the folder indicated by the project URL in your NuGet specification.
For example, if your project URL is https://mypackage.com, we will look for the file at https://mypackage.com/umbraco-marketplace.json.
If your project URL is your GitHub repository we will check the root of the default branch, or a deeper link if provided.
It is also possible to use a single website for multiple packages. In this case, create a JSON file for each package, suffixed with the package ID.
For example, if your package ID is My.Package, we will look for https://mypackage.com/umbraco-marketplace-my.package.json.
Custom "README" information
We have implemented an import for a custom "README" file for the Umbraco Marketplace. This can be used if you want to display different information here than on nuget.org.
By default, we will import and display the "README" content made available as part of the NuGet package. However, if we find a file by the name of umbraco-marketplace-readme.md in the same location as the umbraco-marketplace.json file, we will import and display that instead.
We will look for an import a file with a package-specific name, e.g. umbraco-marketplace-readme-my.package.md.
JSON Schema
In order for the additional package information to be imported, the file contents need to match the JSON schema we expect.
The which is illustrated and described as follows. All values are optional and can be empty or omitted.
Description of each element
Categories
When defining categories for your package, they need to match one of the following:
Analytics & Insights
Artificial Intelligence
Campaign & Marketing
License Types
When defining the License Type for your package, use one of the following values:
Free
Purchase
Subscription
Package Type
When defining the Package Type for your package, use one of the following values:
Package
Integration
An "Integration" provides a connection between Umbraco and a third-party service that a customer has an account with. All other add-ons are considered as a "Package", which is also the default when nothing is specified for this value.
Version Dependency Mode
When defining the Version Dependency Mode for your package, use one of the following values:
Default
SemVer
Your Umbraco package will either have a direct or an indirect dependency on Umbraco, which will be reported via NuGet. We use this, across all versions of your package, to determine the minimum and maximum supported versions of Umbraco.
In most cases, we take what we retrieve from NuGet and present that unaltered on the Marketplace.
There is currently one exception though. Many packages are listed with a minimum version of Umbraco as a dependency, but no maximum. Strictly this means the package claims to support not only the minimum selected, but any subsequent major versions of Umbraco too. For major releases with minimal breaking changes, such as Umbraco 9 through 13, this is likely correct. So there is no problem in reporting this compatibility on the website.
With the introduction of Umbraco 14 though, and the significant breaking change of the new backoffice, this is no longer likely to be true. We assume if a package has a minimum version or 13 or less, and an unlimited maximum, that it won't support Umbraco 14. And that's what we'll show on the Marketplace.
For any package that makes backoffice customization, this is almost certainly correct.
Some packages though have no user interface component, and will likely work in Umbraco 14 without modification. If that's the case for you, there are two options:
Release a new version with a minimum dependency on Umbraco 14, or a maximum exclusive dependency on Umbraco 15.
Set this option in the umbraco-marketplace.json file to SemVer
Via this setting you are indicating that we should take what is defined in NuGet as strictly correct. And as such, we'll import the unlimited maximum and report the package as working on any major version of Umbraco according to the semantic version range.
Related Packages
When providing a list of related packages, you have the option to organize them into separate groups, each with a title.
When a group title is provided, the package, and subsequent ones that don't have a title assigned, will be presented within a group. If a later package has a group title, that will start a new group.
The example below will be rendered as two separate groups, each with two packages:
Package.One and Package.Two will be part of Group One, while Package.Three and Package.Four will be part of Group Two.
Video URL
When defining the Video URL for your package, use one of the following formats:
https://www.youtube.com/embed/{videoId}
https://www.youtube.com/watch?v={videoId}
https://player.vimeo.com/video/{videoId}
Validation
Want to check how the Umbraco Marketplace parses your package? .
Synchronization With NuGet and Package Owner Data
The schedule for retrieving the latest information from NuGet and any further information provided by the package owners is as follows:
If you can't wait, it's possible to trigger the process for a single package by making an HTTP POST request to https://functions.marketplace.umbraco.com/api/InitiateSinglePackageSyncFunction.
The request should include a Content-Type header of application/json and a body of:
This endpoint is throttled such that only one request a minute can be made per package ID.
Feedback
If you run into any issues with listing your package, file an issue on the .
We will periodically send details of updates made to registered package developers.
If you aren't currently receiving these updates from Umbraco you can .
String value
A URL to the package developer's blog, profile or company website.
AuthorDetails.ImageUrl
String value
A URL to a headshot or avatar image for the package developer (.png or .jpg). To use an existing GitHub avatar, use https://github.com/{username}.png
AuthorDetails.Contributors
Array of objects
A collection of key contributors can also be provided, each having a required name and an optional URL.
AuthorDetails.SyncContributorsFromRepository
Boolean value
If contributors are not explicitly provided, a GitHub repository is available in the 'RepositoryUrl' of the NuGet package. This option is set to true; the contributors will be synchronized from the GitHub repo.
Categories
String value
The name of a single category as defined on the marketplace website. The package will be displayed under this category on the website.
Description
String value
The package description. If omitted, the Description defined in the NuGet package details will be used. A short paragraph of text is recommended.
DocumentationUrl
String value
A URL to a the documentation related to the package.
DiscussionForumUrl
String value
A URL to a discussion forum related to the package.
IssueTrackerUrl
String value
A URL to an issue tracker related to the package.
IsSubPackageOf
String value
The NuGet package ID of a "parent" package, allowing for packages with multiple subtle variations to be displayed under a single listing.
LicenseTypes
Array of strings
The types of license available for the package.
LookingForContributors
Boolean value
Set to true if you'd like your package indicated on the Marketplace as looking for contributors to help with development or support.
LookingForMaintainer
Boolean value
Set to true if you are looking to move away from supporting your package and would welcome someone stepping forward as a new maintainer.
PackageType
String value
The type of package.
PackagesByAuthor
String array
A collection of NuGet package IDs for packages that are built by the same author and are also listed on the Umbraco Marketplace. If this information isn't provided, the display of packages by the same author will be derived from the package owners specified for the NuGet package.
RelatedPackages
Object array
A collection of complementary packages that are also listed on the Umbraco Marketplace. Each element should contain the package ID along with a short description amd group title (both optional). The idea of the description is to provide additional context of why the two packages work well together. The group title can be used to group the related packages (see below for details).
Screenshots
Object array
A collection of media assets for displaying on the package details page. Each element should consist of a URL to either a video or image file and a short caption. The order of the assets will be reflected in the package details page.
Tags
String array
One or more package owner-defined tags for the package. Multiple word tags are supported, e.g. "property editor".
Title
String value
The package title. If omitted, if a title is defined in the NuGet package details this will be used. Otherwise, the package ID itself is displayed.
VersionDependencyMode
String value
The version dependency mode for the package.
VersionSpecificPackageIds
Object array
If a developer has created their package for older Umbraco versions under a different package ID, they can be listed here. Each element should contain an integer value for the Umbraco major version and the associated NuGet package ID.
Video URL
String value
A URL to a video for embedding.
Commerce
Developer Tools
Editor Tools
Headless
PIM & DAM
Search
Themes & Starter Kits
Translations
Element
Data Type
Description
AddOnPackagesRequiredForUmbracoCloud
String array
Provides a collection of package IDs defining additional packages necessary for install to use the package on Umbraco Cloud. For example, when using Umbraco.Forms, Umbraco.Forms.Deploy is required.
AlternateCategory
String value
The name of a second, alternate category as defined on the marketplace website. The package will be displayed under this category, as well as the main one selected.
AuthorDetails.Name
String value
The name of the package developer(s). If the name is provided, it will be used in preference to the value retrieved from the NuGet package's Authors field.
AuthorDetails.Description
String value
A short description of the package developer. One or two sentences is recommended.
Operation
Schedule
Scan NuGet for new tagged packages
Every 24 hours at 0400 (Coordinated Universal Time)
Details a package supporting creation of integrations with external services that use an OAuth flow for authentication and authorization.
Umbraco Authorized Services is an Umbraco package designed to reduce the effort needed to integrate third-party services into Umbraco solutions. Many Software as a Service (SaaS) offerings require an OAuth or API key based flow for authentication and authorization. Working with them requires a fair bit of plumbing code to handle creating an authorized connection. This is necessary before the developer working with the service can get to using the provided API to implement the business requirements.
There are similarities to the flow that needs to be implemented for different services. Steps include:
Redirecting to an authentication endpoint.
Handling the response including an authentication code and exchanging it for an access token.
Securely storing the token.
Including the token in API requests.
Serializing requests and deserializing the API responses.
Handling cases where the token has expired and obtaining a new one via a refresh token.
With API key based flows, the process is a little simpler. But you still have to consider secure storage of the key, providing it correctly in API calls and handling serialization tasks.
There are also differences across the request and response structures and variations in the details of the flow itself.
The package tries to implement a single, best practice implementation of working with OAuth. For particular providers the specific flow required can be customized via configuration or code.
The primary use case for this package is when working with services that offer an OAuth authentication and authorization flow against an "app". The developer will need to create this "app" with the service. From this, details such as client key and secret can be obtained and applied to the configuration.
In addition, the package supports integration with Api key based authentication and authorization services.
Features
For the solution developer, the Umbraco Authorized Services offers two primary features.
Authorized Services in the backoffice
Firstly there's a tree available in the Settings section of the backoffice, called Authorized Services. The tree shows the list of services based on the details provided in configuration.
Each tree entry has a management screen where an administrator can authenticate with an app that has been setup with the service. The status of each service is shown on this screen. When authorized, the authentication and authorization flow has been completed and an access token stored.
A service can be configured to allow the manual entry of access tokens/API keys manually using the CanManuallyProvideToken or CanManuallyProvideApiKey settings. If this is set to true, a new section will be available for providing them.
From the settings panel the administrator can review the service configuration.
IAuthorizedServiceCaller interface
Secondly, the developer has access to an interface - IAuthorizedServiceCaller - that they can inject instances of and use to make authorized requests to the service's API.
Package Links
Usage
Below you can learn more about how to use the Umbraco Authorized Services package.
Installation
The package should be installed into your Umbraco solution from .
App Creation
Services supported by the package will often offer an OAuth authentication and authorization flow against an "app" that the developer will need to create. This will make available information, including for example a "client ID" and "client secret", that will need to be applied in configuration.
When creating the app it will be necessary to configure a call back URL. You should use the following:
For OAuth2: /umbraco/api/AuthorizedServiceResponse/HandleOAuth2IdentityResponse
For OAuth1: /umbraco/api/AuthorizedServiceResponse/HandleOAuth1IdentityResponse
Configuring a Service
Details of services available need to be applied to the Umbraco web application's configuration.
An example of doing this through the appSettings.json file is shown below. Other sources such as environment variables can also be used, as per standard .NET configuration.
TokenEncryptionKey is a setting for an optional key used for token encryption when they are saved and retrieved from storage. It's only necessary and advisable when using the non-default AesSecretEncryptor implementation.
Services contains the a collection of details for all the configured services structured as a dictionary.
The dictionary key is the alias of the service, which must be unique across the service collection.
The following table describes each of the service elements. Where appropriate, an example is provided for one service provider, GitHub.
Not all values are required for all services. Those that are required are indicated below.
Element
Description
Required?
Example
With UseProofKeyForCodeExchange set to true, a random code will be generated on the client and stored under the name code_verifier. Using the SHA-256 algorithm it will be hashed under the name code_challenge. When the authorization URL is generated, the code_challenge will be sent to the OAuth Server, which will store it. The next request for access token will pass the code_verifier as a header key. The OAuth Server will compare it with the previously sent code_challenge.
The options for JsonSerializer are:
Default - uses the Umbraco CMS default IJsonSerializer.
JsonNet - uses the JSON.Net serializer.
In 14.0 the JsonSerializer configuration option was removed, as we will now use the CMS default based only on System.Text.Json.
Authorizing a Service
With one or more service configured, it will be available from the items within a tree in the Settings section.
Selecting an item will show some details about the configured service, and it's authentication status.
If the service is not yet authorized, click the Authorize Service button to trigger the authentication and authorization flow. You will be directed to the service to login, and optionally choose an account. You will then be asked to agree to the permissions requested by the app. Finally you will be redirected back to the Umbraco backoffice. You should see confirmation that an access token has been retrieved and stored such that the service is now authorized. If provided, you can click the Verify Sample Request button to ensure that service's API can be called.
Calling an Service
To make a call to an authorized service, you first need to obtain an instance of IAuthorizedServiceCaller. This is registered with the dependency injection framework. As such it can be injected into a controller, view or service class where it needs to be used.
When making a request where all information is provided via the path and querystring, such as GET requests, the following method will be invoked:
The parameters for the request are as follows:
serviceAlias - the alias of the service being invoked (e.g. github).
path - the path to the API method being invoked (e.g. /repos/Umbraco/Umbraco-CMS/contributors).
There is also a type parameter:
TResponse - defines the strongly typed representation of the service method's response, that the raw response content will be deserialized into.
If you need to provide data in the request an overload is available. This can be used for POST or PUT requests that trigger the creation or update of a resource:
The additional parameter is:
requestContent - the strongly typed request content, which will be serialized and provided in the request.
And additional type parameter:
TRequest - defines the strongly typed representation of the requested content.
If you need to work with the raw JSON response, there are equivalent methods for both of these that omit the deserialization step:
There are convenience extension methods available for each of the common HTTP verbs. These allow you to simplify the requests and omit the HttpMethod parameter, e.g.
The response from the service is wrapped in an instance of AuthorizedServiceResponse, which contains the following properties:
Data - the response deserialized into an instance of the provided type (TResponse).
RawResponse - the raw response as string.
RawHeaders
ServiceResponseMetadata contains properties that will allow you to retrieve information about rate limits and other response details.
Depending on the configured authentication method, there are some methods that can be used to retrieve the access token or the API key:
These will return null if the token or key is not found. They will also return null if the service is not configured to use the authorization method related to these objects.
Verified Providers
The following service providers have been tested against the package implementation. For each one the necessary configuration is listed.
As integrations with more providers are successfully completed, we plan to maintain the details for each here. Pull requests updating this list with verified integrations are welcome.
The Authorized Services package is open-source and we welcome Issues, suggestions for improvement, and PRs.
You can find the .
The readme file there contains further information, expanding on the documentation you have read here. This will help anyone interested in understanding how it has been developed and how to contribute to the solution.
CanExchangeToken
Specifies whether the access token can be exchanged with a long lived one.
No
ExchangeTokenProvision
The available options for exchanging an access token. Configuration includes: TokenHost, RequestTokenPath, TokenGrantType, RequestRefreshTokenPath, RefreshTokenGrantType and ExchangeTokenWhenExpiresWithin
No
AuthenticationMethod
An enum value that controls the type of authentication. OAuth2AuthorizationCode is the default value; other available options are OAuth2ClientCredentials, OAuth1 and ApiKey.
No
ClientCredentialsProvision
The available options for providing credentials in an OAuth2 flow: AuthHeader or RequestBody.
No
ApiHost
The host name for the service API that will be called to deliver business functionality.
Yes
https://api.github.com
IdentityHost
The host name for the service's authentication endpoint, used to initiate the authorization of the service by asking the user to login.
Yes
https://github.com
TokenHost
Some providers make available a separately hosted service for handling requests for access tokens. If that's the case, it can be provided here. If not provided, the value of IdentityHost is used.
No
RequestIdentityPath
Used along with IdentityHost to construct a URL that the user is redirected to when initiating the authorization of the service via the backoffice.
Yes
/login/oauth/authorize
AuthorizationUrlRequiresRedirectUrl
Some providers require a redirect URL to be provided with the authentication request. For others, instead it's necessary to configure this as part of the registered app. The default value if not provided via configuration is false.
No
RequestTokenPath
Used, along with TokenHost to construct a URL used for retrieving access tokens.
Yes
/login/oauth/access_token
RequestTokenFormat
An enum value that controls how the request to retrieve an access token is formatted. Options are Querystring and FormUrlEncoded. Querystring is the default value.
No
RequestAuthorizationPath
OAuth1 flow path for building the authorization URL.
No
JsonSerializer
An enum value that defines the JSON serializer to use when creating requests and deserializing responses. Options are Default and JsonNet and SystemTextJson as described below. If not provided, Default is used.
This flag indicates whether the basic token should be included in the request for an access token. If true, a base64 encoding of <clientId>:<clientSecret> will be added to the authorization header. Default is false.
No
ApiKey
Provides the service's API key, if "AuthenticationMethod": "ApiKey"
No
ApiKeyProvision
Provides an object that dictates how the API key will be included with each request. This is configured using the Method(pass the API key as QueryString or HttpHeader) and Key (name of the key used to include the API key) properties. You can also provide additional parameters that will be included in the querystring or headers via the AdditionalParameters dictionary.
No
ClientId
This value will be retrieved from the registered service app. For OAuth1 registered apps, the matching value is consumer key.
Yes
ClientSecret
This value will be retrieved from the registered service app. As the name suggests, it should be kept secret and so is probably best not added directly to appSettings.json and checked into source control. For OAuth1 registered apps, the matching value is consumer secret.
Yes
Scopes
This value will be configured on the service app and retrieved from there. Best practice is to define only the set of permissions that the integration will need.
Yes
repo
IncludeScopesInAuthorizationRequest
Specifies whether the provided scopes should be included in the authorization request body.
No
UseProofKeyForCodeExchange
This flag will extend the OAuth flow with an additional security layer called .
No
AccessTokenResponseKey
The expected key for retrieving an access token from a response. If not provided the default access_token is assumed.
No
RefreshTokenResponseKey
The expected key for retrieving a refresh token from a response. If not provided the default refresh_token is assumed.
No
ExpiresInResponseKey
The expected key for retrieving the datetime of token expiry from a response. If not provided the default expires_in is assumed.
No
SampleRequest
An optional sample request can be provided, which can be used to check that an authorized service is functioning as expected from the backoffice.
No
/repos/Umbraco/Umbraco-CMS/contributors
RefreshAccessTokenWhenExpiresWithin
Specifies a time interval for expiration of access tokens.
No
SystemTextJson - uses the System.Text.Json serializer.
httpMethod - the HTTP method to use for the request (e.g. HttpMethod.Get).
- the raw headers as a dictionary.
Metadata - metadata about the response parsed from the headers into an instance of ServiceResponseMetadata.
DisplayName
Provides a friendly name for the service used for identification in the user interface.
Yes
CanManuallyProvideToken
Toggles an UI section in the backoffice for manually providing an access token.
No
CanManuallyProvideApiKey
Toggles an UI section in the backoffice for manually providing an API key.