Umbraco Cloud Projects are made of three major components: Environments, Team Members/Invite Users, and Settings.
Project overview
Environments
The number of Environments in your project is dependent on which plan you are on:
Plan
Environments
Flexible Environments
Environment Combinations Examples
To get a technical overview of your Cloud environments, see the article. For more information on how to add or remove environments, see the article.
Team Members/Invite Users
Another major component of your Umbraco Cloud project is Team Members. When you add team members to a project, they will automatically be added as backoffice users in all the environments. Team members can be added as Admins, Writers, or Readers. Refer to the article to learn more about these roles.
Settings
There are many different settings available for you to configure your project for your needs. Learn more about the settings in the article.
Database backups
Sometimes you might need to have a backup of your Cloud database. This can be accomplished directly on Umbraco Cloud.
Read more about Umbraco Cloud's Backup and data retention policy in the FAQ.
Limitations
When restoring a database backup on Umbraco Cloud, certain elements may cause issues:
SQL Server logins - Custom SQL Server logins (for example, admin, sysuser, etc.) may conflict with existing logins when restoring the database in the hosting platform.
Complex Database Objects - Custom complex database objects in SQL is an element with external dependencies or special server configurations, which may result in conflicts when restoring the database in our hosting platform.
Restoring a database replaces the existing database with a fresh one containing the restored content. Once a Restore has run, you cannot create database backups with a Date and Time for snapshot (UTC) going back before the Restore-operation. However, any existing backups are still available.
Backup on Umbraco Cloud
On Umbraco Cloud, you can utilize our 35-day point-in-time recovery to create and download a bacpac file from your project.
Only Project Administrators have access to the Backups page on Umbraco Cloud.
To create a backup follow the steps below:
Open your Cloud project.
Go to Backups in the Settings menu.
Click Create Backup.
Click Create Backup.
When you click on the Create Backup button, the system will start creating a backup file in the form of a bacpac file. Once the bacpac file is created, you can download it by clicking on the download icon. If you want to delete any backups, click the delete icon next to the backup.
Create Backup Errors
When a backup creation fails, you can click the triangle icon to view more details about the error.
Error Name
Description
Upload Database
There might be times when you want to upload a database backup to Umbraco Cloud. You might need to restore your database to a certain point in time, or you might be migrating a project to Umbraco Cloud.
Follow the steps below to upload a .bacpac file to your Umbraco Cloud project:
Go to your Umbraco Cloud project.
Go to the "Configuration" tab in the side menu.
Click on "Backup".
Once the Database has been uploaded, restoring the backup to your environment is possible.
Upload Database Errors
When an upload fails, you can click the triangle icon to view more details about the error.
Error Name
Description
Restore Database
When restoring a database backup on Umbraco Cloud, certain elements may cause issues. For more details, see the section .
Once you have uploaded a backup, you might want to restore it to one of your environments. To restore a backup to an environment follow the steps below.
Click on the small watch on the right side.
Choose which environment to replace the database with the backup.
Optional: Create a Cloud Backup of the selected environment's database before restoring the backup.
Once you click "Restore backup" the database will be restored to your selected environment. Wait for it to finish and you will successfully have replaced your environment database with your backup.
Make sure to check your environment and see if everything works as expected and that the data from the backup is there.
Restoring a Cloud backup to a SQL Server Database
Use the following steps:
Connect to your SQL Server using SQL Server Management Studio (SSMS).
Expand "Databases", right-click "Databases", then select "Import Data-tier Application...".
Proceed through the dialog, by browsing to the saved location of your bacpac file, and then setting the options appropriate to your configuration
If a bacpac restore fails in SQL server, ensure the 'Contained Database Authentication' flag is set to true for resolution.
If it is not set the import will fail.
To Enable Contained Database Authentication, run the following SQL against your SQL server on the main database.
For reference, see the .
Migrate from Umbraco 7 to Umbraco 8 on Umbraco Cloud
This article will provide detailed steps on how to migrate a Umbraco 7 Cloud project to Umbraco 8.
Taking your Umbraco CMS project from Umbraco 7 to 8 is called a migration as it requires that the data is migrated in the process. This article covers each step involved in this process.
A Umbraco 7 Cloud project running the latest version of Umbraco 7.
Make sure Umbraco Forms data is not handled as content.
See for more details on how to check the setting.
We strongly recommend having at least 2 environments on the Umbraco 8 project.
Should something fail during the migration, the Development environment can always be removed and re-added in order to start over on a clean slate.
Step 1: Content migration
Clone down the Umbraco 7 Cloud project.
Run the project locally and restore Content and Media.
Clone down the Development environment from the Umbraco 8 Cloud project.
We recommend setting up the Umbraco 8 Cloud portal locally in Visual Studio.
This can be done after cloning down the Cloud environment or by using the .
To use the cloning tool, place it and run it in the local directory you want to clone the Cloud project into.
Install the community package on the cloned Umbraco 8 site.
Copy ~/App_Data/Umbraco.sdf or ~/App_Data/Umbraco.mdf from the cloned Umbraco 7 project.
Paste the file into ~/App_Data
Click Continue to start the migration.
Log in to the backoffice and verify that everything is there once the migration is complete.
If your login does not work, try the following approach:
Copy the UsersMembershipProvider attributes from your Umbraco 7 web.config file to the Umbraco 8 web.config file. Once you've done this, try to login again.
Below is an example of how the attribute can look:
Please be aware that this is only a content migration.
The database will be migrated, but updating view files, custom code, and implementation is a manual process.
See of this guide, for more detail on this.
Step 2: Files migration
Before moving on to the next step, make sure that the Umbraco 8 project is no longer running.
The following files/folders need to be copied into the Umbraco 8 project:
~/Views - do not overwrite the default Macro and Partial View Macro files, unless changes have been made to these.
~/Media
Any files/folders related to Stylesheets and JavaScripts.
Merge the configuration files carefully to ensure any custom settings are migrated while none of the default configurations for Umbraco 8 is overwritten.
Generating UDA files
Run the Umbraco 8 project locally
It will give you an error on the frontend as none of the Template files have been updated yet.
Open the command line tool in the ~/data folder on the Umbraco 8 project.
Running the echo > deploy command will generate a new marker. Move forward with the migration based on the marker:
deploy-failed
Something failed during the check
Run echo > deploy-clearsignatures followed by echo > deploy
Step 3: Setup custom code for Umbraco 8
Umbraco 8 is different from Umbraco 7 in many ways. This means that in this step, all custom code, controllers, and models need to be reviewed and rewritten for Umbraco 8.
Example of changes that need to be made
One of the changes made, is how published content is rendered through Template files. Due to this, it will be necessary to update all Template files (.cshtml) to reflect these changes.
Read more about these changes in the .
Template files need to inherit from Umbraco.Web.Mvc.UmbracoViewPage<ContentModels.HomePage> instead of Umbraco.Web.Mvc.UmbracoTemplatePage<ContentModels.HomePage>.
Template files need to use ContentModels = Umbraco.Web.PublishedModels instead of ContentModels = Umbraco.Web.PublishedContentModels.
Depending on the size of the project and the amount of custom code and implementations, this step is going to require a lot of work.
Step 4: Deploy and test on Umbraco Cloud
Once the Umbraco 8 project runs without errors on the local setup, the next step is to deploy and test on the Cloud Development environment.
Push the migration and changes to the Umbraco Cloud Development environment
The deployment might take a bit longer than normal.
To track the process, keep an eye on the deploy markers in site/wwwroot/data using KUDU.
Progress through the steps based on the deployment result:
deploy-failed: Run echo > deploy-clearsignatures followed by echo > deploy to clear up the error.
Step 5: Going live
Once the migration is complete, and the Live environment is running without errors, the site is almost ready for launch.
Setup rewrites on the Umbraco 8 site.
Assign hostnames to the project.
Hostnames are unique, and can only be added to one Cloud project at a time.
Related information
Starter
2
QA + Production
Standard
3
Flexible + QA + ProductionDevelopment + QA + Production
Explore, build, launch, and maintain your projects with ease.
The Umbraco Cloud documentation is structured to follow the user journey rather than only listing features. This change acknowledges that building and managing a project involves real-life steps. It begins with your initial login and continues through the go-live phase and beyond.
User Journey
Whether you're new to Umbraco Cloud or a seasoned user, this hub is your essential resource for understanding and mastering Umbraco Cloud.
Explore by Phase: Your Umbraco Cloud Journey
The documentation is structured to match your journey. From discovery to going live and beyond. Each phase is designed to help you learn, implement, and grow with confidence.
Quick Links
New to Umbraco Cloud?
Start with the tour of the or try a to explore without commitment.
Working with Databases
The databases on your Umbraco Cloud environments are specific to their environment. This means that the connectionstring to use the SQL Azure Server is overwritten no matter what else is configured.
When working with Umbraco Cloud, the way you work with databases might differ from what you're used to. One important aspect of Umbraco Cloud is that you always work isolated to avoid interfering with colleagues or a running website. This includes the database as well.
In this article you can read more about working with the Cloud Database.
This article will tell you all you need to know to work locally with your Cloud Database.
Here you can learn more about taking backups of your Cloud Database.
Azure Blob Storage
Azure Blob Storage is an external storage system, that the Umbraco Cloud service uses to store all media files on Umbraco Cloud projects.
This includes everything that is added to the Media library through the Umbraco backoffice, like images, PDFs, and other document formats.
In some cases, you might want to store other files in the Blob Storage than Media files.
These articles explain connecting to your Blob Storage, uploading files via Storage Explorer or code, and performing backups and restorations.
You can learn more about Azure Blob Storage in the .
Boost your Project
Unlock powerful features and extend your Umbraco Cloud projects with advanced integrations and tools. Whether you want to manage your own packages, connect with external services, or add form capabilities, you are covered.
Cloud Extensions
Enhance your Umbraco Cloud projects with powerful built-in tools and custom package management designed to help you build more flexible, feature-rich websites. Cloud Extensions provide seamless ways to extend functionality without leaving the Cloud environment.
Application Insights
With Application Insight, you can collect telemetry about your cloud project, including web server telemetry, web page telemetry, and performance counters.
Be aware that projects hosted on Umbraco Cloud operate on a shared infrastructure, which may lead to misleading information when using Application Insights.
Since multiple projects utilize the same resources, Application Insights will provide data based on the overall resource usage across these projects.
To obtain accurate information with Application Insights, you must move your project to a .
Microsoft Documentation
For more information about Application Insight, check out Microsoft's documentation on
What is Umbraco Cloud?
Here you can find information about getting started working with Umbraco Cloud.
Umbraco Cloud is a fully managed, flexible, and scalable way to build and host Umbraco websites, all in one place. Built on the open-source Umbraco CMS and hosted on Microsoft Azure, it provides everything developers and teams need for fast, secure digital experiences.
Umbraco Cloud takes care of installation, infrastructure, and security. You will also get the tools to work with your project in the Cloud or locally. Local development starts with cloning the project down to your PC or Linux/macOS.
When you are ready to show your work to the world, Umbraco Cloud provides a safe deployment mechanism that lets you publish to the web. When you have changes or updates to your site, Umbraco Cloud follows the process of moving, testing, and deploying your changes to your public site.
Technical Contact
One of the biggest benefits of having a Umbraco Cloud project is that you do not need to worry about the hosting. We handle it for you.
When we do maintenance on our Umbraco Cloud servers, we send out information to all our Umbraco Cloud customers. For us to reach out to the correct person, you need to add a Technical Contact to your project.
If you have more than one project on Umbraco Cloud, you will need to add a technical contact to each of the projects manually.
When you create a New Project, the user used to create the project will automatically be added as the technical contact. To update the technical contact or add more than one technical contact, do the following:
Set Up Your Project
Follow these guides to get your project configured the way you need.
Once your project is created, it's time to configure it to match your requirements. From access control and settings to managing connections and database structure, this section helps you establish a strong foundation for your Umbraco Cloud solution.
Whether you're preparing for collaboration, going live, or expanding functionality — the right setup ensures a secure and scalable environment.
Best Practice for Working in Teams
This article will look at some of the best practices and recommendations when you are working in teams on your Umbraco Cloud projects.
Working with Git in Teams
Always start by making a pull request from your project before you push anything back up to Cloud. This way you ensure that you do not accidentally overwrite the work that someone else in your team has worked with.
Web Application Firewall
Your Umbraco Cloud website is protected by a Web Application Firewall (WAF) by default. Learn more about the feature and the benefits.
A Web Application Firewall (WAF) is a security solution designed to protect web applications by filtering and monitoring HTTP traffic between them and the Internet. By acting as a shield between the web application and potential threats, it helps mitigate common attacks. This could be attacks like cross-site scripting (XSS), SQL injection, and file inclusion.
Umbraco Cloud WAF
Umbraco Cloud uses which include pre-configured rules that provide immediate protection against a wide range of threats. These managed rulesets are regularly updated to defend against the latest vulnerabilities and attack techniques. The rulesets include protections against:
Working with a Cloud database locally
Explanation on how to work with an Umbraco Cloud database locally, connecting to your local database using Visual Studio and working with custom tables in the Cloud database
This article covers how you can connect to the database of your local project and how you can work with custom tables on Umbraco Cloud.
Connecting to your local Umbraco installation
When cloning down your project to work locally you might want to have a look in your database every now and then.
Since Umbraco 10, SQL CE
Handle Deployments and Environments
Umbraco Cloud enables you to develop, test, and deploy your projects through a structured and flexible environment setup. With built-in support for deployments, local development, and media synchronization, you can confidently make changes and collaborate with your teams.
This section covers working with environments, deployments, and CI/CD pipelines, giving you full control over how your changes are deployed from development to production.
Also in this Section
Deployment Artifact Best Practices
For a smooth deployment process, it is recommended to follow the best practice guidelines for artifacts outlined in this article.
The zip package you are deploying must contain everything that is normally present in an Umbraco Cloud environment repository.
Every new Umbraco Cloud project contains a readme.md file that explains the structure and how you can adapt it to fit your needs.
The sample scripts on GitHub include a way to package the zip. As the scripts are samples, they show a universal way to do this, which works well for most people. But not all projects are alike, and you may not want to use that particular approach.
Known Limitations and Considerations
Learn about the different feature limitations and what is being considered for the future.
As insights are gathered from users of this feature, there are some known limitations and considerations to be aware of.
Format Restrictions
The packaged artifact from your CI/CD pipeline must adhere to the Umbraco Cloud API's required zip source file format. This could necessitate changes to your existing build and packaging scripts. Read about .
Cloud Services Static IPs
Umbraco Cloud services access external applications with static outbound IP addresses. This enables you to allowlist Cloud services in IP-based firewalls.
Umbraco Cloud services access external applications using static outbound IP addresses. This enables you to allowlist Cloud services in IP-based firewalls. This is particularly useful if you wish to control access to your website based on IP addresses.
Allowlisting IP Addresses
To ensure uninterrupted access and functionality, allowlist the global and regional services IP addresses. Use the regional IP addresses from the region where your website is hosted.
Launch Your Site
When you are about to go live with your website on Umbraco Cloud, there are a few things you might want to consider beforehand.
Below are a few suggestions that you might want to look into:
While you get a lot of fantastic features with Umbraco Cloud, SMTP server is not something that is available. There are many reasons for setting up an SMTP service on your Cloud project. For example, if you are working with Umbraco Forms.
New Certificate Authority for custom hostnames
The following changes in CAA used to issue certificates for all Umbraco Cloud sites' for new and existing custom hostnames.
Not sure if your Cloud project is using a CAA record or not?
You can use this to check whether a CAA record is configured on your hostname(s).
Create branches locally
Umbraco Cloud is built on top of Git which means that you can create branches locally as either a feature or developer branch. You can then work on the project and test out the new features before merging it into the master branch. The branch can then be pushed up to your cloud environments.
Working with Environments in a team
It is recommended to use multiple environments when you are working in teams. With additional environments, members of a team can work locally, pushing up changes to the Cloud environment for testing.
Having multiple environments enables developers to continue developing, while content editors can focus on creating content in a separate environment.
Flexible Environments
When you need to work on a new feature, using a flexible environment ensures that the regular workflow isn't affected. The flexible environment is connected to a single mainline environment and isn't part of the left-to-right deployment workflow.
You can also configure your project to prefer SQL Server LocalDb when it's available on your local machine by enabling the Deploy PreferLocalDbConnectionString setting.
To configure your database, you can add the connection string in the 'appsettings.json' file. For more information, see the Configure your database section in the Unattended Installs article.
Using Custom Tables with Umbraco Cloud
Umbraco Cloud ensures that your Umbraco-related data is always up to date, but it won't know anything about data in custom tables. This is like any other host when it comes to non-Umbraco data.
However, you have full access to the SQL Azure databases running on Umbraco Cloud. You can create custom tables like you'd expect on any other hosting provider. The easiest way to do this is to connect using SQL Management Studio.
The recommended way of making sure custom tables are present is to use Migrations. This is to ensure that the tables will be created or altered when starting your site.
Migrations will ensure if you add environments to your Umbraco Cloud site, the tables in the newly created databases will automatically be created for you.
Don’t include any binary build artifacts coming from the .NET build/publish process.
The general deployment process on Umbraco Cloud needs the source code, and the system will rebuild it once it is pushed back to the environment.
Exclude the .git directory
The .git directory will be ignored in the isolated instance, but the extra megabytes will still slow down the deployment process. Due to these two facts, it is recommended not to include this directory in your deployments.
Also, consider the artifact size limitation below.
Include only finished frontend assets
If you are using modern frontend build tools, include only the finished frontend assets that are needed. There is no need to include JavaScript or TypeScript source files if you need to build the frontend.
Keep the Artifact as small as possible
It is good practice to keep the zipped artifact as small as possible.
Large files will slow down the underlying git operations and, therefore, also the deployment process.
Do not include large files like pictures and PDFs in the artifact.
Large files need to be uploaded to the Azure Blob Storage connected to your environment.
Remove old and leftover code from the artifact.
Orphaned .csproj files with outdated package references are a common cause for issues in the deployment process.
Size limitations to consider:
Version 1 endpoints allow file sizes up to 128 MB.
Version 2 endpoints allow file sizes up to 256 MB.
Zero-day vulnerabilities: Newly discovered vulnerabilities that have not yet been patched.
Top-10 attack techniques (logging only): Common attack methods identified by security organizations like Open Worldwide Application Security Project (OWASP).
WAF is enabled by default on each custom hostname. It is not available for the internal Cloud hostnames.
Impact on your website
Performance
A WAF helps maintain optimal performance by blocking malicious traffic before it reaches your web application. This means that your server resources are not wasted on processing harmful requests, which can slow down your website. Additionally, by preventing attacks that could exploit vulnerabilities, WAF helps ensure the website remains available and responsive to legitimate users.
Security
A WAF enhances the security of your web applications by providing a robust defense against different types of attacks. It protects your website from data breaches, defacement, and other security incidents by filtering out malicious traffic. This helps not only safeguard sensitive data but also maintain the trust and confidence of your users.
Requirements
The custom hostname(s) must be pointing to the Umbraco Cloud entry point CNAME record pointing to dns.umbraco.io or A records.
Working with Umbraco Forms, allows you to set up email workflows that enable you to send emails through Forms - This requires an SMTP service. Another great use of SMTP service is if you want to add users to your project's Backoffice. The service requires SMTP to send the invitation from the project to the new user. This also applies to sending emails to users who have requested a password reset.
When you create a project on Umbraco Cloud, the generated project URL is based on the project's name. You have the option to a custom hostname.
Before adding a hostname, you need to update your DNS host domain registrar DNS entries to resolve to umbraco.io. We recommend setting a CNAME record for your site using the dns.umbraco.io Umbraco Cloud DNS record. You can read more about how to do this under Manage Hostnames.
The last step before your website goes live and is accessible to the public is to deploy it to the Live environment. When everything has been tested in the left-most mainline environment or locally, you are ready to deploy the site to your live environment and make it public.
If you want to keep track of what goes on with your website after publishing, you can set up a Deployment Webhook. This is a great way to keep an eye on your project and it works great with Slack.
In Trial mode, by default, Public Access is disabled on all environments and cannot be enabled. As soon as a subscription is purchased, Public Access is enabled on the Live environment with the option to disable it again.
Fully managed hosting: Hosted on Microsoft Azure with automatic backups, global Content Delivery Network (CDN), HTTPS, and scaling built in.
Out-of-the-box DevOps: Use Git-based workflows, built-in CI/CD, and structured environments (Development, Staging, Live) to deliver with confidence.
Seamless collaboration: Invite team members, manage access, and deploy content and code with ease, all from Cloud Portal.
Security and reliability: Backed by secure infrastructure, automated Transport Layer Security (TLS), point-in-time restores, and Cloudflare protection for performance and safety.
Built for growth: Start small and scale as needed, with flexible environments, external integrations, and support for custom workflows and packages.
Umbraco Cloud Plans
Umbraco Cloud offers shared hosting in 3 different plans:
Starter
Standard
Professional
Learn more about the quotas put in place to ensure the stability of your website.
What’s Included?
Umbraco CMS: The core editor-friendly, open-source CMS.
Cloud Portal: A user-friendly dashboard for managing projects, environments, users, and settings.
Umbraco Deploy: Effortlessly synchronize content and structure across environments, ensuring smooth collaboration between development and live environments.
Umbraco Forms: Build and manage forms seamlessly, enhancing user engagement and collecting valuable insights without additional costs.
Umbraco UI Builder (In selected plans): Accelerate content creation and management by building intuitive, customized interfaces that enhance editorial workflows.
Support Plans: Umbraco Cloud Support ensures you're never alone. Known for being helpful and knowledgeable, they're dedicated to your Cloud success.
Different ways to start an Umbraco Cloud project
End-of-Service Policy for Umbraco Cloud
The End-of-Service policy outlines how long projects and software are supported and available on Umbraco Cloud. Learn more about this policy for given versions of Umbraco CMS and more in the End-of-Service policy for Umbraco Cloud.
Umbraco Training
Umbraco HQ offers a full-day training course covering best practices for developing with Umbraco Cloud. The course targets frontend and backend developers who currently work or plan to work with Umbraco Cloud.
Below are the static outbound IP address ranges for regions:
Europe
Australia
Canada
United Kingdom
United States
Ensure that these IP ranges are added to your firewall's allowlist to maintain seamless connectivity with Umbraco Cloud services.
Related Information
For information about product upgrades and their impact on your Cloud services, see Product Upgrades.
Certificates for new custom hostnames
Starting September 26, 2022, certificates are issued by Google Trust Services instead of DigiCert. The validity period of certificates has been reduced from one year to 90 days.
Certificates for existing custom hostnames
From October 31, 2022, certificate renewals will no longer use 'DigiCert' as the issuing CA. The renewed certificate will instead be issued by 'Google Trust Services', and certificate validity will be decreased from 1 year to 90 days.
No action is required unless you set a Certificate Authority Authorization (CAA) record on your domain.
From October 31, 2022, Certificate renewals will no longer use 'DigiCert' as the issuing CA. This means that you need to update your CAA record to allow 'Google Trust Services' issuing certificates for your domain.
Click Add Technical Contact in the Technical Contacts section.
Add Technical contact
Enter the Name, Email, and Telephone Number in the Add New Technical Contact window.
Click Confirm.
Workflow considerations
To ensure smooth execution of the CI/CD Flow, it is recommended to avoid making any schema changes on any cloud environment. Use your local clone to add or edit Document Types, Data Types, Templates, and the like. Use CI/CD Flow to deploy to Umbraco Cloud. The intention behind this principle is to prevent conflicts that could potentially arise due to simultaneous modifications made in different environments.
Additional Build Steps
The CI/CD Flow feature starts an isolated instance, which may add an extra build to the deployment process. It takes longer for a deployment to finish through Umbraco CI/CD Flow compared to standard deployments.
Conflict Management
Without coordination between teams, the risk of project conflicts increases, especially when trying to avoid unintended changes across different environments. Make sure to handle changes and local conflicts in your version control system.
Key Points to Consider
Direct Commits to Umbraco Git Repos: Any commits made directly to the Umbraco Git Repos are not advised.
Incomplete API: The promotion endpoint for transitioning between environments is not fully functional yet.
Lack of Predefined Tasks: There are no Umbraco-provided Azure DevOps tasks or GitHub Actions available.
No Webhooks: Currently, there's no webhook support for real-time feedback to the pipeline; polling is the only option.
Casing Conflicts: Be cautious of casing issues, such as having a README.md file created by Azure DevOps and a Readme.md file from the default Umbraco Cloud. This can cause conflicts in the cloud Git repository.
Learn how content and code deployments work across environments in Umbraco Cloud.
Set up a local development environment synced with your Cloud project using Git.
Automate your build and deployment pipeline with Git-based workflows and CI/CD best practices.
Fine-tune your project settings, including public access, dedicated resources, and team management to align with your workflow.
Explore how security is built into every layer of Umbraco Cloud — from platform to project.
Understand how databases are structured in Umbraco Cloud, including how to back up, restore, and connect locally when needed.
Technology
Overview
Umbraco Cloud is built on a modern, cloud-native technology stack designed to simplify your development workflow, automate deployment, and ensure reliable, scalable hosting. This section provides a comprehensive overview of the key technologies that power your Cloud projects. From version control and cloud infrastructure to deployment automation and developer tools.
Version Control with Git
At the core of every Umbraco Cloud project is a Git repository, which securely tracks your changes. When you create a project, a Git repo is automatically set up, enabling you to:
Collaborate safely with your team through branching and merging.
Roll back to previous versions if needed.
Trigger automatic deployments when changes are pushed.
For more information, see the article.
Cloud Infrastructure
Umbraco Cloud is hosted on Microsoft Azure, providing scalable, secure, and resilient infrastructure. This means your projects benefit from the same robust platform trusted by enterprises worldwide, without the burden of managing servers or manual configurations.
What infrastructure powers Umbraco Cloud?
Umbraco Cloud runs on Microsoft Azure and uses Cloudflare for optimization and security. It includes:
Automatic backups with point-in-time restore for data safety.
TLS certificates for secure HTTPS connections.
Built-in firewalls and network-level security.
Environment-level access controls, allowing staging or development to be blocked from public access.
For more information, see the article.
Automated Deployments and Continuous Integration
Umbraco Cloud includes an integrated CI/CD pipeline that automates the deployment of your site whenever you push changes to Git. This means:
Each commit triggers a build and deployment to your project’s environments (Development, Staging, Production).
Deployments are fast, reliable, and consistent, reducing manual errors.
You can promote changes through environments, ensuring quality control before going live.
For more information, see the article.
Developer Tools: Power Tools (Kudu) and Diagnostics
To help you manage and troubleshoot your Cloud projects, Umbraco Cloud integrates Power Tools powered by Kudu, an advanced Azure service. With these tools, you can:
Inspect deployment logs and diagnose failed builds.
Access your environment’s file system and process information.
Run scripts and commands remotely.
For more information, see the article.
Performance Enhancements: CDN Caching and Optimization Settings
Umbraco Cloud ensures exceptional performance and stability, whether it’s business as usual or during high-demand periods. With built-in caching, scalable resources, and seamless integrations, your digital experiences remain responsive and reliable under any circumstances.
For more information, see the article.
Payments
In this article, you will be able to find information on the following:
How to manage your subscriptions.
How to download and pay invoices.
How to change your credit card for payments.
Manage Subscriptions
To manage your subscription on Umbraco Cloud, go to the menu in the top right corner and select "Organization".
You will see an overview of your organization on Umbraco Cloud. From here you can see the information about the organization.
Payment methods
To change your payment method on Umbraco Cloud, go to your organization and select "Payment Methods" in the left side menu.
On this page, you can see the credit cards you have already added or you can add a new one.
Once a credit card has been added it will show up in a drop-down when creating new projects. You can also change the payment method for a specific project from here.
Changing and removing payment methods
In some cases, you might need to change the credit card information on the Umbraco Cloud Organization.
If you add multiple cards, you can choose which one will be billed on the 1st of the month. To do this, click the Set as primary button on the card you want to use.
To remove an expired or unused card, click the trash can icon next to that card.
Payment and Invoices
The invoices in this list are for projects paid by credit card.
Projects billed annually by invoice are excluded, as these invoices are handled manually and sent via email.
On Umbraco Cloud, we are sending out one single invoice with all the projects that you are paying for via email every month.
You can view the invoices for your projects under your organization in the Payment History section. You can see the following information for each invoice:
The invoice ID
The total amount paid
When the invoice was created
When downloaded for a given month, the invoice will contain all the projects that you were paying for during the month.
Flexible Environments
Use flexible environments to create a separate workflow along side the left-to-right deployment approach in Umbraco Cloud.
Flexible Environments allow users to create and manage environments outside the regular left-to-right deployment flow. This enhancement provides flexibility in orchestrating code and content workflows, empowering developers and content editors to work in a way that best suits their needs.
While the mainline environments use a horizontal deployment flow, flexible environments work differently. A flexible environment is added to an existing mainline environment and only deploys to and from that environment. Get an overview of the different types of environments in the Environments article.
A Cloud project set up with two mainline environments and one flexible environment
The image above shows a project setup including two mainline environments and one flexible environment attached to the left-most mainline environment.
With Flexible Environments, teams can create environments as needed, allowing for more efficient and tailored workflows.
This feature enables:
Parallel development and testing: Developers can create isolated environments for different features, bug fixes, or client-specific work without impacting the main development branch.
Custom workflow orchestration: Teams can define custom flows of code and content deployment rather than being restricted to a linear left-to-right approach.
Easier hotfixes and feature releases: Urgent fixes can be deployed directly without being blocked by unfinished work in other environments.
Improved Content Management: Content editors can create, test, and validate content changes without depending on a specific environment.
How it Works
A flexible environment is added and connected to a single mainline environment.
Developers can develop and build features in the flexible environment without affecting the mainline environment.
Once a feature is complete, it can be merged back into the mainline environment and become part of regular deployment flow.
Learn more about the deployment process in the section.
Learn more about handling merge Conflicts in Flexible Environments in the section.
Project Prerequisites
Before you can add a Flexible environment to your project, the following prerequisites must be met:
Uses Umbraco Version 10 or greater.
Uses Deploy Version Greater than 10.4.1, 13.3.0, 14.2.0 or greater.
Limitations
Only one flexible environment is available.
Flexible environments are available only for projects paid by credit cards or credits.
Flexible Environments are not available for Heartcore projects.
Learn more about pricing for Flexible Environments on the
Plans and Availability
Plan
Environments
Flexible Environments
Environment Combinations Examples
For more information on environment limits and pricing, visit the page.
Multi-Factor Authentication
This article shows how you can enable Multi-Factor authentication when you log in to the Umbraco Cloud Portal or the Umbraco Backoffice.
On Umbraco Cloud, you can add Multi-Factor Authentication (MFA) for your Umbraco Cloud account.
You can use Email, Phone, or an Authenticator App when logging in to the Umbraco Cloud Portal or the Umbraco Backoffice.
You will not be prompted to authenticate your backoffice login if you have already done it for the portal. This is because both logins use the same centralized login service.
Enabling MFA
MFA can be enabled when editing your Umbraco Cloud profile.
To enable MFA, follow these steps:
Go to your Profile on Umbraco Cloud.
Click Edit Profile in the Profile Settings section.
Select the desired Multifactor Authentication Method from the drop-down list.
Email Authentication
You will get an email with a code that you need to enter when logging in through the Umbraco Cloud portal or the backoffice.
Authenticator App
You have the option to use an Authenticator App when logging in to the Umbraco Cloud Portal or the Umbraco Backoffice.
You can use the Microsoft Authenticator App for both iOS and Android or any other authenticator app of your choice.
In case you want to reset the authenticator app settings for your user, an administrator in your Umbraco Cloud organization can do this. It may be relevant if you want to use another authenticator app on your current phone or transfer the authentication process to another device.
Phone Authentication
You have the option to use your phone when you log in to the Umbraco Cloud portal or the Umbraco Backoffice. You can choose to receive a text message with a code or a call to log you in.
Before deactivating your old phone number, make sure to update the phone number used for your MFA. Changing the phone number used for MFA will require verification through the old number.
Disabling MFA
You can always disable MFA from your profile.
To disable MFA for your user, you will need to use the authentication method that you had enabled to disable it again.
If you had phone authentication enabled, it will then need to be used to disable it again.
The same is the case for email authentication.
Manage Team Members and Permissions
This article covers team members added to your project via the Invite User button in the Edit Team page. If you are looking for more information about Users in the Backoffice, see the Users article. Users added through the backoffice do not have access to the Umbraco Cloud Portal.
Team members are automatically added as users in the Backoffice of all environments for the project. These users can clone the project locally and log in using the same credentials they use for Umbraco Cloud.
Add team member
When adding a user, the default permission is Read for each environment. You can assign backoffice user groups to the user for each environment.
Team Member User Permissions
User Permissions for each environment can be set in the Edit Team page from the Overview dropdown. User Permissions can be set per environment. For example, a user can have Write access on the left-most mainline environment and Read access on the Live environment.
Admin: Has access to everything on a project. An admin can delete a project and edit the team. An admin can deploy changes between environments in the Project Portal and has access to git, as well as the Power Tools Kudu.
Read: A team member with Read permissions can only view the project in the portal as well as the backoffice. They are unable to deploy or make changes to the project itself. They can clone down the project, but cannot push changes they have made locally. By default, they are added as an admin in the backoffice so they can make changes in the backoffice. If you want to change this, see Team Member Permissions in the Umbraco Backoffice below.
Backoffice User Groups for Team Members
You can view the user group memberships of the project’s backoffice users. Currently, you can manage the backoffice user groups of a user through the Umbraco backoffice. A backoffice user is only created once the user logs into the backoffice of the project for the first time.
Team Members Pending Invitation
Find invitation details in the Member(s) who still need to accept the project invitation section of the Edit Team page. You have the following options:
View the team member's name and email.
See the expiration date of the invitation.
Check the status of the invitation.
Copy the invitation link.
To ensure information about server maintenance reaches the correct person, add/update the technical contact to your Umbraco Cloud project.
Public Access
In this article, we show how you can enable public access for your Umbraco Cloud project, so only people with whitelisted IPs can access your project.
Public access is by default available for projects created after the 10th of January 2023.
The Umbraco.Cloud.Cms.PublicAccess package can be installed to enable Public access for projects created before the 10th of January 2023.
The public access feature is available for all Umbraco Cloud projects on the standard plan or higher.
Public Access lets you deny access to your Umbraco Cloud project.
When enabled only team members on the project and users whose IPs have been allowed, can access the frontend of the project.
All environments on Umbraco Cloud projects can be protected by Public access. It requires you to enter your Cloud credentials in order to view the frontend.
By default, Basic Authentication is enabled on trial projects.
How to enable Basic Authentication and allow IPs
Go to Public Access in the project settings tab
Enable Basic Authentication on the project
Once enabled Add IPs for users that need access to the project
Once Basic Authentication has been enabled, users not on the project or with IPs not added to the allowlist will be prompted to log in.
CMS Basic Authentication
The Public Access feature in Umbraco Cloud is built on top of the Basic Authentication implementation in CMS core. This means that the appsettings related to Basic Authentication are controlled by Umbraco Cloud, and your Cloud Environment has access to them.
This setup allows you to configure an HttpClient that can do a loop back request without being blocked, by adding the Shared Secret Header if needed.
For more information, see the following links:
Connecting to the Database on Mac
In this guide, we show you how you can connect and work with your Cloud Database on Mac.
Prerequisite
An Umbraco Cloud project
on Umbraco Cloud
Connecting to the Database
Follow the steps below to connect and work with your Umbraco Cloud Database on a Mac.
Go to SQL Connection Details in the Configuration menu on Umbraco Cloud.
Note down the Server name, Login, Password, and Database.
Open Azure Data Studio.
Click "Create a connection" on the welcome page in Azure Data Studio.
Change the Authentication type to SQL Login and enter the following information in the Connection details dialog:
Add the Server name.
Add the Login.
Click Connect once the connection details have been filled out.
You have now connected to your database. You can work with the databases on Umbraco Cloud like you could on any other host. Remember to let Umbraco Cloud do the work when it comes to the Umbraco-related tables (Umbraco* and CMS* tables).
Partial Restores
In some cases, you might not want to restore the entire content tree but only the parts that you need. Partial restore is a feature that allows for restoring specific parts of your content instead of restoring everything.
This feature is only available with Umbraco Deploy 3.3+
In this scenario, the Cloud environment is cloned to your local machine or a new Cloud environment has been created. In both cases, the new environment will have an empty Content section as well as an empty Media section.
This feature will also restore all dependencies of the selected content. When you restore a content node that references media items and other content nodes, these will all be restored. This includes any parent nodes that these nodes depend on.
To partially restore the parts you need:
Go to the Content section of the Umbraco backoffice on your new environment (local or Cloud).
Right-click the Content tree or click the three dots and select Do something else.
Choose Partial Restore.
Partial Restores on empty environments are helpful when not all content or media is necessary for the tasks to be performed on the new environment. Instead of having to restore everything, doing a partial restore can be used to only restore the parts you need. This will ensure that you can quickly get on your way with the task at hand.
Environment with existing Content or Media
It is possible to use the Partial Restore feature in environments where you already have content in the Content tree.
Go to the Content section of your Umbraco backoffice.
Right-click the content node which you know contains updates.
Choose Partial Restore.
Deploying Changes
How to Deploy changes between a local machine and an environment with Umbraco Deploy using either a Git GUI or CLI
In this article, you can learn more about deploying your code changes and metadata from a local instance to your Cloud environment.
Local changes in your Umbraco Cloud project are automatically detected and synced with your Git client for seamless collaboration.
There are two ways this can be done. You can push the changes using a Git UI or your terminal. This guide will show how you can use both ways to deploy your local changes to Umbraco Cloud.
Prerequisites
A clone of your Cloud project.
A or a Terminal.
Created some Document Types and Data Types with corresponding .uda files.
The files are located in the /umbraco/Deploy/Revision folder.
Deploying using a Git UI
Once you have created some Documents and Data types, follow the steps below to deploy your local changes using a Git UI. The guide will use as the Git UI, however you can use your own preferred Git UI.
Go to your Git UI.
Check for local changes in your UI.
Prepare changes, so they are ready to be committed.
Write a commit subject
Write a description of the commit.
Commit the files.
Push the files to your cloud project in the UI.
The deployment will kick in and the new Documents and Data Types you have created locally are now automatically created on the remote environment.
After deploying changes locally to your Cloud environment, use the Umbraco Cloud portal's 'Deploy changes to ..' button for subsequent deployments to other environments. For more information, see the article.
Deploying local changes using the terminal
To deploy your local changes from local to Umbraco Cloud using a terminal follow the steps below:
Navigate to your local projects folder using the cd YourProjectName command in the terminal.
Check for pending changes in your project with git status.
Add the pending changes with git add -.
If you have to pull down, make sure to see if any of these commits contain changes to the schema (anything in umbraco/Deploy/Revision/).
To validate your local site and ensure compatibility with the updated schema, use the in the Settings section of the Umbraco backoffice.
Here, you can see the status of ongoing or completed deployment processes. The status will show whether an operation has been triggered and is in progress has been completed, or has failed.
The dashboard will show the status based on the marker files on the disk, for example, deploy-progress. From the Deploy Dashboard, it is also possible to trigger different processes.
Deploying between environments
When you are working in your Cloud environment, changes made through the Backoffice are automatically detected and committed to the site's Git repository. This includes Umbraco-specific items like Document Types and Templates. These changes are also referred to as metadata.
Deploying between Mainline Environments
Changes made in your Cloud environments will appear in the Umbraco Cloud portal. You can see what files have been added or changed and who made the changes.
To deploy metadata changes from one Cloud environment to another, click the Deploy changes button on the environment where the changes were made.
The deployment starts, and you can follow the progress in the Overview section of your project.
Once complete, the changes are deployed to the next Cloud environment in the deployment flow. If you have additional environments, repeat this process to deploy the changes through each environment.
Syncing Changes Between Mainline and Flexible Environment
When working with a flexible environment alongside your mainline environments, it's important to keep them aligned to avoid conflicts and ensure consistent deployments.
If any changes have been made in a mainline environment those changes must be pulled into the flexible environment before pushing updates back. The changes can be updated Document Types, content, or other schema changes.
If what you've been working on in the flexible environment has also been changed in the mainline, a merge conflict will occur. These conflicts need to be resolved before you can continue with the deployment. For information on how to resolve them, see the article.
Once you’ve completed your feature or update in the flexible environment and it’s synced with the latest mainline changes:
Push your changes from the flexible environment to the mainline environment.
From there, the changes become part of the regular deployment flow.
Important Notes
When you deploy, for example, from your left-most mainline environment to your Live environment, changes are made to the Live environment. These changes will then be merged back into the left-most mainline environment.
Here are the automatic steps Umbraco Cloud goes through when you hit the "Deploy changes" button:
Before pushing your changes from the source environment, the engine running Umbraco Cloud - Umbraco Deploy - looks for changes in the repository on the target environment
If changes are found, Umbraco Deploy merges the changes from the target environment into the repository on the source environment.
After the merge, the changes from the source environment are pushed to the repository on the target environment.
It is recommended that you only make changes to metadata on the left-most mainline environment or a flexible environment. Making changes directly on other mainline environments can cause merge conflicts when you deploy.
It is important to be aware of how deletions work between environments. Some deletions are environment-specific and others are not. For more information see the .
Refer to our troubleshooting documentation about , if you should run into issues while deploying between your Umbraco Cloud environments.
Connect to Azure Storage Explorer to upload files manually
If you want to manually upload files to the Azure Blob Storage container provided to your Cloud environments, you can use "Microsoft Azure Storage Explorer" software.
This article provides the steps you need, to connect to your Azure Blob Storage containers using Azure Storage Explorer.
It is strongly recommend that you add all the media items to your Cloud environments through the backoffice. Clone your environment to your local machine to manage the files of your media library.
Important: If you upload your media files manually using this method, they will not be available in the backoffice.
All media needs to be added through the Umbraco backoffice.
Getting the credentials
The first thing to sort out, if you want to connect to the Azure Blob Storage container of your environment is the credentials.
To find the connection details for your environment's Blob Storage, follow the steps below:
Go to your project on Umbraco Cloud.
Go to Configuration in the side menu.
Go to Connections.
Scroll down to
Installing Azure Storage Explorer
The next step is to have Azure Storage Explorer installed on your local computer. , and run through the installer.
Configuring the Connection to your Azure Blob Storage
Let's use the information you have gathered, and connect Azure Storage Explorer to the Blob storage container:
Click the Open Connect Dialog button to get the Connect dialogue.
Select the Blob container in the first prompt.
Select Shared Access Signature (SAS) URL in the second prompt.
Input the information you have gathered earlier in the following format [Endpoint][ContainerName][SharedAccessSignature], in the URI field. See below for an example.
Ensure that the credentials are correctly set in the Connection Summary prompt.
Select Connect.
You are now connected to the blob storage for your environment and you can upload your files to Azure Blob Storage through the explorer.
Important: If you upload your media files manually using this method, they will not be available in the backoffice.
All media needs to be added through the Umbraco backoffice.
Manage Environments
Learn how to add and remove environments on your Umbraco Cloud projects.
The number of environments available on your project is dependent on which plan you are on:
Plan
Environments
Flexible Environments
Environment Combinations Examples
Starter
2
.
Configuring Environments
Clicking Configure environments from the project overview gives you access to environment management options. From here, you can:
Rename an existing environment.
Create a new environment.
Delete an environment you no longer need.
These options help keep your deployment pipeline organized and aligned with your team's workflow.
Adding or Removing Environments
Most Umbraco Cloud plans give you the flexibility to work with multiple environments. You can decide how many to add and how to organize them as flexible or mainline environments. For more information on environment types, see the article.
The following sections provide guidance on managing your Cloud environments.
Adding an Environment
Follow the steps outlined below to add a new environment to your Cloud project.
Click Configure environments.
Click Create environment.
Choose an Environment name.
Click Confirm.
After adding a new left-most mainline environment or a flexible environment, you need to clone this environment instead. The current local clone will be set up to push to Live, while the fresh clone will push to the new environment.
Removing an Environment
To remove an environment:
Navigate to the environment you want to delete.
Click on the three dots.
Click Delete.
It may take a few minutes for Cloud to set up the changes after adding or removing an environment.
External Services
In some cases, Umbraco Cloud might not be the only service you are working with. You might need to work with other services as well. This could be either internal or third-party services. In either case, it will be serviced externally to Umbraco Cloud.
If an external service behind a firewall needs to communicate with your Umbraco Cloud project, allow Umbraco Cloud Server IPs to bypass the firewall.
For example, to retrieve information from an external service that is located behind a firewall, you must grant access to your Umbraco Cloud project. To do this, add the IP addresses used by Umbraco Cloud servers to an allowlist.
Enabling static outbound IP addresses
For projects on a Standard, Professional, and Enterprise plan you can enable static outbound IP addresses.
On the Advanced page of your project, you can turn on the static outbound IP address feature to ensure persistent communication. This opt-in feature can be switched on for Standard, Professional, and Enterprise Cloud projects.
The enabling of static outbound IP addresses will have the effect that port 25 will be blocked. Port 25 is the default port for SMTP relays and is commonly abused to send spam from compromised parties. Accordingly, this port is often blocked by ISPs and cloud providers such as Microsoft and Google. For SMTP submissions, we advise you to use port 587 or port 2525.
The static outbound IP ranges vary per region. Below are the values per region in a notation. The expanded IP ranges can be calculated by using .
West Europe
UK South
US East
Australia East
If you need to use a CIDR Range for the IPs: 40.113.173.32/28
For projects on a Starter plan, you can see the current dynamic outbound IP addresses. The IP addresses for starter projects are dynamic and may change due to Azure or Umbraco optimizing resources.
Complete IP Address Reference
For a comprehensive list of all static outbound IP addresses used by Umbraco Cloud services across all regions, including both global and regional services, see .
Custom Certificates
This feature is only available for Umbraco Cloud projects on a Professional or Enterprise plan.
All projects on Starter, Standard, or Professional plans will automatically be assigned a Transport Layer Security (HTTPS) certificate.
To manually upload your certificate on the Umbraco Cloud Portal and assign it to one of the hostnames you've added:
Go to your project on the Umbraco Cloud portal.
Click Settings -> Certificates. The Manual Certificates window opens.
Your certificates need to be:
In .pfx format.
Must use a password.
Cannot be expired.
The .pfx file can only contain one certificate. Each certificate can then be bound to a hostname you have already added to your site. Make sure you use the hostname you will bind the certificate to as the Common Name (CN) when generating the certificate.
Add Manual certificate
Click Add New Certificate.
Select Choose file in the Certificate (.pfx file) field and upload your certificate from your local machine.
Enter the Password for your certificate.
Bind Certificate to a Hostname
Click Add new binding.
Choose your hostname from the Hostname dropdown.
Choose your newly uploaded certificate from the Certificate dropdown.
You've now successfully added your certificate to the Cloud project.
From Custom Certificate to Automatic TLS (HTTPS)
In some cases, you might want to switch from using your custom certificate to using the ones provided by the Umbraco Cloud service.
By removing your certificate from your Cloud project, the Umbraco Cloud service will automatically assign a new TLS (HTTPS) certificate to the hostname.
Did your manually uploaded security certificate expire?
You will need to remove the expired certificate for Umbraco Cloud to assign a new certificate to your hostname(s).
Read more
Version Specific Upgrades
This article provides an overview of any version-specific steps that might be necessary when upgrading your Umbraco Cloud project to a new version.
As there might also be version-specific notes for the specific products involved in the upgrade it is recommend giving those a look as well.
Umbraco Cloud is a fully managed, scalable platform built to simplify and enhance the experience of building, deploying, and maintaining Umbraco websites.
Umbraco Cloud enables developers, agencies, and enterprise teams to work faster, collaborate seamlessly, and maintain security using modern best practices.
This article highlights the most valuable features and benefits of Umbraco Cloud.
Fully Managed Hosting on Microsoft Azure
Baselines
Use Baselines to quickly create new Umbraco Cloud projects using pre-made schema and setup.
A Baseline project is similar to a fork (forked repository) on GitHub. A clone of an existing project is created while maintaining a connection between the two projects. The connection exists between the Live environment of the Baseline project and the left-most mainline environment of the Child project.
Any project can act as a Baseline project.
The idea is that you have a project containing all your standard Umbraco packages and components. Some default Document Types that you want to use as a baseline for future projects are also configured. When you've made changes to your Baseline project, you can push them out to all the Child projects with a click of a button.
Umbraco CI/CD Flow
Learn how to use Umbraco CI/CD to build a workflow that fits into your team.
Umbraco CI/CD Flow is designed to seamlessly integrate your existing CI/CD flow with Umbraco Cloud. The primary objective of this feature is to enable your automated workflows to deploy directly to Umbraco Cloud. This lets you leverage the best of both worlds: the robustness of your current CI/CD setup and the specialized hosting environment of Umbraco Cloud.
Umbraco Cloud is a cornerstone in this setup, providing a cloud-based hosting solution specifically optimized for Umbraco CMS. With integration to your Continuous Integration and Continuous Deployment (CI/CD) pipeline, Umbraco CI/CD allows the inclusion of automated workflows. These automated workflows include building, testing, and deploying your Umbraco projects.
Advantages of Utilizing Umbraco CI/CD Flow
Blob Storage Backups
Learn how to back up your Umbraco Cloud Blob Storage using AzCopy.
Umbraco Cloud uses Azure Blob Storage to store all media files for your project. This includes images, PDFs, and other files added through the Media library in the Umbraco backoffice.
While Umbraco Cloud provides database backups through the Cloud Portal, you may want to create your own backups of the Blob Storage. This article describes how to back up and restore Blob Storage using AzCopy.
Prerequisites
Manage Product Upgrades
Follow these guides to ensure a hassle-free upgrade process.
Keeping your Umbraco Cloud project up to date ensures security, performance, and access to the latest features. This section guides you through upgrading your project, from minor updates to major version upgrades, including handling dependencies.
End-of-Service Policy for Umbraco Cloud
The End-of-Service policy outlines how long projects and software are supported and available on Umbraco Cloud. Learn more about this policy for given versions of Umbraco CMS and more in the .
Umbraco Cloud hosts your projects on trusted Microsoft Azure infrastructure, ensuring:
High availability and performance
Data privacy and security
Azure-backed reliability and global scalability
Smooth Deployments & Built-In CI/CD Workflows
Deploy faster and safer with a modern, built-in developer experience:
Git-based deployments with environment-aware configuration
Content and media transfers/restores between environments
Built-in CI/CD pipeline support for GitHub Actions and Azure DevOps
Umbraco Baselines allows you to use a base project as a template for creating more projects. This is ideal if you're planning on building multiple similar websites. For more information, see the Baselines articles.
Automated Upgrades and Hotfixes
Stay secure and up to date with automated CMS upgrades, including:
Finally, the changes pushed to the target repository are extracted to the site, and you will now see your changes reflected in the Backoffice and on the Frontend.
: A team member with Write permissions can do everything on a project except delete it and edit the team. A user with Write permissions can deploy changes between environments through the portal. They have access to the git repositories and can push local changes to the environment.
No Access: A team member with no access permissions cannot restart the environment, deploy changes between environments, check error logs or log files, or access Kudo in the Project Portal. They can view the project in the portal and access the backoffice.
// Setup http client that does loop back requests
var basicAuthEnabled = Environment.GetEnvironmentVariable("UMBRACO__CMS__BASICAUTH__ENABLED") == "True";
if (basicAuthEnabled) {
var headerName = Environment.GetEnvironmentVariable("UMBRACO__CMS__BASICAUTH__SHAREDSECRET__HEADERNAME");
var headerValue = Environment.GetEnvironmentVariable("UMBRACO__CMS__BASICAUTH__SHAREDSECRET__VALUE");
loopbackHttpClient.DefaultRequestHeaders.Add(headerName, headerValue));
}
Explore the practical benefits of using Umbraco CI/CD Flow for your development and deployment needs. This solution aims to simplify your workflow, improve team collaboration, and reduce deployment time. Here are some key advantages to consider:
Seamless Integration with Existing CI/CD
Umbraco CI/CD Flow allows customers to connect their existing CI/CD pipelines to Umbraco Cloud, making the transition smoother and reducing the learning curve.
Enhanced CI/CD Features
The feature enables unique CI/CD features like PR-flows and automated tests, which are not natively available in Umbraco Cloud. This adds a layer of quality assurance and streamlines the development workflow.
Scalability and Flexibility
Umbraco CI/CD Flow allows for greater scalability and flexibility in your deployment process. You can adapt your existing CI/CD pipeline to handle larger projects or more complex workflows without having to overhaul your Umbraco Cloud setup.
Centralized Management
With Umbraco CI/CD Flow, you can centralize the management of your deployments, tests, and workflows. This makes it easier to monitor, troubleshoot, and optimize your processes, leading to more efficient and reliable deployments. Automating deployment minimizes the risk of human errors that could have a negative effect on the target environment.
Umbraco CI/CD Flow serves as a bridge between your existing CI/CD pipeline and Umbraco Cloud, enabling a more streamlined and automated deployment process. While it offers a number of advantages, there are also limitations that need to be considered. On the page 'Known Limitations and Considerations', you will find a detailed list of the pros and cons of using Umbraco CI/CD Flow.
Overview of Flow
The CI/CD process for Umbraco projects involves some key steps, from code development locally to deployment to Umbraco Cloud. The flow of these steps is as follows:
Code Development: Developers work on features or bug fixes in their local environments.
Customer code repository: Changes are committed and pushed to a version control system like Git in the customer's own repository.
Customer pipeline: The code is compiled and built. Tests can be run automatically in the associated pipeline to ensure code quality. Finally, the code is packaged into a zip file and prepared for deployment.
Umbraco Cloud API: The customer pipeline uploads the source packed as a zip file to the Umbraco Cloud API.
Umbraco cloud repository: The deployments start and trigger the queueing of the built-in Umbraco services. It then pushes the Umbraco Cloud repository to the left-most mainline environment. If pushed directly to a live environment, the website has been updated.
Basic overview
In a bit more detail, the flow will look like this from a pipeline perspective.
Detailed overview
Next Steps: Dive into the Documentation
To ensure you make the most of the Umbraco CI/CD Flow, it is recommended to explore the documentation further. Familiarizing yourself with the fundamentals is a good starting point, but delving deeper will enable you to fully harness its capabilities.
Here are three essential pages to get you started:
How To Configure A Sample CI/CD Pipeline: Follow our step-by-step guide to set up a sample pipeline, making your development and deployment process more efficient.
Known Limitations and Considerations: Familiarize yourself with the current limitations and considerations to ensure you're making the most out of Umbraco CI/CD Flow.
These resources will provide you with the knowledge and tools you need to successfully implement and optimize your use of Umbraco CI/CD Flow.
Understand how upgrades work in Umbraco Cloud and what to consider before upgrading.
Learn how to push a hotfix to your Live environment.
Umbraco Cloud Plans
Overview of Umbraco Cloud plans, resource quotas, and infrastructure details.
Umbraco Cloud plans - Starter, Standard, and Professional - run on shared infrastructure, referred to as pools. To ensure consistent performance and prevent resource exhaustion within a pool, each website is assigned a resource quota based on its plan. Resource usage is continuously monitored to maintain stability across all sites.
The shared resources used by Umbraco Cloud websites include:
Central Processing Unit (CPU)
Random Access Memory (RAM)/Memory
Disk space
Transmission Control Protocol (TCP) connections
Currently, all available Umbraco Cloud plans utilize P1V3 Azure App Service Plans as their underlying infrastructure. A P1V3 Azure App Service Plan provides:
2 CPU Cores
8GB of RAM
250 GB of Disk space
To ensure stable performance for all websites hosted on Umbraco Cloud shared plans, both soft and hard quotas are in place. Quotas per site and the number of sites in each pool vary by Umbraco Cloud Plan.
Plan quotas for shared Umbraco Cloud Plans
Each plan has specific resource quotas. If a CPU or memory quota is exceeded, the application will restart to maintain stability for all adjacent sites on the app service plan. Exceeding the disk space quota will result in errors when performing write operations.
While there are no per-site limits for TCP connections, the total available TCP connections for all sites in the pool is 1,920. Once this limit is reached, any additional connection attempts will result in errors.
Umbraco Cloud Starter plan
CPU - 20% (120 seconds of CPU time within a 5-minute period)
Memory - 1,500 MB (private bytes)
Disk - 7,800 MB
Umbraco Cloud Standard plan
CPU - 35% (210 seconds of CPU time within a 5-minute period)
Memory - 1,800 MB (private bytes)
Disk - 9,600 MB
Umbraco Cloud Professional plan
CPU - 50% (300 seconds of CPU time within a 5-minute period)
Memory - 2,000 MB (private bytes)
Disk - 10,400 MB
These quotas are hard limits and cannot be exceeded for more than a 5-minute interval. If an application surpasses the CPU or memory limits defined by the plan quota, the app service hosting the application will automatically restart. If multiple restarts occur, we will relocate the application to a dedicated instance to prevent negative impacts on other tenants within the shared pool.
For more details on pricing, plans, and features, visit the page.
Environment limits per plan
Each Umbraco Cloud plan supports a specific number of included environments. You can add extra environments for an additional cost on Umbraco Cloud, but Heartcore does not support extra environments.
Umbraco Cloud environment limits
Plan
Included Environments
Maximum Environments
Heartcore environment limits
Plan
Included Environments
If your project has more environments than the target plan allows, downgrades are blocked until you remove environments.
Hosting with Umbraco Cloud: Cloud vs. Self-Hosted
A quick overview of how Umbraco Cloud provides secure, scalable, and fully managed hosting.
Umbraco Cloud offers fully managed hosting for your Umbraco projects, leveraging Microsoft Azure. This means you don’t have to worry about setting up infrastructure, servers, or deployment pipelines. Everything is included and optimized for running Umbraco projects at scale.
Choosing between Umbraco Cloud and self-hosted Umbraco depends on your project's requirements, team setup, and compliance needs. Here's a breakdown to help you make a decision:
Feature
Umbraco Cloud
Self-Hosted Umbraco
Shared vs. Dedicated Hosting
Umbraco Cloud offers:
Shared Hosting (default): Your site runs in an isolated environment on shared infrastructure that is optimized for performance and security.
Dedicated Resources: Available for high-traffic or security-sensitive projects with full tenant isolation. For a full overview of configuration and pricing, refer to the
For plan-level details, see the .
When to Choose Umbraco Cloud
Choose Umbraco Cloud if you want to:
Launch quickly with minimal infrastructure setup.
Automate deployments, upgrades, and backups.
Focus on building solutions, not managing servers.
Collaborate smoothly across teams with built-in workflows.
Ideal for
Digital agencies
Internal development teams
MVPs and large-scale web projects needing quick iteration and long-term stability
When to Choose Self-Hosted Umbraco
Choose self-hosted Umbraco if you:
Require complete control over your hosting and stack.
Must adhere to specific security, legal, or compliance requirements.
Have in-house DevOps expertise and want to tailor CI/CD workflows.
Need integration with private networks or legacy systems.
Ideal for
Enterprises with strict governance
Custom architecture requirements
Projects with highly specialized hosting needs
Resources
Config Transforms
Configuration files can be transformed to match requirements on different Umbraco Cloud environments.
In this article, you will find examples of applying environment-specific configuration to your Umbraco Cloud project.
Common configuration files, like the web.config and appSettings.json files on your Umbraco Cloud project will be used as examples.
What are Config Transforms?
Config Transforms are a way to transform your config files without changing the actual config file.
To transform a config file, you need to create a new file in your project with the following naming convention: {config-file name}.{environmentAlias}.config.
Legacy Umbraco
If your project is on Umbraco 7 and 8 the naming convention is the following: {config-file name}.{environmentAlias}.xdt.config. Find more details on this in the .
To transform your appSetttings.json file for an environment with the alias "Live", create a config transform that looks like this:
appSettings.Live.json
The {environmentAlias} part needs to be replaced with the target environment's alias. The environment alias is fetched from the environment variable named DOTNET_ENVIRONMENT.
You can find and manage the value of the DOTNET_ENVIRONMENT environment variable through the Advanced settings in the Configuration section of the Cloud Portal.
Create the files in your local project clone to ensure it's added to the repository.
When the file is deployed to the Live environment, the transforms will be applied to the appSettings.json file in the Root of your project. In the case that you have multiple mainline environments, the appSettings.Live.json will only transform the appSettings.json on the Live environment.
If you don't have a web.config you will need to create one locally as well.
For each deployment, the Umbraco Cloud engine searches for all of the .{environment}.json files in your site and apply the transforms.
Using config transforms to remove and/or add sections to config files is currently only possible for the Web.config file.
Be aware that a misconfigured config transform may .
Syntax and testing
When creating config transforms you need to follow these three rules:
Use the correct file-naming convention.
Place the transform file in the same folder as the file you want to transform.
Follow the correct .
Before applying the config transform files to your environments, we recommend running a test using this tool: .
Using the tool will let you test whether the transform file transforms your config files correctly. The tool can be used for all config files.
Examples (web.config)
Rewrite rules are often something you only want to apply to your Live environment. To avoid the rewrites being applied to other mainline environments, create a transform file to apply the rewrite rules only to the Live environment.
Here is an example of how that config transform would look:
The snippet requires a web.config file with a matching structure; otherwise, the config transform (and subsequently, the deployment) may fail.
This config transform will add a <rule> to <system.webServer><rewrite><rules>. The xdt:Transform attribute is used to tell the system what to transform. In this case, the value is Insert, which means it will add the section if it's not already in the config file.
Dedicated Resources
Dedicated Resources is a feature on Umbraco Cloud that gives you the option to move your project to a dedicated server. You can choose between a number of dedicated options depending on the amount of resources you will need for your project.
In this article, you can read about how to move your Umbraco Cloud project to dedicated resources. You can also find information about what you need to be aware of before doing so.
Before you move your project to dedicated resources
Before you decide to move your Umbraco Cloud project, you need to consider a few things:
Umbraco Cloud offers dedicated resources for Standard and Professional plans. You can choose between two dedicated options for a Standard plan project and three dedicated options for a Professional plan project.
Moving from a shared resource to a dedicated resource will change the outgoing IP of the project. If your solution has an external service that requires whitelisting the outgoing IP, we advise you to enable the static outbound IP feature for your project and share that static outbound IP address with the third party. The static outbound IP address will not change when moving from a shared resource to a dedicated resource. For more info on static lease, visit the documentation for .
How to move from shared to dedicated
The first step in moving to a dedicated resource is to access your project in the project overview at .
Find and select the project that you want to move to dedicated resources.
Select Dedicated Resources from the Management menu:
There are currently three dedicated options to choose from for the Professional plan and two dedicated options for the Standard plan. For each of the dedicated options, you will find its name, the memory and CPU cores, and the price per month.
By hitting the "Upgrade" button on your dedicated option of choice and confirming this, you will be redirected to the project page, where you will be notified when the move to a dedicated resource has been completed.
Are you moving your Cloud project to a dedicated resource in the middle of the month? Dedicated resources are reserved on a per-month basis. The price of the dedicated resource will take effect from the next period of your subscription. The time from that date until the start of the next subscription period will be added to the next invoice.
Moving to a higher or lower dedicated server
When on a Dedicated plan, you can scale the dedicated server up to a higher plan or scale down to a lower plan. On a Standard plan, you can scale up from Standard Dedicated 1 to Standard Dedicated 2, and scale down back to Standard Dedicated 1 again.
On a Professional plan with Pro dedicated 1, you can scale it up to Pro dedicated 2 or 3. Similarly, you can scale down from higher to lower plans.
Once it has been scaled, the environment will do a , which will restart the environment.
How to move from dedicated to shared
Moving away from dedicated resources and back to a shared plan can be done from the Dedicated Resources page.
By hitting "Downgrade to shared" and confirming your choice, you will be redirected to the project page, where you will be notified when the move back to a shared resource has been completed.
Your Cloud project is now back on a shared resource.
Frequently asked questions
Wondering what happens when you move your environment to a dedicated server? Below you can find a list of the most frequently asked questions, including answers.
Will it move all the environments to the dedicated server?
You can choose to only move your live environment to the dedicated server.
How will the resources be split between the environments?
All environments on the project moved to dedicated will share the resources of the dedicated server.
Will the customer be able to work on the project during the move?
It will not be possible to work on the project while it is being moved to the dedicated server. The move takes a couple of minutes, and during that time the backoffice will not respond as usual.
Will the environments be moved at the same time or one by one?
All environments that have been selected to be moved, will be moved simultaneously.
Will the live environment be unavailable while the Project is moved?
There will always be an active live environment that continues to serve requests and be online during the move operation. When the moved live environment is ready and responding to requests, the hostnames will be switched to point to the moved environment.
If you have any other questions regarding dedicated resource, feel free to reach out to .
Platform Configuration
Learn how to manage Platform Configuration on Umbraco Cloud, including Proactive Auto-Heal and Always On.
The Platform Configuration section in the Umbraco Cloud Portal lets you manage environment-level settings that affect how your application runs on Azure App Service. You can control the following settings:
Proactive Auto-Heal: Automatically restart an environment when the platform detects unhealthy resource usage.
Always On: Keep your application loaded at all times so it does not unload after periods of inactivity.
Changes to either setting cause the environment to restart and take effect only after you confirm them.
Proactive Auto-Heal
Proactive Auto-Heal is an Azure App Service feature that automatically monitors the health of your Umbraco Cloud environments. When the platform detects an unhealthy environment due to memory usage or slow requests, it performs an overlapping restart to recover it. This means a new instance is started before the old one is stopped, minimizing downtime.
Proactive Auto-Heal is enabled by default on all Umbraco Cloud projects and helps ensure your site remains available without manual intervention.
When Proactive Auto-Heal is triggered
Proactive Auto-Heal monitors your environment and triggers a restart depending on the following factors:
Memory usage: If the environment's memory consumption exceeds 90% of the available limit for more than 30 seconds, an overlapping restart is triggered. The exact memory limit depends on the worker size and process architecture.
Slow requests: If 80% or more of all requests take longer than 200 seconds within a 2-minute rolling window, a restart is triggered. This rule requires a minimum of 5 requests in the window before it activates. The rule is not applied during the initial warm-up period after a process start.
When to Disable Proactive Auto-Heal
In most cases, Proactive Auto-Heal should remain enabled. However, there are scenarios where legitimate high-resource workloads may trigger unnecessary restarts. Consider disabling Proactive Auto-Heal when your project performs:
Large content imports: Bulk importing content can temporarily increase memory usage and request processing times.
Examine index rebuilds: Rebuilding search indexes is resource-intensive and can trigger the monitoring thresholds.
Schema migrations: Running database schema migrations may cause slow request processing during the migration.
Disabling Proactive Auto-Heal means your environment will no longer be automatically restarted when it enters an unhealthy state. If your site experiences genuine resource exhaustion, you need to manually restart the environment or wait for the issue to resolve itself. Only disable this feature if you understand the trade-offs.
The option to disable Proactive Auto-Heal is only available for projects on a Dedicated plan. Projects on Shared plans always have Proactive Auto-Heal enabled.
Automatic Re-enablement on Plan Downgrade
If you downgrade your project from a Dedicated plan to a Shared plan, Proactive Auto-Heal is automatically re-enabled. This ensures that projects on shared infrastructure benefit from the automatic recovery behavior.
You do not need to take any action. The setting is applied automatically during the downgrade process.
Always On
Always On keeps your application loaded, so it does not unload after periods of inactivity. Without Always On, an idle application is unloaded to free resources. The next incoming request then has to wait for the application to start again.
Keeping the application loaded removes this warm-up delay and helps ensure consistent response times.
Changing the Always On toggle is only available for environments on a Dedicated plan. Environments on Shared plans use the default value for Always On. This restriction exists for sustainability reasons. Keeping idle applications loaded consumes resources that could otherwise be released on shared infrastructure.
Default Value on Plan Downgrade
If you downgrade an environment from a Dedicated plan to a Shared plan, the Always On setting reverts to its default value:
Production environments: Always On is enabled (true) by default.
Feature environments: Always On is disabled (false) by default.
You do not need to take any action. The default is applied automatically as part of the downgrade process.
How to Update Platform Configuration
To update Proactive Auto-Heal or Always On for your project:
Go to your project in the .
Navigate to Configuration > Advanced in the left-side menu.
Locate the Platform Configuration section.
Toggle Proactive Auto-Heal and Always On to the desired state.
Select Save to apply the changes.
Select Cancel to discard the changes.
Saving changes to Platform Configuration restarts the environment. Selecting Cancel on the dialog or the Cancel button below the toggles reverts any pending changes.
Database
There are a few steps you need to do before you can work with your database. You will be ready to start working with the database at the end of the article.
Connecting to your Cloud database locally
Umbraco Cloud automatically overrides whatever is in the umbracoDbDsn connection string in the web.config or appSettings.json when the site is running on Cloud.
Any connection string named umbracoDbDsn will only be used when you run the site locally (cloned). In rare cases, you might need the database timeout increased on Cloud, for that, you'll need to reach out to support for assistance.
For security, your database on Umbraco Cloud is running behind a firewall. You'll need to open the firewall for the relevant IPs to connect to the database. This can be a single IP, a list of IPs, or even an IP range.
To open the firewall to a specific IP follow the steps below:
Go to your Umbraco Cloud Project.
Go to Configuration in the side menu on your project.
Click on Connections.
If you don't see the SQL Azure firewall, it's due to permissions and you'll need to contact the projects administrator.
The IP can also be added by clicking "Add now". It'll automatically add your current IP address and save the settings. It might take up to five minutes for the firewall to be open for your IP.
Connecting to the database using SQL Management Studio
Once the firewall is open, it's time to fire up SQL Management Studio and connect to the database. Be aware that a database exists for each environment on Umbraco Cloud. Any changes you make to custom tables need to be done for each database.
To connect to the database using SQL Management Studio follow the steps below:
Go to SQL Connection Details in the Configuration menu on Umbraco Cloud.
Note down the Server name, Login, Password, and Database.
Go to SQL Management Studio.
Now that you've connected you can work with the databases on Umbraco Cloud, like you could on any other host. Remember to let Umbraco Cloud do the work when it comes to the Umbraco-related tables (Umbraco* and CMS* tables).
LocalDB
LocalDB is no longer supported in the latest major version of Umbraco. The documentation below is only relevant if you are on Umbraco 9 and below.
When you clone a site locally, Umbraco Cloud automatically creates a local database and populates it with data from your website running on the Cloud. If you don't specify database settings before the local site startup, it defaults to a SQL CE database in the umbraco/Data folder. If you wish to use a local SQL Server instead, you can update the connection string in the web.config or appSettings.json file (from v9+). You need to do this before your site starts up the first time.
By default when Umbraco Cloud restores a local database it will be a Umbraco.sdf file in the /App_Data folder. However, the restore creates a Umbraco.mdf file if LocalDB is installed and configured. To use LocalDB ensure applicationHost.config it is configured with loadUserProfile="true" and setProfileEnvironment="true".
Read about how to work with LocalDB and full IIS in the .
If you don´t see the lines in the applicationHost.config, you can add them manually to the <applicationPools> section.
Usually applicationHost.config is located in this folder for IIS: C:\Windows\System32\inetsrv\config
and in one of these folders for IIS Express:
C:\Users\<user>\Documents\IISExpress\config\
If you're using Visual Studio 2015+ check this path: $(solutionDir)\.vs\config\applicationhost.config
In Visual Studio 2015+ you can also configure which applicationhost.config file is used by altering the <UseGlobalApplicationHostFile>true|false</UseGlobalApplicationHostFile> setting in the project file (for example, MyProject.csproj). Source: Microsoft Developer Network (MSDN) forum.
Now that you are all set and ready you can continue to work with your .
Deployment
A deployment model that relies on Git, Kudu, and Umbraco Deploy core technology to move your changes from one environment to another.
Umbraco Cloud uses a deployment model based on Git, Kudu, and Umbraco Deploy to move changes between environments. This follows a left-to-right deployment approach. Changes start in the local or left-most environment and are deployed to the production/Live environment. This workflow is called the mainline.
The mainline environments are used when building and deploying the initial website. Upgrades, both manual and automatic also go through the mainline environments.
Flexible environments can be used to work on features separate from the mainline. This is done without interfering with upgrades or other changes being worked on in the mainline.
Left to right model
Deployment Approach
Umbraco Cloud separates schema and content during deployment. Schema includes Document Types, Templates, Forms, Views, and config files. Content includes content items and media.
Deploy: Moves schema between environments using a Git client or the Umbraco Cloud Portal.
Transfer: Move content and media directly via the Umbraco backoffice.
Types of Deployments
Schema Deployments
Content and Media Transfers
Content editors do not need Umbraco Cloud Portal access. They can manage content through the backoffice, while developers handle schema deployments via Git.
Deploying Schema
The source and target environments must be in sync before transferring content and media. Deploy schema first to ensure consistency.
Transfer Content and Media
Content and media move between environments through the Umbraco backoffice. Content can be transferred from Local to Development and restored from Live or Staging.
The transfer and restore process is the same for Local to Cloud and between Cloud environments.
All configuration for Umbraco Deploy is stored in the appSettings.json file found at the root of your Umbraco website.
Environment Restart
Some deployments can trigger an Umbraco Cloud environment to restart. The table below outlines which actions initiate a restart.
Action:
Application Restart?
Manual Restart
From the Umbraco Cloud Portal, you can manually restart your environments.
Umbraco-cloud.json
The umbraco-cloud.json file defines deployment settings, identifies the current environment, and determines the next deployment target.
The name attribute in the umbraco-cloud.json can be updated to clarify deployment destinations in the Workspaces dashboard.
Restoring Content
When you have content on your Cloud environment and clone down your project to your local machine, you need to restore the content. You will also need to use the restore option when setting up new Cloud environments.
The restore option can be used to always ensure you work with the latest content when developing new features.
How to Restore Content
You can restore the content in the following ways:
Restore when starting up the project locally
The first time you run your project locally you will have the option to restore your content and media before going to the Umbraco Backoffice.
This will restore all the content nodes and any media dependencies.
Run the website locally.
Click the green Restore button to restore all the content nodes and media files.
Wait till the process completes. This might take a while depending on the amount of content and media you have on your project.
All your content and media is now available in the Umbraco Backoffice.
Workspace Restore
Use this option when setting up new Cloud environments. The Workspace restore option restores all the entities (content, media, forms, datasources, and prevalue sources from Umbraco Forms) of a workspace via the Backoffice.
Log in to the Umbraco Backoffice on the environment you want to restore the content and media.
Click ... and select Do something else or Right-click the Content Tree in the Content section.
Choose Workspace Restore.
Tree Restore
The Tree restore option restores all the entities available for the selected tree in that section. It's available in the Content, Media, Members, Forms (root node of Forms, Datasources, and Prevalue sources), or Translation (Dictionary menu if configured) sections. Using Tree Restore, you can choose to restore only content. This will restore any media that’s referenced in that content, but it won’t attempt to restore the full media library.
Log in to the Umbraco Backoffice in the environment you want to restore the tree.
Click ... and select Do something else or Right-click the Content Tree in the Content section.
Choose Tree Restore.
Using the Partial Restore option, you can restore single nodes from a tree (optionally with descendants) that you need to work with.
Deploy Dashboard
With the Deploy Dashboard, it is possible to get an overview of your Umbraco Deploy installation and perform Deploy operations.
In this article, you'll find an overview of the different sections on the Deploy dashboard and how they can be used.
Accessing the Deploy Dashboard
To access the Deploy dashboard, follow these steps:
Log in to the .
Select your project from the project list.
Choose the environment you want to work with (for example, Development, Staging, or Live).
Click Backoffice to open the Umbraco backoffice for that environment.
Navigate to the Settings section in the Backoffice. You will find the Deploy Dashboard at the end.
Deploy Status
Here you can see whether the latest deployment has been completed or failed. You can see the version of Umbraco Deploy you are running, and the last time an operation was run.
Deploy Operations
With the Deploy operations, you can run different operations in Umbraco Deploy.
Below you can read what each operation will do when run through the dashboard.
Update Umbraco Schema From Data Files
Running this operation will update the Umbraco Schema based on the information in the .uda files on disk.
Export Schema To Data Files
Running this operation will extract the schema from Umbraco and output it to the .uda files on disk.
Clear Cached Signatures
Running this operation will clear the cached artifact signatures from the Umbraco environment. This should not be necessary, however, it may resolve reports of schema mismatches when transferring content that has been aligned.
Set Cached Signatures
This operation will set the cached artifact signatures for all entities within the Umbraco environment. Use this when signatures have been cleared and you want to ensure they are pre-generated before attempting a potentially longer restore or transfer operation.
Download Deploy Artifacts
Running this operation will download a zip file with all the Deploy artifacts representing the Umbraco schema in the form of .uda files.
This operation is useful if you want to move to another Umbraco instance and migrate the data with you.
Configuration Details
In the Configuration details, you can see how Umbraco Deploy has been on your environment. You get an overview of the Setting options, the current value(s), and notes help you understand each of the settings. Updates to the need to be applied in the appsettings.json file.
Schema Comparison
The Schema Comparison table shows the schema information managed by Umbraco Deploy.
You can see a comparison between the information that is held in Umbraco and the information in the .uda files on disk.
The table shows:
The name of the schema
The file name
Whether the file exists in Umbraco
Whether the file exists
You can also view details about a certain element by selecting "View Details".
This will show the difference between entities stored in Umbraco and the .uda file stored on disk.
Deploying Deletions
On Umbraco Cloud, deletions are environment specific. To delete something entirely from your project, you need to delete it in all environments.
In this article, you can read about the correct way of deleting files, schema, and content from your Umbraco Cloud project.
When you have an Umbraco Cloud project, you might have couple of environments including a local clone of the project. Each of these environments have their own database. These databases store references to your content, media, and schema files, such as Document Types and Templates.
The databases are environment specific. During deployment across environments, Umbraco Cloud's engine compares schema files with database references using alias and GUID for accuracy. If something doesn't add up, for example, there is a mismatch between the database references and the files deployed, you will see an error. Learn more about this in the Troubleshooting section.
The workflow described above does not recognize deletions of content and schema from the database. You'll need to delete the content and/or schema on all your environments to fully complete the deletion.
The main reason not to delete schema and content on deployments is that it could lead to an unrecoverable loss of data.
Here's an example of what can happen when a Document Type is deleted and deployed:
A Document Type is deleted in the left-most mainline environment.
This deletion is then pushed to the Live environment, where many content nodes depend on the deleted Document Type.
When the deployment is completed, all those content nodes would be instantly removed.
In the scenario described above, there is no option to roll back because the Document Type they rely on no longer exists. To prevent such situations, manual deletion is necessary. You must actively decide on each environment for the process to occur. Below is the same scenario explained in more detail.
Example scenario
The following example will build in the scenario outlined above, calling the left-most mainline environment the Development environment. In addition to the deletion, additional changes that have been made will also be deployed.
Before you deploy the changes, the Development environment will show that the following changes are ready to be deployed:
Following the Activity log in the browser, you'll notice that the .uda file for the Document Type gets deleted. Additionally, other files with changes are copied to the Live environment.
Once the deployment is completed, the following changes has taken place:
The template is correctly updated.
The Document Type you deleted on the Development environment is still present in the backoffice on the Live environment.
The reason for the Document Type to still be there is, that the associated .uda file is deleted. The Document Type still exists in the database.
To delete the Document Type from your entire project, you need to delete it from the backoffice of the other environments. When the Document Type has been deleted from the backoffice of all the environments and no .uda file exist, it is fully removed.
If you save your Document Type during the process, a new .uda file is generated. This can recreate your deleted Document Type when deploying changes between environments.
Which deletions are deployed?
Every file that's deleted, will also be deleted on the next environment when you deploy. However, there are some differences depending on what you have deleted.
Here's an overview of what happens when you deploy deletions to the next environment.
Deleting Schema (Document Types, Datatypes, etc.)
Deleted
Not Deleted
Deleting a Template
Deleted
Not Deleted
Deleting Files (CSS files, config files, etc.)
All files are deleted in the next environment upon deployment.
Deleting Content and/or Media
Deletions of content and media won't be detected during deployments. You must manually delete them on each environment where removal is desired.
Deleting Backoffice Languages
Deleted
Not Deleted
Deleting the language in the backoffice on the target environment will ensure the environments are in sync.
Deployment Webhook
You can now configure a deployment webhook to be triggered upon successful deployments to any of your Umbraco Cloud environments. For example, when deploying from your local environment to one of your Cloud environments. Upon successful deployment, general information about the deployment will be posted in a JSON format to the specific URL you have configured.
Use cases
There are many use cases for deployment webhooks such as providing a detailed audit trail. Here are some scenarios where webhooks could be useful:
Any deployments to the Live site could be relevant for many parties in a company. Posting information about a deployment in internal communication channels like Slack is made possible using this feature.
Monitoring of the whole deployment cycle. A successful deployment might cause an error to show on the website. Integrating the webhook with other monitoring services, you could find out which deployment caused the issue.
Letting content editors know about particular deployments such as when a new Document Type was added. Will inform them that they can now use the new Document Type.
How to set up a webhook
From the Umbraco Cloud Portal go to Settings -> Webhooks
Select the environment to register a webhook.
Fill in the Webhook URL to which the data about a deployment should be posted to. An absolute URL with HTTP/HTTPS schema is an acceptable input to the field - ex. https://exampleURL.com
Sample data
General information about the deployment (to the configured environment) will be posted in JSON format to the URL (configured in the previous section).
Headers
The headers contain information about the payload in JSON format as well as a version of the payload.
Contents
Contents of the payload contain general information about the current deployment with links to the project in the Portal and the frontend of the environment. The final section lists deployed commits, including author, commit message, and changed files in the environment.
Advanced Setup: Deploy to multiple targets
Learn how to set up your CI/CD pipeline to include more than one target environment.
The sample will enable you to work on two different branches, where each of the branches deploys to a different environment.
With the CI/CD flow, you can trigger deployments to multiple environments simultaneously.
If a deployment is already in progress to a named environment, it will not be possible to trigger another until the first is done.
Replace the azure-release-pipeline.yaml with the file called azure-release-pipeline-more-targets.yaml. It's okay to rename azure-release-pipeline-more-targets.yaml.
The file can be found in these locations within the sample files:
Bash: /V2/bash/azuredevops/advanced
Ensure you don't have multiple YAML files that contain triggers (unless you designed your pipeline's workflow that way).
Fetch the aliases of the environments you want to target from the Cloud portal.
Insert the aliases into the following placeholders in azure-release-pipeline-more-targets.yaml:
##Your target environment alias here##
##Your other target environment alias here##
Fill in the projectId placeholder if you haven't already: ##Your project ID here##.
Look at the triggers for the pipeline:
Here, you can change when a deployment is triggered based on which branch is pushed to.
The pipeline needs to resolve the target based on the triggering branch, which is done in the following code:
The triggering branch is evaluated in the if [ "$(Build.SourceBranchName)" = "main" ]; then or elif [ "$(Build.SourceBranchName)" = "flexible" ]; then statement.
The code will write which alias is targeted and write a pipeline variable (targetEnvironment). This variable is used by steps later.
When updating the triggering branch names, it must be updated in the two mentioned places:
The trigger
The script
Replace the main.yml with the one called main-more-targets.yml. It's okay to rename main-more-targets.yml.
The file can be found in these locations within the sample files:
Media
All Media files for Umbraco Cloud projects are stored in Azure Blob Storage containers. Each environment has a separate container linked to it.
All media files on your Umbraco Cloud projects are stored using Azure Blob Storage. This means that the media files are not stored with the rest of your project files but in an external storage system.
To access the media files on your Umbraco Cloud project you can either:
Azure Blob Storage is an external storage system, that the Umbraco Cloud service uses to store all media files on Umbraco Cloud projects. To learn how you can connect to your Blob Storages, read the article.
Working with media locally
When cloning a Cloud environment to your local machine, run a content restore from the backoffice. This will retrieve a copy of all the media files from the Azure Blob Storage container connected to that environment.
You can learn more about how this works in the article.
Adding new media files to your local clone automatically uploads to the Azure Blob Storage container connected to the environment you are deploying to.
One Storage per Environment
Each environment on your Umbraco Cloud project has a separate Azure Blob Storage container. Each of your environments uses a storage container specific to that environment.
When you deploy between two environments on your Umbraco Cloud project, media files will be copied from one storage to the other. The files are transferred depending on which environment you are moving to and from.
As an example, consider a scenario where you are transferring content changes from your left-most mainline environment to your Live environment. Initiating the transfer copies all media files from your left-most mainline environment Azure Blob Storage container to the Live environment container. Once all content changes have been successfully transferred and the process is complete, the media libraries in both environments will be synchronized.
Media Folder
You will notice that there is a Media (wwwroot/media) folder in your project files. This folder usually holds all media files associated with a Umbraco project. As your Umbraco Cloud environments are all configured with Azure Blob Storage, the media files are not in this media folder.
Instead, you will find a project.assets.json file in the obj folder. This file is used to connect the Media library on your Cloud environment to an Azure Blob Storage container.
Environment Variables
In some cases, you might want to connect to your Azure Blob Storage container for the environments on your Umbraco Cloud project. This could be to clean up unwanted media files or to download the current contents of the library.
Instead of connecting to Azure Blob Storage, you can clone your Cloud environment locally to access the files.
You should only use the following approach when you do not have the option to clone down the environment to your local machine.
To do this, you need to know some details about the connection between the environment and the Azure Blob Storage containers. Below are the steps you need to follow, to locate the necessary variables:
Access on your Cloud environment.
Locate the Environment page in the top navigation.
Scroll to the section containing Environment variables.
There are 4 variables related to the Azure Blob Storage container in your environment:
Once you have the variables, use the guide to connect to your storage container.
Related Articles
Private NuGet Feed on Umbraco Cloud
A private NuGet feed is a package repository that is only accessible to a specific group of users, rather than being publicly available.
Private feeds are often used to host internal libraries or proprietary software within an organization.
NuGet is a package manager for the Microsoft development platform, including .NET. It gives you the ability to add, remove, and update libraries and tools in Visual Studio projects.
In this tutorial, we'll be covering how to set up a private NuGet feed with Umbraco Cloud.
Prerequisite
To follow along with this tutorial, you'll need the following tools:
A NuGet server such as
An Umbraco Cloud project on a standard plan or higher
Step 1: Create a NuGet package
The first part of this tutorial is to create and publish a NuGet package using Visual Studio.
To create and publish a NuGet package with Visual Studio, you will need to follow the .
Step 2: Create your own MyGet feed
Once the first step is completed, we need to create our own MyGet feed.
To create the MyGet feed, follow the
When you create the MyGet feed, it needs to be created as private.
Step 3: Publish your NuGet package
We will publish our NuGet package to your MyGet feed in the third step.
There are two ways to do so:
Go directly to your MyGet feed and upload the NuGet package.
Follow the .
Step 4: Add private MyGet feed on Umbraco Cloud
In the last step, we will add the private feed to our Umbraco cloud project.
To add the private feed to your Cloud project, follow the steps below:
Access the cloud .
Add your MyGet credentials as a Shared Secret.
Clone down your Umbraco Cloud project.
In the above code example, you can see that we are using the Key: "MYGET_PASSWORD" that we created in the previous step. We did that by using the Cloud Secrets Management feature on Umbraco Cloud.
Push the changes to your Umbraco Cloud project.
Congratulations, you've successfully set up a private NuGet feed with Umbraco Cloud using the cloud secrets management feature!
You can now use this feed to host and manage your own internal libraries or proprietary software. If you want to learn more about NuGet and how to use it, check out the official .
Hostname Pre-Validation
When adding a hostname to Umbraco Cloud, we ask you to point your DNS records to Umbraco Cloud.
Sometimes it's difficult to change the DNS record to point to Umbraco Cloud due to:
Existing Proxy/Web Application Firewall (WAF) in front of the hostname (hostname is proxied outside of Umbraco Cloud)
Requiring a zero downtime migration to Umbraco Cloud (hostname needs to be ready in Umbraco Cloud before pointing DNS records to Umbraco Cloud)
Add a hostname to Umbraco Cloud, activate the routing, and generate a certificate for the hostname before pointing it to Umbraco Cloud.
After the pre-validation completes, you can keep using an outside proxy or migrate the hostname fully to Umbraco Cloud. This is done by pointing the DNS records to Umbraco Cloud.
When to Use Hostname Pre-Validation
Use pre-validation in any of the following situations:
You're dealing with live or production domains that require 100% uptime.
The hostname will be proxied in front of Umbraco Cloud
You want to avoid the brief downtime that may occur while Transport Layer Security (TLS) certificates are being validated after pointing DNS to Umbraco Cloud.
How to Use Hostname Pre-Validation
The following steps outline how to use hostname pre-validation.
1. Enable Pre-Validation for the Hostname
After adding your custom hostname in the Umbraco Cloud Portal:
Navigate to Hostname Settings.
Toggle the Pre-Validation option to enable it.
Umbraco Cloud will provide two DNS records:
A TXT record used to verify domain ownership.
A CNAME record that is required for the TLS certificate issuance.
2. Add DNS Records at Your Domain Registrar
Log in to your DNS provider or domain registrar.
Add the records provided:
Record Type
Name
Value/Description
DNS propagation times can vary. Changes may take a while to become active globally. Tools like https://www.nslookup.io/ can help verify that your records are live.
3. Check Validation Status
Return to the Hostname page in Umbraco Cloud. You'll see a Hostname Pre-Validation status dialog showing the current status of your validation.
The status will change to Active when everything is set up correctly. The hostname is validated, and the TLS certificate is issued.
4. Point Your DNS to Umbraco Cloud / Activate proxying
Once the certificate is issued:
Update your domain's A record or CNAME to point to .
Update your proxy to serve traffic from Umbraco Cloud.
Your site will be accessible securely via HTTPS without any downtime because the certificate and routing setup are in place.
5. Disable Pre-Validation and Clean Up DNS Records
After the hostname is active and secure:
Go back to Hostname Settings and disable the pre-validation method.
Remove the TXT and CNAME records you added for pre-validation.
Umbraco Cloud will automatically handle future certificate renewals without the need for manual DNS management.
In a proxy case, you'll need to ensure that the URI http://{custom-hostname}/.well-known/acme-challenge/{token} is accessible.
Custom Certificate
If you plan to use a , the Hostname Pre-Validation method can be used to prove ownership of the hostname. This is done before binding the custom certificate.
You can do this by following these steps:
Enable Pre-Validation for the Hostname.
Add the TXT record provided to your Domain Name System (DNS) settings. The record will prove ownership of the domain.
Upload a custom certificate and set a binding to the Hostname.
Wait a couple of minutes, then disable Pre-Validation for the Hostname. The status will now show "Manual" for the Hostname.
Upgrade your projects manually
Learn how to manually upgrade your Umbraco Cloud project to the latest version of the Umbraco projects.
In some cases, you might need to upgrade your Umbraco Cloud project manually. It's similar to how you would upgrade any other Umbraco project but includes a few extra and important steps.
Umbraco Cloud project uses Umbraco Forms and Umbraco Deploy. This means there are some dependencies you need to consider when upgrading your Umbraco Cloud project manually.
Why and when would you do a manual upgrade?
By default, all Umbraco Cloud projects are automatically upgraded when we release new patches (like 8.8.1) to the Umbraco CMS. This also goes for Umbraco Forms and Umbraco Deploy.
When a new minor version (like 8.8) is released, the upgrade is applied to the Umbraco Cloud engine, and not to the individual projects. The same goes for the release of new major versions (like 10.0).
For minor and major versions, there will be an option on your left-most mainline environment to apply the upgrade. The Umbraco Cloud engine will take care of the entire process, and you only need to ensure everything works when upgrade is complete.
It is recommended to use the automatic and semi-automatic upgrade options provided to you as part of your Umbraco Cloud project. It's also possible to upgrade your Umbraco Cloud project manually. This can be done with both patches and minor and major versions.
Manually upgrading your Cloud project allows you to test out new features and functionality on your local machine before applying them to your Cloud environments.
Product dependencies
When manually upgrading a Umbraco Cloud project, it is important to consider the dependencies that exist between the products on Umbraco Cloud. To fully benefit from Umbraco Cloud, be sure to check for these dependencies before upgrading to a new minor or major version of Umbraco CMS.
Upgrade order
When you are manually upgrading your Umbraco Cloud project and need to upgrade two or more products, follow this order:
Umbraco CMS
Umbraco Forms
Umbraco Deploy
Make sure to follow the steps carefully when upgrading your Umbraco Cloud project to the newest version of Umbraco CMS.
There are no Umbraco Cloud-related files to be aware of when upgrading Umbraco Forms. Therefore you can follow the general Umbraco Forms upgrade notes. When upgrading Umbraco Forms, be sure to also consult the to learn about potential breaking changes and common pitfalls.
Product Dependencies
Which version of Umbraco Forms and Umbraco Deploy you use on your Umbraco Cloud project depends on the Umbraco CMS version used.
Dependencies on Umbraco Cloud
This article gives an overview of the dependencies between the products on Umbraco Cloud.
The products are:
Umbraco CMS
Umbraco Forms
Umbraco Deploy
In the table below, you can see which version of Umbraco Forms and Deploy you should be running on your Umbraco Cloud project. Those depend on which version of Umbraco CMS you are running.
Umbraco CMS
Umbraco Forms
Umbraco Deploy
Quick Links
Create a Cloud Project
Starting your journey with Umbraco Cloud begins with creating your first project. A streamlined process designed to get you up and running quickly with all the power of Umbraco and the cloud, without complex setup.
You can either create a or a project from the . Both provide access to the core Umbraco Cloud experience, but there are key differences to keep in mind depending on your goals.
Umbraco Cloud Trial Project
A trial project provides an opportunity to explore the Cloud platform without any commitment.
Environments
Environments are a core part of your Umbraco Cloud project. This is where you develop, write, build, and eventually publish your website.
An Umbraco Cloud environment is defined as a workspace and is also a Git repository. When you have more than one environments on your project, these environments act as branches of the main repository.
Umbraco Cloud uses a deployment model that relies on Git and other core technology. This gives you the option to move both content and structure files from one environment to another. Learn more in the .
You can have multiple environments in your Umbraco Cloud project, with two types available: Mainline Environments and Flexible Environments.
The image below shows a Cloud setup including two mainline environments and one flexible environment connected to the left-most mainline environment.
Users
An article explaining how Umbraco Users are working on Umbraco Cloud.
On Umbraco Cloud, users work in almost the same way as on a normal installation of Umbraco. However, there are a few more settings available for the backoffice users on Umbraco Cloud.
In this article, we will show how users work, as well as explain the different settings for users on Umbraco Cloud.
Umbraco ID
Umbraco ID is a centralized login for all users on Umbraco Cloud, both team members and Umbraco Backoffice users. It is to log in to the Umbraco Cloud Portal, projects, as well as cloning down a project to your local machine.
Change your Plan
This article explains how to change your Umbraco Cloud plan. You can upgrade to a higher plan or downgrade to a lower plan depending on your project needs.
Before you change your plan
Before you change your Umbraco Cloud plan, consider the following:
IP address change
Managing Transport Security
Once you have added your custom hostnames to your Umbraco Cloud project, it's possible to configure certain transport security options for your custom hostnames. These options all relate to the traffic that goes through your hostname from the origin (Umbraco Cloud) to the end-user. This includes the protocols and encryption used to transport your website and assets from the webserver to the browser.
Currently, these options are available:
HTTP/2 (default: on)
TLS 1.3 (default: off)
Transferring Content, Media, Members, and Forms
How to restore content in Umbraco Deploy using the deployment dashboard
After deploying changes to the metadata, it's time to transfer your content and media. This is done from the Umbraco Backoffice.
Content and media transfers are flexible. You control which content nodes or media items to transfer, all in one go, a few at a time, or a single node.
Transferring content will overwrite any existing nodes on the target environment. Content transfers will transfer the items that you select in the "source" environment to the "target" environment the same as it was in the "source". This means that if you have some content on the target environment already, this will be replaced by the new content from the source environment.
Important: Content and Media transfers will only work if you've deployed all changes to your metadata beforehand. Please refer to our documentation on how to deploy metadata from either or .
Product Upgrades
This document describes when and what product updates are rolled out on Umbraco Cloud.
What products are auto-upgraded?
Umbraco CMS
Receive support and platform updates directly from Umbraco HQ.
Align with best practices for security, scaling, and deployment.
Prefer a different cloud provider or on-premises setup.
Hosting infrastructure
Managed by Umbraco on Azure
Managed by you (Azure, Amazon Web Services (AWS), on-prem, etc.)
Schema is stored in a Git repository. These are deployed between environments using a Git client or the Umbraco Cloud Portal.
Content and Media items are not stored in the Git repository. They must be transferred directly from the Umbraco backoffice using the Queue for Transfer option. Once queued, use the Deployment Dashboard in the Content section to complete the transfer.
Ensure you don't have multiple YAML files that contain triggers (unless you designed your pipeline's workflow that way).
Fetch the aliases of the environments you want to target from the Cloud portal.
Go to the repository in GitHub, and navigate to the Settings section.
Expand Secrets and Variables in the left-hand menu titled Security and click on Actions.
Go to the Variables tab.
Add a repository variable called FLEXIBLE_ENVIRONMENT_ALIAS and enter the environment alias you selected earlier.
If you followed the GitHub guide, you should already have a variable called TARGET_ENVIRONMENT_ALIAS.
Next, look at the triggers for the pipeline:
Here, you can change when a deployment is triggered based on which branch is pushed to.
The pipeline needs to resolve the target based on the triggering branch. This is done with the following code:
The triggering branch is evaluated in the statement if [[ "${{ github.ref_name }}" == "main" ]]; then or elif [ "${{ github.ref_name }}" = "flexible" ]; then.
The code will write which alias is targeted and write a pipeline variable (targetEnvironmentAlias). This variable is used by jobs later.
When updating the triggering branch names, it must be updated in the two mentioned places:
The trigger
The script
# Trigger when committing to main or flexible branch trigger:batch:truebranches:include:-main-flexible
stages:
# resolve which environment to deploy to based on the triggering branch
- stage: resolveTarget
displayName: Resolve Target Environment
jobs:
- job: setTargetEnvironment
steps:
- script: |
echo "Triggering branch: $(Build.SourceBranchName)"
if [ "$(Build.SourceBranchName)" = "main" ]; then
echo "Target is: $(targetEnvironmentAlias)"
echo "##vso[task.setvariable variable=targetEnvironment;isOutput=true]$(targetEnvironmentAlias)"
elif [ "$(Build.SourceBranchName)" = "flexible" ]; then
echo "Target is: $(flexibleTargetEnvironmentAlias)"
echo "##vso[task.setvariable variable=targetEnvironment;isOutput=true]$(flexibleTargetEnvironmentAlias)"
else
echo "no target environment defined for branch: $(Build.SourceBranchName)"
exit 1
fi
name: setTargetEnvironmentValue
# Trigger when committing to the main branch
on:
push:
branches:
- main
- flexible
workflow_dispatch: # Allow manual triggering of the workflow
jobs:
# resolve which environment to deploy to based on the triggering branch
set-env:
runs-on: ubuntu-latest
outputs:
targetEnvironmentAlias: ${{ steps.set.outputs.targetEnvironmentAlias }}
steps:
- name: Resolve Target Environment
id: set
run: |
echo "Triggering branch: ${{ github.ref_name }}"
if [[ "${{ github.ref_name }}" == "main" ]]; then
echo "Target is: $leftmostMainline"
echo "targetEnvironmentAlias=$leftmostMainline" >> $GITHUB_OUTPUT
elif [ "${{ github.ref_name }}" = "flexible" ]; then
echo "Target is: $flexible"
echo "targetEnvironmentAlias=$flexible" >> $GITHUB_OUTPUT
else
echo "no target environment defined for branch: $(Build.SourceBranchName)"
exit 1
fi
env:
leftmostMainline: ${{ vars.TARGET_ENVIRONMENT_ALIAS}}
flexible: ${{ vars.FLEXIBLE_ENVIRONMENT_ALIAS }}
Select Open Umbraco to go to the Backoffice.
Select the environment from the Restore this workspace from dropdown.
Make sure that your environments have the same schema.
Click Restore from <environment_name> and wait till the process completes. This might take a while depending on the amount of content and media you have on your project.
Click Okay to complete the process once the restore is done.
Right-click the Content tree and choose Reload to see your content in the tree.
Select the environment from the Restore this tree from dropdown.
Make sure that your environments have the same schema.
Click Restore from <environment_name> and wait till the process completes. This might take a while depending on the amount of content and media you have on your project.
Click Okay to complete the process when the restore is done.
Right-click the Content tree and choose Reload to see your content in the tree.
The easiest way to start with an Umbraco Cloud project is to take a 14-day free trial. The project is automatically created, and you are ready to start within a few minutes.
Since everything is already set up for you, it is recommended that you get to know your project before you start building.
Yes. You can upgrade to a paid project within the 14-day trial period without losing your work. You can upgrade your trial to a paid plan within the Umbraco Cloud portal.
Umbraco Cloud provides a seamless transition from a trial to a paid plan. You can adjust your plan or resources as your project evolves.
Creating a Project from the Umbraco Cloud Portal
You can create a paid project from the Cloud Portal, which offers the latest features and full control.
To create a project from the Umbraco Cloud Portal:
A mainline environment serves as the root deployment pipeline, responsible for managing code and content flow. Each mainline environment is a part of the left-to-right deployment workflow.
The left-most mainline environment is where you can connect to your local machine using Git. This environment is often called the Development environment.
The right-most mainline environment is your live website, often called the Live or Production environment.
Flexible Environments
A flexible environment is an environment that branches off a mainline environment. It is positioned vertically from the mainline deployment flow.
The flexible environment can only be connected to the left-most mainline environment and changes can only be pushed to the Mainline Environment it derives.
Technically, the flexible environment is connected only to its mainline environment using a Git remote. This ensures that changes follow a structured path while allowing flexibility in development workflows.
Each environment on Umbraco Cloud has both a Git repository and a folder with your actual live site. The Git repository is what you clone down when you work with the project locally, and it's where your changes are pushed to.
The live site (/site/wwwroot/) contains the files used to show your website to the world. When pushing changes from your local machine, they are pushed to the Git repository (/site/repository/). When this finishes successfully, the changes are copied into the live site.
Configuration files
An appSettings.json file holds all configurations for the Umbraco CMS project within the Cloud project. This file follows ASP.NET standards as they are tied to the Umbraco CMS installation.
It is possible to set up specific configurations for each environment:
Clone the appSettings.json file.
Rename it by adding the environment name: appSettings.{EnvironmentAlias}.json.
The EnvironmentAlias is fetched from the Environment variable named DOTNET_ENVIRONMENT. This variable can be found in the Environment Variables section of Kudu on the environment. You can read more about ASP.NET Configuration in the official Microsoft documentation.
The value of the DOTNET_ENVIRONMENT environment variable can be managed through the Advanced settings in the Configuration section of the Cloud Portal.
Learn more about how to transform configuration files in the Config Transforms article.
When you start up the Umbraco Application, ensure you load the correct JSON file as per the ASP.NET Configuration in the official Microsoft documentation.
Team Members
All the team members you add through the Umbraco Cloud Portal will also be added as backoffice users in your environments. You can also add users directly in the backoffice of your Umbraco Cloud environments. If you do this, the user will not have the option to deploy changes between the environments.
Read more about this and team member roles in the Team Members article.
SQL Database
Each of your Umbraco Cloud environments has its own SQL Azure database. You have full access to the databases, and you can create custom tables as you'd expect from any other hosting provider.
Learn more about how to connect to your Umbraco Cloud databases in the Database article.
Power Tools (Kudu)
Aside from viewing the files when cloning down the project to your local machine, you also have access to Kudu (Power Tools).
Kudu is a dashboard that allows you to browse, view, and edit all the files in your environments. We recommend using the tool only when you are following one of our guides.
In the Power Tools article, you can read more about how to access the dashboard, and how we recommend using it.
Environment History
Each of your Umbraco Cloud environments has a Git repository and therefore also a Git history. We've made a simplified view of this Git history in the Cloud Portal. The History is found via the action menu available on each environment in the environments overview on your project.
In the History view, you'll be able to see what file changes have been made in the environment.
A Cloud setup including 2 mainline environments and 1 flexible environment connected to the left-most mainline environment
When working locally the initial login will go through Umbraco ID and the online login flow. After the initial login, you can set a password on your user or create a new local login for the backoffice.
Adding users on Umbraco Cloud
There are two ways of adding a user to your backoffice on Umbraco Cloud.
You can add them as a team member) from the project portal on Umbraco Cloud.
By default, when added as a team member, they are added as users to the backoffice of all the environments as administrators.
Users can also be invited directly from the backoffice of your Umbraco Cloud project, from where you can give them different permissions.
Check out the Users article for an in-depth explanation about Umbraco users in general.
Users are environment-specific on Umbraco Cloud. This means that users are not transferred over when doing a deployment to the next environment. They need to be added to each environment on Umbraco Cloud where their access is needed.
Invite User through the Umbraco backoffice
As mentioned, it is possible to invite new Users to your Umbraco Cloud project through the backoffice.
To invite a User you need to do the following:
Go to the backoffice of your Umbraco Cloud project.
Go to the Users section in the backoffice.
Click on the Invite User button.
Enter the Name, Email, add a User Group to assign access and permissions, and enter a new Message for the invitation.
Invite User
Accept invitation
Once the User has been invited they will receive an invitation for the project.
If the invited person already has a user on Umbraco Cloud they will see the invitation in the project portal under "Project Invites".
If the User being invited does not have a User on Umbraco Cloud, they will receive an email asking them to create one.
New User Invitation
Once the User has been created, it is now possible for them to log in to the Umbraco Cloud portal.
From here they will be able to see a pending invitation to the project they have been invited to.
Once the invitation has been accepted, they can now access the project through the Umbraco Cloud portal and access their site from there.
Project overview
User group permissions for transfers and restores
On Umbraco Cloud, it is possible to control which users have access to transferring and restoring content and media on your Umbraco Cloud project.
This can be done when creating a new User Group or when editing an existing group.
You can decide whether a specific User Group has permission to do restores and queue content for transfer to the next environment.
It is also possible to get Granular control on a per-node basis to restrict restores and transfers of specific content on your site. This can help avoid mistakes and ensure that the proper workflows are followed.
Set up Permissions for transfers and restores
There are two ways that you can set up these permissions:
Create a new User Group
Edit an existing one
To create a User Group, go to the Users section of the backoffice.
Click on "Groups" in the right corner, from here you are able to either create a new User Group or edit an existing one.
User Groups
Click "Create group"
Scroll down and go to the "Content" heading in the "Default permissions" section. Here you can see three options:
User Groups
Decide whether the users in the new User Group can restore items for the whole workspace, restore items for a tree, or partially restore items and click Save.
To edit an already existing User Group:
Go to the User Group you want to edit, e.g Editors or Writers.
Update the permissions and click Save.
Granular Permissions
It is also possible to set Granular permissions for a specific content node on your Cloud project.
You can set the permission when you are creating or editing an existing User Group.
Add the setting for Granular permission for your content nodes at the bottom of the User Group.
Granular permission
Click "Add".
Choose the content node which you want to set the Granular settings for.
Granular content node
Set permissions for restore, partial restore, and queueing content for transfer.
Granular permission
— Changing a plan for a project will change the outgoing IP of the project. If your solution has an external service that requires whitelisting the outgoing IP, visit the
documentation first.
Plan constraints — Review the environment limits for each plan to ensure the target plan supports your current number of environments.
Pricing — Check the Umbraco Cloud pricing page to understand the cost difference between plans.
When changing your plan, log files such as trace logs will not be transferred to the new environment.
If you need to retain log history, download and back up the log files before changing your plan. For more information on accessing logs, see the Log files article.
Plan Types
Umbraco Cloud:
Starter → Standard → Professional → Enterprise
Heartcore:
Starter → Standard → Professional → Enterprise
Enterprise plans require contact through Umbraco Support and are not available for self-service changes.
Environment Limits
Each plan supports a specific number of environments. If your project exceeds the target plan's environment limit, the downgrade will be blocked until you remove environments.
Umbraco Cloud (supports extra paid environments):
Starter: 1 included, max 2
Standard: 2 included, max 3
Professional: 3 included, max 4
Enterprise: 3 included, max 4
Heartcore (extra environments allowed):
Starter: 1 included
Standard: 2 included
Professional: 3 included
Enterprise: 3 included
If a Heartcore project exceeds the target plan's limit, the downgrade is blocked entirely.
Locate the project you want to upgrade in the project overview.
On the project card, open the Management dropdown (left-side).
Select Change Plan.
Change Plan menu option
Review the available plans, pricing, and limits.
Click Select Plan on the plan you want to upgrade to:
Starter → Standard or Professional
Standard → Professional
[Optional] Choose a dedicated option in the next step.
Dedicated option on Cloud
Review the Summary to confirm your selections.
Summary of project upgrade.
Click Upgrade Project to apply the new plan.
When changing your plan, the project ID is appended with -1. If -1 already exists, it is removed. Update any references to your project ID in external services or configurations.
How to Downgrade your Plan
Downgrading your plan is handled through the same Change Plan interface. However, you need to be aware of downgrade rules and restrictions.
Downgrade Rules
Before downgrading, review the following rules:
Too many environments → Hard block
If your project has more environments than the target plan supports, the downgrade is blocked entirely. Remove environments until your project meets the target plan's environment limit, then retry the downgrade.
Example message: "Your project has 4 environments but this plan only supports up to 3. Please remove 1 environment before downgrading."
Losing dedicated resources → Warning
If you're downgrading from dedicated to shared hosting, you'll see a warning that your dedicated resources will be switched to shared hosting.
Extra environment costs → Warning
If your project has paid extra environments beyond the plan's included count, you'll see a warning about additional monthly costs.
Example message: "Your extra environment will incur an additional cost of €100 on top of the plan price."
Locate the project you want to downgrade in the project overview.
On the project card, open the Management dropdown (left-side).
Select Change Plan.
Review available plans. Plans below your current plan are marked as downgrades.
Click Select Plan on the plan you want to downgrade to.
Review any warnings about downgrade restrictions.
Review the Summary to confirm the changes.
Click Downgrade project to apply the downgrade.
Summary of project downgrade.
Your new plan takes effect immediately. From the next billing period, you are charged at the new, lower plan rate.
Billing
Upgrades: The price difference is prorated and added to your next invoice. If you upgrade mid-month, the remaining days are charged at the new plan's rate.
Downgrades: Your new plan takes effect immediately. Since you've already been billed for the current month, there is no refund for the remaining days. From next month, you are charged the new, lower price.
Automatic Plan Upgrades
If your project exceeds usage limits, you are automatically upgraded to a suitable plan to keep your website running smoothly.
You receive an email notification to the project owner and technical contact(s). The upgrade appears on your next bill and takes effect on the upgrade date.
Once upgraded, you gain access to all features in the new plan. See Umbraco Cloud pricing for feature details.
Web Application Firewall Sensitivity (default: off)
Managed Challenge (default: off)
Continent Managed Challenge (default: none)
When a new custom hostname is added to a Project it will have the default settings applied. But you can change the defaults for your Project, so new custom hostnames will get the default settings you have chosen.
HTTP/2 Explained
The first usable version of HTTP was created in 1997. Because it went through different stages of development, this first version of HTTP was called HTTP/1.1. This version is still in use on the web. In 2015, a new version of HTTP called HTTP/2 was created. HTTP/2 progressively enhances your website’s performance. When a browser supports HTTP/2, Umbraco Cloud will take full advantage of HTTP/2 performance benefits end to end. For older browsers or non-HTTPS requests, the traffic will fall back to HTTP/1.1.
You don’t need to choose between better performance and backward compatibility. This is why HTTP/2 is enabled by default for all new custom hostnames added to a Umbraco Cloud project.
TLS 1.3 Explained
Transport Layer Security (TLS) TLS 1.3 is the newest, fastest, and most secure version of the TLS protocol. SSL/TLS is the protocol that encrypts communication between users and your website. When web traffic is encrypted with TLS, users will see the green padlock in their browser window. By turning on TLS 1.3, traffic to and from your website will be served over the TLS 1.3 protocol when supported by clients. The TLS 1.3 protocol has improved latency, new features, and is supported in Chrome (starting with release 66), Firefox (starting with release 60).
Minimum TLS Version Explained
The minimum TLS Version only allows HTTPS connections from visitors that support the selected TLS protocol version or newer. This option relates to the TLS versions mentioned above and the current default, which is TLS 1.2. If you want your website traffic to only use TLS 1.3 you can change the minimum version. But be mindful of the implications that this might have (see browser support above). You don't need to change the minimum version to use TLS 1.3.
WAF Explained
A Web Application Firewall (WAF) is a security solution designed to protect web applications by filtering and monitoring HTTP traffic between them and the Internet. Common attacks like cross-site scripting, SQL injection, and file inclusion are mitigated by acting as a shield between the web application and potential threats. For more detailed information, refer to our WAF section.
Web Application Firewall Sensitivity
The Umbraco Cloud WAF supports sensitivity configuration, extending the default WAF protection. The default WAF and WAF sensitivity configuration options don't interact and can be controlled separately. It is recommended to configure WAF sensitivity early in the project and adjust it based on the performance.
Sensitivity levels
Low severity configuration will block malicious requests with high confidence - blocks fewer requests.
High severity configuration will block malicious requests with medium confidence, providing stricter filtering - blocks more requests.
Off configuration will not block any requests.
Managed Challenge
A managed challenge is a lightweight JavaScript-based page that detects users without user input. After successfully passing a challenge, the user will receive a cookie. Users with a cookie won't be asked to pass another challenge for 30 minutes anywhere on the project/hostname.
Enabling the Managed Challenge presents an automatic CAPTCHA to all requests for the project/hostname. The managed challenge will ensure that only human users will be able to access the content on the website. Presenting an automatically managed CAPTCHA is useful in cases when a website is experiencing higher load. Higher load on the website can be caused by any reason, such as, DDoS attack, aggressive scraped by bots, or high demand. Enabling a managed challenge will ensure that all of your website's resources are delivering value to the end users.
Continent Managed Challenge
Selecting continent(s) in the list will present a managed challenge to all traffic from the continent(s). Continent-based managed challenge presents a challenge meant to only pass through the human users requesting the website from selected continents. A continent-based managed challenge is useful when a website's primary users live on a specific continent. By presenting a challenge to selected continents, you can block all malicious traffic from the continent while allowing humans to pass through.
All continents are supported, as well as presenting a challenge to all requests from the Tor network.
Be aware that this will also block services you may want, such as Google's Search indexing bot.
Plan specific features
Access to the different options varies depending on the Umbraco Cloud plan your project is on. Currently, the features are available as follows:
Starter: HTTP/2
Standard: HTTP/2, TLS 1.3, Minimum TLS Version
Professional: HTTP/2, TLS 1.3, Minimum TLS Version
Security subpage
Click Security from the Settings dropdown on your Umbraco Cloud Project. The Security settings are scoped per environment, so if you have multiple environments and add your custom hostnames to different environments you can select the environment at the top of the page.
Aside from the environments, the Security page is divided into 'Default Settings' and 'Hostname Specific Settings'. Use the Default Settings to configure what should be applied to new and existing custom hostnames by default.
Security Settings Umbraco Cloud
If you want to have different security options for different custom hostnames, select the custom hostname under Hostname Specific Settings and adjust the options. This might be useful if you want to test the different options on another custom hostname than your primary hostname.
Hostname Specific settings
Cipher Suite Management
On the security page, you can enable or disable individual cipher suites for your project. This gives you full control over which encryption methods your project accepts.
Each cipher suite is labeled with a security recommendation:
Modern: Highest security with Authenticated Encryption with Associated Data (AEAD). Recommended for maximum protection.
Compatible: Balanced security with broader client support.
Legacy: Basic security for outdated clients.
New projects have legacy cipher suites disabled by default. Enable them only if you need to support older clients that cannot use modern encryption.
You can manage cipher suites under the minimum TLS version in the Ciphers drop-down:
Enable or disable Cipher Suites for your project.
Like the other Hostname Specific Settings, you can enable/disable specific ciphers for your custom hostname based on your needs.
Step-by-step
Let’s go through a content transfer step by step. Imagine you’ve finished working on new content for your project locally and you are ready to transfer the changes to your Cloud Development environment.
You want to transfer the whole site. You start from the Home node and choose to transfer everything under it:
Right-click ... next to the Home node in the Content tree.
Select Queue for transfer.
Alternatively, if you are in the Home page editor, you can go to the Actions dropdown and select Queue for transfer.
Choose if you want to include all items below the chosen page or only transfer the chosen node. Alternatively, right-click the Content tree and select Queue for transfer to transfer all your content at once.
Click Queue.
Select Open transfer queue. The Workspaces dashboard opens.
You will be able to see which items are currently ready to be transferred - this will include both content and media that you've queued for transfer.
Click Transfer to Development and monitor the progress of the transfer.
Once the transfer is completed, you will see a confirmation message stating that the transfer has succeeded.
Media Items
Media items are transferred the same way as content:
Right-click the items in the Media section and select Queue for transfer. Alternatively, right-click the Media tree and select Queue for transfer to transfer all your media at once.
Click Queue.
Select Open transfer queue. The Workspaces dashboard opens.
To be able to transfer Members and Member groups make sure that AllowMembersDeploymentOperations is configured to transfer and TransferMemberGroupsAsContent is set to true. This needs to be done in the appSettings.json file
Once the settings have been configured Members can be transferred in the same ways as both content and media from the Members section:
Right-click on the Members or the Member Groups folder and choose Queue for transfer.
Click Queue.
Select Open transfer queue. The workspace dashboard opens.
Click Transfer to Development.
Umbraco Forms
You'll need to ensure the TransferFormsAsContent the setting is set to true in the appsettings.jsonfile:
Once the setting has been added to the source and target environment, Forms can be transferred the same way as content and media:
Right-click the items in the Forms section and choose Queue for transfer. Alternatively, right-click the Forms tree and select Queue for transfer to transfer all your Forms at once.
Click Queue.
Select Open transfer queue. The Workspaces dashboard opens.
Click Transfer to Development.
This does not include entries submitted via the forms.
TransferDictionaryAsContent
Deploy can be configured to allow for backoffice transfers of dictionary items instead of using files serialized to disk by setting TransferDictionaryAsContent as true.
When changing the values forTransferDictionaryAsContent and TransferFormsAsContent to true,remove any .uda files for Forms and Dictionary entities that have been serialized to disk. These will no longer be updated. By deleting them you avoid any risk of them being processed in the future and inadvertently reverting a form to an earlier state.
Schema Mismatches
Sometimes a content transfer is not possible. For example, adding a new property to the HomePage Document Type that's missing in another Cloud environment throws an error. The error contains details on how to fix it.
clone dialog
If you encounter this issue while transferring content, refer to the Schema Mismatches article. This article provides guidance on resolving these issues.
Internal Umbraco Cloud services (generally these updates will not affect running websites but in some cases, if they do we will notify Umbraco Cloud users via the status page)
The decision to roll out an upgrade will be made no later than the Thursday prior and the status page will be updated accordingly
A product upgrade will be rolled out if:
A fix needs to be shipped due to a critical issue in any product
A new version of Umbraco CMS is ready for release
A new version of Deploy is ready for release
Umbraco Cloud reserves the right to roll out an emergency product fix to fix a critical issue at any time
Your project will not be auto-upgraded if your environments aren't running the same minor version. For example, when upgrading a project to a new minor version, one environment may be running 10.6.x while another runs 10.7.x.
The auto upgrade rollout process
Before a live upgrade is rolled out on Umbraco Cloud:
Release notes, special upgrade instructions and/or blog posts are published when necessary
Update Umbraco Cloud’s site creation engine with the new version so that all new sites are built with the latest version
Run the auto-upgrader on Umbraco Cloud on a subset of internal test sites to verify there are no issues
Run the auto-upgrader on all Umbraco Cloud sites
The process of auto-upgrading a Umbraco Cloud project
This describes how a Umbraco Cloud project is auto-upgraded:
The upgrade payload will have been created for the specific product(s) being upgraded
The payload is a set of files (such as DLLs, and other ASP.NET website files)
The upgrader will verify that the home page of all the environments in the mainline environment is healthy, meaning they don’t return an HTTP status error. If all environments are ok, it will proceed.
The upgrader will take a snapshot of the left-most environments home page including its HTTP status code result and its HTML contents.
The payload is deployed to the left-most environments Git repository and committed with a tag for the product version being updated. This new Git repository commit will replace the Umbraco product assembly (DLL) files along with other product files such as files located in /umbraco, /umbraco_client folders
The normal Umbraco Cloud deployment process is invoked and the repository files are deployed to the website
The upgrader will automatically ensure the web.config version and the database version are updated so that the Installer/upgrade page is not shown
The upgrader will verify that the new HTTP status code returned from the left-most environments home page is OK and will verify that the HTML contents of the home page match that of the snapshot originally taken.
If either of these tests fails we will be notified and Umbraco will take appropriate measures to roll back the site to its previous state
The failed upgrade is then tracked for reporting and the customer will be notified if necessary
When the left-most environment is upgraded successfully, the upgrader will continue this same process for the next environment in the chain.
Changes for patches might appear on left-most environment, even if they have already been applied to Live. The environments will not be synchronized during the upgrade process. This is because synchronization risks pushing other apparent changes from one environment to another. Those changes will need to be deployed. Once that has been done, the environments will be in sync again.
How do baseline updates work?
The upgrade process for patch and minor versions is the same for projects with child projects created off them. The difference is that we always upgrade the baseline as the first project, and afterward we upgrade the child projects. This ensures that any updates done from the baseline will also send the upgrade to the children.
What is a breaking change?
It is important that developers understand what is considered a breaking change in Umbraco products. In most cases, an auto-upgrade will not have any breaking changes and we strive to ensure this is the case. However, in some rare cases, developers may be using Umbraco's internal code not intended for public consumption. In some releases, that code may change. It is important for developers to understand the risks of using Umbraco code that is not considered a breaking change when it is updated. This may directly affect a site that is auto-upgraded.
Yes. You can enable or disable automatic minor and/or patch upgrades from the Cloud Portal:
Go to your Umbraco Cloud project.
Navigate to Configuration -> Automatic Upgrades.
Toggle Automatic Minor Upgrades or Automatic Patch Upgrades on or off.
Minor Upgrades
New projects have automatic minor upgrades enabled by default. When disabled, you are responsible for upgrading to new minor versions manually. See the Minor Upgrades article for details.
Patch Upgrades
By default, all Umbraco Cloud projects are automatically upgraded when new patch versions are released, including security patches. This ensures all sites run the most stable and secure versions of our products.
If your project requires full control over the timing of upgrades, you can disable automated patch upgrades.
When you disable automated patch upgrades, you are responsible for keeping your project up to date. Falling behind on patches may affect your eligibility for support and can expose your project to known security vulnerabilities.
We reserve the right to patch critical vulnerabilities. This ensures the Umbraco Cloud platform remains stable and secure.
Related Information
If your Cloud website uses IP filtering on the origin, ensure the correct IP addresses are allowlisted to maintain connectivity during upgrades. See Static Outbound IP Addresses for Umbraco Cloud for more details.
SMTP Settings
Learn how to configure SMTP settings for your Umbraco Cloud project to enable email functionality for workflows, user invitations, and password resets.
In many cases, you might want to send emails from your Umbraco Cloud project. This could be for inviting users to the Backoffice or as part of an Umbraco Forms Workflow. To do so, you need a SMTP server and must configure it in your appsettings.json file.
SMTP servers are not included with Umbraco Cloud projects. You will need to set up your own SMTP server elsewhere and configure it with your Umbraco Cloud project.
Why Configure SMTP?
Configuring an SMTP service for your Umbraco Cloud project enables email features like user invitations, password resets, and email workflows in Umbraco Forms.
Umbraco Forms
Legacy Umbraco
If your Cloud project runs Umbraco version 7 or 8, configure the SenderEmail in the <notifications> section of the web.config file. For more information, see the .
When working with Umbraco Forms, you can set up email workflows. This allows you to create forms that send out emails. For example, a contact form where customers can directly email you.
To set up an email workflow, you must configure the SMTP service. In some cases, you may also need to configure a SenderEmail for notifications.
Configure SenderEmail in the appsettings.json file under Umbraco:CMS:Global:Smtp. For more details, see the section in the Workflow Types article.
Backoffice Users
You need to configure an SMTP service for Backoffice users in the following cases:
Inviting a New User - When adding a user to your project from the Backoffice, an email invitation is sent. If you haven't set up an SMTP service, a fallback ensures the email is still delivered. However, this fallback only applies to user invitations.
Password Resets - If a Backoffice user forgets their password, they must request a reset link via email. This feature requires an SMTP service to be configured, as no fallback is available.
By default, the option to request password resets for Backoffice Users is disabled on Umbraco Cloud projects. This is mainly to ensure that your Backoffice login stays in sync with your Umbraco ID.
You can reset your Umbraco ID password from the Umbraco Cloud login page. Find more details on Umbraco ID, see the article.
Configure SMTP Settings
Consider the following services for configuring your SMTP settings:
- quick to set up and developer-friendly.
- quick to set up.
- mainly for developers, as it is a bit more on the technical side.
To configure SMTP:
Set up the SMTP server.
Configure the service as follows:
For Umbraco 10 and above, configure SMTP in the Umbraco:CMS:Global:Smtp section in your appsettings.json file.
To configure the SMTP service, enter the following details:
From: The default email address that will send out emails.
To keep your SMTP password secure, use the feature. This hides the setting by using the key: UMBRACO__CMS__GLOBAL__SMTP__PASSWORD.
After configuring these settings, you can send emails from your Umbraco Cloud project. For more information on SMTP configuration, see the article.
Test your SMTP configuration by running a from the Umbraco Backoffice.
Advanced Setup: Deployment options
Learn how to use the deployment options available with the version 2 endpoints for CI/CD.
This provides control over the CI/CD deployment process within the isolated instance before your code is pushed to the Cloud environment.
Skip preserving umbraco-cloud.json
The Umbraco Cloud platform controls the umbraco-cloud.json file. It holds a description of the environment relationships used for content deployments. The configuration needed to be able to log in to the backoffice locally with Umbraco ID is also part of this file.
The CI/CD deployment system ensures that the current JSON file in the cloud environment is preserved.
In edge cases, users might need to supply their own umbraco-cloud.json to the system and overwrite the one on the cloud.
Enabling the skipPreserveUmbracoCloudJson option allows users to overwrite the umbraco-cloud.json through CI/CD Flow.
It is not recommended to edit or add values to the umbraco-cloud.json file. Use the appropriate appSettings.*.json file instead, or add secrets through the Secrets Management page in the Cloud Portal. The cloud platform uses umbraco-cloud.json to update environment relationships when adding or removing environments.
Skip version checks
During deployment, the system automatically checks for downgrades of Cloud dependencies. This prevents accidental downgrades of packages that may have been automatically upgraded on Umbraco Cloud.
Enabling the skipVersionCheck option will allow deployments that include downgraded packages.
This option increases risk and is not recommended for normal workflows. Do not skip the version checks unless you understand the package differences and accept the potential consequences.
Skip build and restore steps
The Umbraco CI/CD flow runs the deployment in an isolated instance and performs dotnet restore and dotnet build to catch obvious build issues before deploying to the Cloud.
Enabling the noBuildAndRestore option skips the restore and build steps in that isolated instance, which can shorten deployment time by a few minutes.
Keep in mind that the final Kudu deployment on the Cloud environment will still run restore, build, and publish; those steps cannot be skipped.
Disable schema extraction
When deploying schema changes to environments beyond "left-most", the CI/CD Flow deployment system will automatically run a schema extraction.
Setting runSchemaExtraction to false, will result in the system not automatically running the schema extraction on the environment. .
This setting doesn't have any effect on the left-most environment.
How to enable the options
While pipeline scripts follow the same structure, there are a few small details to be aware of.
Locate the main entry pipeline file. It will usually be this one: azure-release-pipeline.yaml.
The skipPreserveUmbracoCloudJson, noBuildAndRestore and skipVersionCheck options can be enabled by changing the value to 'true'. The runSchemaExtraction can be disabled by changing the value to 'false'.
Use the latest scripts
The sample scripts are updated to include these extra options. If you need to update, you do not have to update everything; only the following scripts have been updated:
PowerShell files
Bash files
The following pipeline files are also updated. Remember to get the right files from either V2/bash or V2/powershell depending on what you are currently using.
GitHub
Azure DevOps
Umbraco Forms on Cloud
In this article, you can learn about how Umbraco Forms is handled on Umbraco Cloud and read about the workflow and best practices.
Umbraco Forms is a package that is included with your Umbraco Cloud project. It gives you a nice integrated UI, where you can create Forms for your website. The package is built specifically for Umbraco and is maintained by Umbraco HQ.
Read more about the product in the Umbraco Forms documentation.
How Forms are handled on Umbraco Cloud
Forms are handled like content and media. This means that you can transfer your Forms between environments, using the same workflow you use for content and media.
Definitions for each specific Form, its fields, workflows, and prevalues are all stored in the Umbraco database.
Entries submitted are not transferred to the next environment, as they are environment-specific. If you need to move entries from one environment to another, you need to run an export/import script on the databases.
Recommended workflow
You can work with Forms in an environment of your choice. When you need to test or use your Forms in another environment you can:
Transfer the Forms to the next environment using Queue for transfer or
Restore the Forms on an environment lower in the workflow.
For more information on how to handle content transfer/restores on Umbraco Cloud, check out the following articles:
Upgrades
Umbraco Forms is part of the . Whenever a new patch is ready for release, we will automatically apply it to your Cloud project. There will be a notification in the Umbraco Cloud Portal at least 5 days before we roll out new versions.
To avoid having the auto-upgrades overwrite any of your custom settings, we strongly encourage that you use when you need custom configuration. Additionally, use when you need to customize your forms.
When a new minor version of Umbraco Forms, like 10.x or 11.x, is available, you'll have the option to upgrade your project. When your project is eligible to receive the new version, you will see an "Upgrade available!" label on your left-most environment.
Version-specific changes
In this section, you can find information about version-specific changes that might affect the way Umbraco Forms works on your project.
Version 9+
In Umbraco Forms version 9.0.0+, it is only possible to store Form data in the database.
If you want to upgrade to Umbraco 9 and are using Forms, you should first migrate the Forms to the database using Forms 8. See the article.
Version 8.5.0
Prior to Umbraco 8.5.0, all forms data was saved as .json files in the App_Data/UmbracoForms directory in the file system.
As of Umbraco 8.5.0, you have the option to persist all Forms data directly in the database. This behavior defaults to all new sites created on Umbraco Cloud since September 2020. If your Cloud project was created before, you will need to upgrade the Umbraco Forms version. Additionally, apply a setting to perform the migration of the Umbraco Forms data.
To switch to persisting all definitions for Umbraco Forms data in the Umbraco database, follow these steps:
Make sure all environments are upgraded to at least Umbraco Forms version 8.5.2 and Deploy 3.5.0.
Make sure your Forms are in sync between all your Cloud environments.
Clone down your left-most environment.
Now it is time to deploy the setting to your Cloud environments.
Follow the steps outlined below for each environment for the migration to run on each of them.
Access KUDU.
Navigate to site/wwwroot/App_Data.
Delete the UmbracoForms directory.
Did you create your project before June 2018?
Then your Umbraco Forms data might still be handled as metadata.
You will need to follow the steps below to persist Umbraco Forms data in the Umbraco database.
Find and open Config\UmbracoDeploy.settings.config on your local machine.
Update the transferFormsAsContent value to true:
If you do not have the transferFormsAsContent setting in the UmbracoDeploy.settings.config file, you do not need to make any further changes.
Common issues with Umbraco Forms on Cloud
The Forms tree is missing
Sometimes you might experience that you lose the tree in the Forms section in the backoffice after a deployment. To get the tree back, all you need to do is restart the environment from the Umbraco Cloud Portal.
Rewrite rules
To make rewrite rules on Umbraco Cloud as seamless as possible, we've installed the IIS Rewrite Module on all our Umbraco Cloud servers.
If you are running Umbraco 8, the rewrite rule can be added directly to your project's web.config.
The rewrite rules should be added to the <system.webServer><rewrite> module in your project's web.config file.
Best practices
When setting up rewrite rules on Umbraco Cloud, there are a few important things to keep in mind:
Always include a condition to exclude the Umbraco backoffice path (/umbraco). Failing to do so may prevent you from deploying to and from the environment.
To continue working locally with your Umbraco Cloud project, you should also add a condition to exclude localhost.
To serve verification files from the .well-known
Hiding the default umbraco.io URL
After assigning a hostname to your live environment, you may want to hide the project's default URL (for example, example.euwest01.umbraco.io). This could be for improving Search Engine Optimization (SEO) or to communicate to your users that the site is accessible only through the primary hostname.
One approach for this is to add a new rewrite rule to the <system.webServer><rewrite><rules> section in the web.config file. For example, the following rule will redirect all requests for the project example.euwest01.umbraco.io to example.com. It will use HTTPS and include the www. prefix, responding with a permanent redirect status.
This will not rewrite anything under the /umbraco path so that you can still do content deployments. You don't have to give your editors the umbraco.io URL, and they won't see it if you give them the actual hostname. This rule will also not apply to your local copy of the site running on localhost.
Running your site on HTTPS only
Once you've applied a certificate to your site, anybody visiting your site will always end up on HTTPS instead of the insecure HTTP.
To accomplish this, add a rewrite rule to the live environment's web.config in the <system.webServer><rewrite><rules> section.
For example, the following rule will redirect all requests for the site http://example.com URL to the secure https://example.com URL and respond with a permanent redirect status.
This redirect rule will not apply when the request is already going to the secure HTTPS URL. This redirect rule will also not apply to your local copy of the site running on localhost.
Adding a trailing slash to your URLs
It is possible to transform all of your URLs to use a trailing slash consistently for SEO.
To accomplish this, add a rewrite rule to the Live environment's web.config in the <system.webServer><rewrite><rules> section.
For example, the following rule will redirect all requests for https://example.com/page to https://example.com/page/, and respond with a permanent redirect status. This way you can ensure that you use the trailing slashes consistently on your site.
Take note of the negates in the rewrite rule.
It is important to negate the file paths on your site. If a trailing slash is added, your media may not display correctly after .
Redirect from non-www to www
Another example would be to redirect from non-www to www:
Custom Rewrite Rules for Umbraco Cloud
An example configuration to help ensure your custom rules integrate properly:
Manual upgrade of Umbraco Deploy
Learn how to manually upgrade the Umbraco Deploy version used on your Umbraco Cloud project.
Deploy on Cloud will either be automatically upgraded with patch releases or it can be done through the portal when new minors are available.
In rare cases, Deploy might not be on the latest patch or minor and you will need to upgrade Deploy manually.
This article will give you a step-by-step on how to manually upgrade the deployment engine used on your Umbraco Cloud project.
Prepare for the upgrade
When upgrading an Umbraco Cloud project manually, the first step is to .
Make sure you can run your Cloud project locally and restore content and media. It is important that you check that everything works correctly after the upgrade. To achieve this, you need to have a clone locally that resembles the Cloud environment as much as possible.
Get the latest version of Umbraco
To get the latest version of Umbraco Deploy you will need to upgrade the site using NuGet. The main package to install is Umbraco.Deploy.Cloud. This has dependencies on other components of Umbraco Deploy that will be imported automatically.
If using Umbraco Forms in your installation, you should also update the Umbraco.Deploy.Forms package reference.
Run the dotnet add package Umbraco.Deploy.Cloud command in the directory that contains your project files. If you want a specific package version, run these commands:
Open your .csproj file to make sure the package reference is updated:
Alternatively, you can also update Umbraco Deploy via the NuGet Package Manager in Visual studio:
Make sure that everything works on the local clone and that you can run the project without any errors.
Manually Upgrade Umbraco Deploy Legacy Version 7 and 8
If you are on Umbraco 7 or Umbraco 8, follow these steps to manually upgrade Umbraco Deploy to a later version of your project
Download Storage Explorer here: and install it.
Click the "Plug" Button (Open Connect Dialog):
Push upgrade to Cloud
When you've upgraded everything locally, and made sure that everything runs without any errors, you are ready to deploy the upgrade to Umbraco Cloud.
Stage and commit all changes in Git
Push the changes to the Cloud environment
When everything is pushed, head on over to the Umbraco Cloud Portal
The Cloud Portal
The Umbraco Cloud Portal helps you manage your Umbraco Cloud project. From here, you can view and manage all your Cloud projects in one place.
Umbraco Cloud Portal Overview
When you log in to the , the projects dashboard gives an overview of all your Umbraco Cloud projects. Here, you can view all the projects you've created or have been added to as a team member.
You can see the project's environments, usage for each project, and which plans it is on. You can also see whether it is a baseline or baseline-child project.
Organizations
On Umbraco Cloud, it is possible to set up an Organization. An organization is handy if you are managing many projects for different customers. It is also handy if you need to manage permissions for multiple users (such as developers and content editors.
With an organization, you get an overview of all projects and members that are part of it. You can also manage payment methods for projects, as well as many other functions outlined on this page.
In the following sections, we will go through the different options that are available to an Organization:
Are you interested in getting an organization, or need a project added to a different organization? Please reach out to the Support Team in the small chat box in your
Secrets Management
Learn how to securely store, manage, and use secrets in Umbraco Cloud environments using Shared and Environment Secrets.
If your Umbraco Cloud project uses sensitive information such as API keys, encryption keys, or connection strings, you should store these as secrets.
You can add secrets to your Cloud project in two ways: Environment Secrets or Shared Secrets.
Environment Secrets are used within a specific environment during runtime of your Umbraco solution.
Shared Secrets are available across all environments and are automatically included in any new environment you create. Shared Secrets are well-suited for credentials needed during project development, such as access to private NuGet feeds.
Security
Security has high priority on the Umbraco Cloud platform. Learn more about the different options and features related.
In this article you can find information about security on Umbraco Cloud.
HTTPS & Certificates
All Umbraco Cloud websites use HTTPS by default. Both the default {projectName}.{region}.umbraco.io and custom domains are protected by periodically renewed certificates issued by Cloudflare. This service is offered as part of Umbraco Cloud for all plans.
Connect and Upload Files Programmatically to Azure Blob Storage
There might be use cases, where you want to upload certain files to your Blob Storage programmatically rather than using Azure Storage Explorer.
In this article, we provide the steps to programmatically connect to your Umbraco Cloud Environments Azure Blob Storage containers and persist files programmatically.
These files within the folder will only be available on Azure Storage and are not publicly visible in Umbraco CMS. The only exception is that the files that can be shared publicly via the *.blob.core.windows.net URL.
By the end of this article, you will have connected and uploaded a file to your Cloud Blob Storage.
You will need access to the Blob Storage credentials to authenticate and find the files created programmatically in the Azure Blob Storage.
Minor and Patch Upgrades
This article explains how Minor and Patch upgrades work in Umbraco Cloud.
Both minor and patch upgrades can be managed from the Configuration -> Automatic Upgrades page in the Cloud Portal.
A new version of Forms is ready for release
Professional
3
Restore content and Forms to the local clone.
Open the configuration file App_Plugins\UmbracoForms\UmbracoForms.config from your local clone.
Add the following key in the <settings> section and make sure the value is set to True:
Save the file.
Spin up your local clone and verify that everything works as expected.
Push the updated setting to the environment.
To run the migration, restart the environment from the Cloud portal.
From the Umbraco Backoffice, Queue and transfer the Forms to the environment.
Repeat steps 1-5 for each of your Cloud environments.
Remove all existing data\revision\forms-form__*.uda files, so it's not possible to accidentally revert to this state (removing UDA files won't remove the actual form on deploy).
Push the change back to the Cloud environment.
If you have more than one Cloud environment, make sure to deploy the change through to all of them.
You are now able to queue your Forms for transfer between the Cloud environments, like content and media.
Locate the main entry pipeline file. It will usually be this one:
azure-release-pipeline.yaml
.
The skipPreserveUmbracoCloudJson, noBuildAndRestore and skipVersionCheck options can be enabled by changing the value to true. The runSchemaExtraction can be disabled by changing the value to false.
Locate the main entry pipeline file. It will usually be this one: main.yml.
The skipPreserveUmbracoCloudJson, noBuildAndRestore and skipVersionCheck options can be enabled by changing the value to "true". The runSchemaExtraction can be disabled by changing the value to "false".
Locate the main entry pipeline file. It will usually be this one: main.yml.
The skipPreserveUmbracoCloudJson, noBuildAndRestore and skipVersionCheck options can be enabled by changing the value to 1. The runSchemaExtraction can be disabled by changing the value to 0.
Do not use environment-specific secrets for NuGet feeds. Use Shared Secrets to avoid environment creation failures.
Typical secrets are Private keys, third-party API tokens, database passwords, and other sensitive data that must be kept secure.
When secrets are added, they are exposed only to the assigned environments. Each secret is assigned as an environment variable at runtime using the secret name. The environment accesses the secret through a Key Vault reference secured by the environment’s managed identity.
Starter Plans have a limit of 5 secrets per environment, whereas higher plans do not have a limit
How to add Secrets
Important
When adding a secret to your environment, the environment will restart.
Secrets are stored as environment variables. The underlying platform has a maximum size limit for all environment variables combined. If too many secrets are added, or if secret values are too large, your environment may fail to start.
Recommendations:
Keep secrets small and concise.
Store only sensitive values as secrets (for example, API keys and connection strings).
Use appsettings.json for general configuration values.
To add a secret to your environment, follow these steps:
Go to your Umbraco Cloud project
Go to Security.
Select Secrets.
Choose Shared Secrets or the environment where you want to add the secret.
Click Edit secrets.
Select Add secret.
Enter the Key and the Value in the Create secret window.
Click Add secret.
Click Save secrets to save the secret.
Working locally with Secrets
When developing locally, you cannot access secrets stored in the Key Vault for a Cloud environment.
It is recommended to use standard methods for handling secrets locally, such as the appsettings.development.json. Do not commit this file to your code repository. Add it to your .gitignore file to prevent accidental commits.
For example, if you have a secret in a Cloud environment with the key name ApiKey, you can create a corresponding entry in your appsettings.development.json:
Access secrets in an Umbraco Solution
Secrets for cloud environments are stored in a Key Vault and loaded by the App Service (using a Key Vault reference) as environment variables. This allows you to retrieve the value at runtime like any other environment variable.
You can access a secret in .NET using the System namespace:
Secrets can also be used to override app settings defined in appsettings.json files. For this to work, when adding the secret, the key value should be all the settings names joined by double underscores.
For example, to change the Serilog default options under Serilog:MinimumLevel:Default, the Secret key would be: Serilog__MinimumLevel__Default .
The value defined in appsettings.json file will be overwritten by the Cloud secret value.
Naming standards for Secrets
When naming a secret, you can use alphanumeric characters and underscores (_).
If you need to use a dot (.) as part of an app setting, it should be replaced with a single underscore.
The app setting Umbraco:Licenses:Products:Umbraco.Commerce should become Umbraco__Licenses__Products__Umbraco_Commerce.
Reserved names
The following names are reserved and cannot be used:
COMMAND
HOME
PORT
REMOTE
DEBUGGING
VERSION
REGION_NAME
CONNECTIONSTRINGS__UMBRACODBDSN
Restricted prefixes
The following prefixes are not allowed:
UMBRACO_
WEBSITE_
SCM_
SDEPLOY_
DEPLOYMENT_
DOCKER_
CONTAINER_
DIAGNOSTICS_
APPSERVICEAPPLOGS_
DOTNET_
IDENTITY_
MSI_
WEBJOBS_
FUNCTIONS_
AzureWebJobsWP_
PHP_
FILE_
DATABASE_
WORDPRESS_
MACHINEKEY_
SQLCONNSTR
SQLAZURECONNSTR_
POSTGRESQLCONNSTR_
CUSTOMCONNSTR_
MYSQLCONNSTR_
AZUREFILESSTORAGE_
AZUREBLOBSTORAGE_
NOTIFICATIONHUBCONNSTR_
SERVICEBUSCONNSTR_
EVENTHUBCONNSTR_
DOCDBCONNSTR_
REDISCACHECONNSTR_
FILESHARESTORAGE_
The list of restricted prefixes is incomplete and will be updated as new cases arise.
Accepted Prefixes
The following prefixes are allowed for Secrets on Umbraco Cloud:
Umbraco__CMS__Global__Smtp__
Umbraco__Forms__Security__FormsApiKey__
Umbraco__Forms__FieldTypes__Recaptcha__
Umbraco__CMS__Integrations__
Umbraco__CMS__DeliveryAPI__
UMBRACO__LICENSES__
UMBRACO__AUTHORIZEDSERVICES__
UMBRACO__COMMERCE__,
UMBRACO__AI__,
Umbraco__CMS__Imaging__HMACSecretKey
You can also use secrets to store API keys, passwords, and reCAPTCHA keys for Umbraco products on Umbraco Cloud.
If you have an existing or new secret that conflicts with the naming restrictions, contact Umbraco Support, and your request will be reviewed.
In the top-right corner of the Umbraco Cloud Portal, you will find:
Create New Project - Allows you to create more projects using the plan you wish and a project will be ready for you within a few minutes.
Notifications - You can also see notifications for your different projects. For example: if your project has been automatically updated or if an upgrade has failed.
Profile - Manage projects, subscriptions, pending invites, organization information, profile details, view release notes, and log out of the portal.
Project Groups
Settings
In the right-side corner of the Umbraco Cloud Portal, you can enable Show environments and Show usage of the project from the Settings option.
Project Groups Settings
Collapse Groups
Collapse Groups allows you to collapse the groups on the project dashboard. You can also expand the groups depending on the view you prefer.
Collapse Groups
Edit Groups
To get a better overview of your projects, it is possible to sort your projects into Groups. This can be done by clicking the Edit Groups button on the top right side of the Umbraco Cloud Portal.
Edit Groups
After clicking on Edit Groups, you can create new groups to categorize your projects and create a better overview for yourself.
Create Group
Create Group
Click Add Group, give the group a name, and then drag and drop your projects into the group of your choice.
Chat Feature
In the bottom-right corner of the Umbraco Cloud Portal, you'll find a chat bubble. This feature allows you to contact the Umbraco HQ Support team for assistance with your Umbraco Cloud projects.
Chat Feature
Support availability depends on your plan:
Starter and Standard plans: Support is available for Cloud platform-specific issues.
Professional plan: Includes support for implementation and CMS-related issues through chat.
Managing your projects has been simplified with Umbraco Cloud. By navigating to a specific project, you can quickly view the environments within your project.
Project Overview
Project Name: includes options to Create environments or Invite User.
Environment Name: offers options to Restart the environment, view History, Logs, Error Logs, Clone project, Delete project.
Links: Provides access to View Website (frontend), Backoffice, Power Tools (Kudu), and Clone project.
Change Details: Allows you to view change details.
To manage the environments in your project, click Create Environments to add or remove environments as needed. For more information on how the number of environments varies by plan, refer to the Project Overview article.
Additionally, changes are deployed from one Cloud environment to another from the project view. Find out more in the Cloud-to-Cloud article.
In the Settings section, you will find more options to configure your project.
Pending Invites
On Umbraco Cloud, you may receive invitations to join different projects. These project details are available under the Pending Invites tab. On the Pending Invites page, as a user, you will see the following details:
Project Name
Invited By
Expiration Date of the invite
Status
Options to approve, reject, or delete the invitations that have expired.
Project Invites
Profile
The Profile section includes the following information:
Edit profile
Name: The name displayed on Umbraco Cloud.
Email: The email address used for logging in to Umbraco Cloud and receiving email notifications from the Umbraco Cloud Portal.
{% hint style="info" %} It is not possible to change this email address at a later time. {% endhint %}* Telephone: The contact number of the user.
Edit profile: Allows you to update and ensure your information is valid and up to date for your Umbraco Cloud profile.
Change Password: Provides the option to change the password for your Umbraco Cloud account.
change password
Release Notes
In the Umbraco Cloud portal, you can find a link to the Release Notes in the Profile dropdown. Release notes are published monthly and list the most relevant fixes and features added to the portal.
Logout
The Logout option allows you to securely log out of your Umbraco Cloud account.
In the Information section of the Organization, you can find all the details about your Organization. If there are any changes to your details, you can change them here.
Information
Members
In the Members section, you can view current members, pending invites, and see the Multi-Factor Authentication (MFA) status for the Members of your Organization. You can also set up different permissions for your Members, such as Read, Write, and Administrators for your organization by adjusting their Roles.
Members added to your organization can see different details about their organization based on the user group they are added to. Currently there are three different groups, Read, Write and Admin. Below you can see what each user group has access to under the organization they are a part of.
Organization Members with Admin Access can do the following in the organization:
Update the organization's information
Invite others to the organization
Invite Users to project under the organization
Edit organization team
See pending invitations
See organization information
See organization projects
See payment history
See subscriptions
See organization Members
See payment history
Handle Multi-Factor Authentication (MFA) for users
Handle payment methods
Change permissions for Members
Remove role from users
Organization members with Write Access can do the following in the organization:
See Organization information
See Organization Members
Invite to the organization
See pending invitations
Organization Members with Read Access can do the following in the organization:
See Organization information
See Organization Members
Being a Member of an organization does not give access to any projects under it. To get access to a project under an organization, you need to be invited to the project. This can be done by either someone who is already part of the project or an administrator in your organization.
Multi-Factor Authentication (MFA) enforcement
When working in organizations on Umbraco Cloud, as a company, you can enforce a certain type of Multi-Factor Authentication (MFA) method for members.
MFA for members
Administrators of Organizations on Umbraco Cloud can enforce MFA for specific members of their organization.
To enforce a certain MFA for a member, follow these steps:
Go to the Organizations tab under your user on Umbraco Cloud.
Go to the Members tab under Organization.
Go to Multi-Factor Authentication.
Find the member that needs to have MFA enabled.
Click on the cogwheel and select the Enforced MFA Method from the drop-down list for the member.
Once it has been enabled, the next time the member logs in, they will be forced to setup the chosen Multi-Factor Authentication (MFA) method. It is possible for an administrator to reset the authenticator app settings for members of the organization.
Projects
In the Projects section, you can get an overview of all the Projects that have been created in your Organization.
Project overview
It is possible to see the plan, project status, payment status, creation date, region, and number of environments for each of your projects.
As an administrator, you can invite members of your organization to the different projects under the organization.
Access Rights
In the Access Rights section, you can get a list of all the Access Rights your Members have to each Project in your Organization.
Access Rights
Finance
Finance section
Payment methods
In the Payment Methods section, you can view the payment methods for your organization. From here, you can add or delete credit card details for your Organization. These payment options will be used, when you create new projects under your organization.
Payment methods
Payment History
In the Payment History section, you can see the payment history for your organization.
Insights
Insights section
Sustainability
The Sustainability Dashboard is designed to help users monitor and improve the environmental impact of their websites on Umbraco Cloud. For more information, see the Sustainability Dashboard article.
Login Providers
Insights section
The Login Providers section enables you to configure access to the Umbraco Cloud Portal and Projects.
The section also offers the possibility to follow Sign-ins and changes to Login Provider configurations.
Umbraco Cloud Websites support the following TLS ciphers in this order:
TLS\_ECDHE\_RSA\_WITH\_AES\_256\_CBC\_SHA384
TLS\_ECDHE\_RSA\_WITH\_AES\_128\_CBC\_SHA256
TLS\_ECDHE\_RSA\_WITH\_AES\_256\_CBC\_SHA
TLS\_ECDHE\_RSA\_WITH\_AES\_128\_CBC\_SHA
TLS\_DHE\_RSA\_WITH\_AES\_256\_GCM\_SHA384
TLS\_DHE\_RSA\_WITH\_AES\_128\_GCM\_SHA256
TLS\_DHE\_RSA\_WITH\_AES\_256\_CBC\_SHA
TLS\_DHE\_RSA\_WITH\_AES\_128\_CBC\_SHA
The different Ciphers can be enabled or disabled on the security project settings page for your Cloud projects.
Enable or disable TLS Ciphers
HTTP Strict Transport Security (HSTS)
It's possible to enforce HSTS: HTTP Strict Transport Security by adding the headers to your website. This grants Umbraco Cloud Websites an A+ security rating on sslabs (March 2020).
You can add the header by modifying system.webServer/rewrite/outboundRules section in your web.config:
Alternatively this can be done in Startup.cs inside of the ConfigureServices method with the following C#:
This adds the "Strict-Transport-Security" header telling browsers how long the browser should not make any HTTP requests to this domain. In this example 63072000 seconds or 730 days is two years.
TLS 1.2 by default in external services
In order to integrate older external applications to access Umbraco Cloud Websites you might have to modify the TLS support in the .Net application.
For ASP.NET applications, inspect the <system.web><httpRuntime targetFramework> element of web.config to find the version of the .NET Framework your application is using. .NET applications on .NET 4.7+ are using the OS specified TLS protocols. In Windows 8 & 10, Windows Server 2012 & 2016 TLS 1.2+ is used by default, therefore no actions necessary. .NET applications lower then 4.7 require updates to ensure they can communicate using TLS 1.2 by default.
More information specifically from Microsoft about .Net applications and Transport Layer Security (TLS) support can be found in Microsoft's official documentation. For other application frameworks/languages we encourage to lookup their respective documentations.
HTTP
Umbraco Cloud supports both HTTP2 and HTTP3 protocols.
Ports
By default, all ports are closed to secure them against external attacks. This is done for all ports apart from 80 (HTTP) and 443 (HTTPS).
Some scanning tools will report some other ports open due to Cloudflare's default support on those ports. However, all traffic on those ports is managed by Umbraco Cloud and never reaches your project. You can read more about the Cloudflare Network Ports in the Cloudflare Documentation.
Firewall & Restricting public access to Umbraco Cloud resources
Umbraco Cloud offers a multitude of features allowing you to block access to different resources.
Basic Authentication allows access to the Backoffice & Frontend of Umbraco Cloud Websites for authenticated users only.
Basic authentication will not be available for projects running Umbraco 9. It is available from Umbraco Cloud version 10. The users are currently unable to exclude IP addresses for authentication using the allowlist feature.
IP based list allowing access to Frontend & Backoffice
On Umbraco Cloud sites, you will find an ARRAffinity cookie. This is not sent over HTTPS, and might to some, look like a security risk.
It is not a security risk. This cookie is set by the load balancer (LB) and only used by the LB to track which server your site is on. It is set by the software we use (Azure App Service) and only useful when your website is being scaled to multiple servers. In Umbraco Cloud we cannot scale your site to multiple servers so the cookie is effectively unused.
There is no vulnerable data in this cookie and manipulating or stealing this cookie can not lead to any security issues.
In the future, the cookie will be set to HttpOnly on Umbraco Cloud to conform to best practices. This does not mean that there's anything wrong with the current way it is set.
You can also secure the values in Secrets Management in the project Settings on Umbraco Cloud so you do not store them in code. For more information, see the Secrets Management article.
Run the project.
Visit the {{yourProjectURL}}/umbraco/surface/BlobStorage/BlobUpdate endpoint in the backoffice of your project to manually trigger the creation of the file to the Blob Storage.
Connect to your Blob Storage and there you will find the folder and file that has been created programmatically:
Blob folder created programmatically
Now that you are connected to Blob Storage programmatically, you can customize it to suit your upload needs.
References
For more information on how to work with Azure Blob Storage, see the following articles from Microsoft:
using Azure.Storage.Blobs;
namespace UmbracoProject
{
public class BlobStorageService
{
public BlobContainerClient GetContainerClient(string connectionString, string containerName)
{
BlobServiceClient blobServiceClient = new BlobServiceClient(connectionString);
BlobContainerClient containerClient = blobServiceClient.GetBlobContainerClient(containerName);
return containerClient;
}
}
}
BlobStorageComposer.cs
using Umbraco.Cms.Core.Composing;
namespace UmbracoProject;
public class BlobStorageComposer : IComposer
{
public void Compose(IUmbracoBuilder builder)
{
builder.Services.AddScoped<BlobStorageService>();
}
}
BlobStorageController.cs
using Azure.Storage.Blobs;
using Microsoft.AspNetCore.Mvc;
using Umbraco.Cms.Core.Cache;
using Umbraco.Cms.Core.Logging;
using Umbraco.Cms.Core.Routing;
using Umbraco.Cms.Core.Services;
using Umbraco.Cms.Core.Web;
using Umbraco.Cms.Infrastructure.Persistence;
using Umbraco.Cms.Web.Website.Controllers;
namespace UmbracoProject;
public class BlobStorageController : SurfaceController
{
private readonly BlobStorageService _blobStorageService;
public BlobStorageController(
IUmbracoContextAccessor umbracoContextAccessor,
IUmbracoDatabaseFactory databaseFactory,
ServiceContext services,
AppCaches appCaches,
IProfilingLogger profilingLogger,
IPublishedUrlProvider publishedUrlProvider,
BlobStorageService blobStorageService)
: base(umbracoContextAccessor, databaseFactory, services, appCaches, profilingLogger, publishedUrlProvider)
{
_blobStorageService = blobStorageService;
}
// access the endpoint in backoffice via /umbraco/surface/BlobStorage/BlobUpdate
public async Task<IActionResult> BlobUpdate()
{
string SASUrl = "Replace this with the Shared access signature URL (SAS) from Umbraco Cloud settings";
string containerName = "Replace this with the Container Name from the Umbraco Cloud settings";
string connectionString = $"BlobEndpoint={SASUrl}";
BlobContainerClient containerClient = _blobStorageService.GetContainerClient(connectionString, containerName);
string localPath = "data";
Directory.CreateDirectory(localPath);
string fileName = Guid.NewGuid().ToString() + ".txt";
string localFilePath = Path.Combine(localPath, fileName);
try
{
// Write some content to the file
await using (StreamWriter writer = new StreamWriter(localFilePath))
{
await writer.WriteLineAsync("Hello, World! This file is created programmatically!");
}
}
catch (Exception)
{
// ignored
}
// Get a reference to a blob
string blobName = "FolderProgramatically/" + Guid.NewGuid().ToString() + ".txt"; //the blobName can be anything
BlobClient blobClient = containerClient.GetBlobClient(blobName);
Console.WriteLine("Uploading to Blob storage as blob:\n\t {0}\n", blobClient.Uri);
// Upload data from the local file
await blobClient.UploadAsync(localFilePath, true);
return Content("Check your Blob Storage to see your new file!");
}
}
To enable automatic minor upgrades, follow these steps:
Go to your Umbraco Cloud project.
Navigate to Configuration -> Automatic Upgrades.
Settings Umbraco Cloud
Enable Automatic Minor Upgrades.
Enable Minor Upgrades
With automatic upgrades enabled, all products on Umbraco Cloud will automatically be upgraded. This includes Umbraco CMS, Umbraco Forms, and Umbraco Deploy. Your project does not need to be running the latest minor version for automatic upgrades to work. The project will be upgraded to the latest minor version when it is released.
If you create a new project on Umbraco Cloud automatic upgrades are enabled by default.
For projects where automatic minor upgrades are enabled, having a secondary mainline environment is not required. However, it is highly recommended to facilitate a smoother and more controlled upgrade experience. In cases where manual upgrades are necessary, an additional environment becomes essential.
A secondary mainline environment is included in all Umbraco Cloud plans, except Starter. Find pricing details for Umbraco Cloud Starter plans on our website.
Automatic Patch Upgrades
By default, all Umbraco Cloud projects are automatically upgraded when new patch versions are released. This includes security patches and ensures all sites run the most stable and secure versions.
You can toggle Automatic Patch Upgrades on or off from the same Configuration -> Automatic Upgrades page.
When you disable automated patch upgrades, you are responsible for keeping your project up to date. Falling behind on patches may affect your eligibility for support. It can also expose your project to known security vulnerabilities.
Umbraco reserves the right to patch critical vulnerabilities. This ensures the Umbraco Cloud platform remains stable and secure.
Manual Upgrades
A manual upgrade involves a more hands-on approach, where the upgrade process is initiated and controlled by the user or development team. This allows for greater flexibility and oversight, enabling teams to test and adapt the upgrade to their specific needs and configurations. A manual upgrade provides an opportunity to thoroughly test the new version in a controlled environment before applying it to live production environments. This ensures compatibility and minimizes disruptions.
Umbraco Cloud supports performing minor upgrades to your projects automatically. The feature is available when a new minor version of Umbraco is released (for example 10.5.0 or 10.6.0).
The upgrade will resolve most issues it encounters, but some Umbraco configurations may need manual intervention. This is usually related to custom code that depends on APIs that have changed or been removed in the new minor version.
If anything fails during this process, you can reach out for support using the in-app chat in the bottom right corner. We will assist you through the upgrade process if any issues arise.
Database Upgrade Failing
Symptoms and feedback are given from the upgrade process: Unable to run the Umbraco installer
The first step in the process, after having updated all the files, is to call the Umbraco install engine. This is done in order to get its database updated to support the new version. As this step is the first time the site gets requested after the updated files are run, it may fail. The reason is often code that is incompatible with the upgraded files.
It can be code that references APIs that have been deprecated, or code that has some strong references to specific versions. If the error is clear, it will be shown on the screen. It will be a typical ASP.NET error message also called a Yellow Screen of Death (YSOD). You should request the site, and check the error it shows. If the error isn't descriptive, then it is time to clone the repository to your local machine and fix the issue. The usual suspects would be:
The code you have running is referencing an API that has been changed, is being modified, is obsolete, or removed.
The web.config had assembly bindings for a specific DLL version that doesn't exist anymore. During the upgrade process, we do update the references we are shipping, but there might be something missing.
Once you have the site running locally, you should push your changes to the repository. This will update the site, and it should now be in a running state.
The upgrade process left off when it needed three more steps. These three steps now need to be done manually.
Complete the installer
To complete the installer, you should visit the site: https://dev-YOURSITEALIAS.euwest01.umbraco.io. This will show you the installer screen, where you should insert your backoffice credentials and follow the process. It will run through a few steps, and later Umbraco will be updated to the latest version.
Export the metadata files.
The second thing you need to do is to regenerate the metadata files used for transferring items like document types, data types, and media types. This is done by accessing the Power tools (Kudu) on the project, opening the cmd prompt, and browsing to the wwwroot/data folder. Once there, you need to enter echo > deploy-export. This will generate the required files for the upgraded site to work with Umbraco Deploy.
The last thing to do is to go to the /site/locks folder (still through Kudu) and rename the file called upgrading to upgraded-minor - rename the file by typing ren upgrading upgraded-minor. This will indicate to Umbraco Cloud, that the left-most environment is now ready to deploy all its changes to the next environment.
Before deploying the upgrade to the next environment, you should verify that everything looks as expected on the left-most environment.
Dev, Staging, Flexible, Live (depending on the plan)
Features
Limited
Latest Features (can be customized)
Production Use
Not allowed
Fully supported
Domains
1 assigned domain*
Custom domains
Support
Not included
Depends on plan
Upgrade Available
Yes
Depends on plan
Repositories in a Cloud Project
Learn how Umbraco Cloud environment Git repositories work, how they differ from source control, and how to keep them small and healthy.
Each Umbraco Cloud project can have multiple environments: Mainline and Flexible Environments. Each environment has its own repository hosted on Umbraco's Cloud platform.
These repositories serve a specific purpose: deploying code to your Cloud environments. Understanding how they work and how to use them correctly will help you avoid common issues with deployments, performance, and repository management.
Deployment Repositories vs. Source Code Repositories
The git repositories provided by Umbraco Cloud are deployment repositories. They exist to move code from one environment to another and are not designed for day-to-day development workflows.
Umbraco Cloud repositories are only deployment repositories and should not be used as source code repositories.
A deployment repository differs from a source code repository in the following ways:
Limited branch support - Only the main branch (master) is guaranteed to be maintained. Any other branches may be removed without notice, potentially leading to data loss.
No pull request or review workflows - The deployment repository does not support the collaboration features you would expect from a full source code management platform.
Size constraints - Deployment repositories are optimized for lightweight, frequent deployments. Large repositories slow down cloning, deployments, and environment provisioning.
It is possible to use the Cloud repository as your source code repository. However, doing so means working within the limitations listed above. For the best experience, use a dedicated source code management platform and treat the Cloud repository as the last step in your development pipeline.
Use Your Own Source Code Repository
Using a dedicated source code management platform as the single source of truth for your project is recommended. Popular options include GitHub, GitLab, Azure DevOps, and Bitbucket.
Your external repository is where you should:
Store your complete project source code
Manage branches, pull requests, and code reviews
Track issues and project history
Run CI/CD pipelines to automate deployments
Use CI/CD pipelines to deploy from your source code repository to Umbraco Cloud automatically. See the documentation for setup instructions.
Your external Git repository stores the entire source code of your project. The Umbraco Cloud project must also contain all your source code, as you can no longer deploy only dll files to Umbraco Cloud.
Your external repository stores your custom models, controllers, class libraries, and C# source files. The Umbraco Cloud Git repository stores only the compiled dll files of your C# code.
Best Practices for Managing Your Deployment Repository
Following these practices will keep your deployment repository healthy and your Cloud environments running smoothly.
Do not store media, PDFs, or build artifacts
Media files, PDFs, images uploaded by editors, and build artifacts (such as compiled output or package archives) should not be committed to the deployment repository. These files are often large and grow over time, quickly inflating the repository size.
Instead, store media files in external storage. Umbraco Cloud supports Azure Blob Storage for this purpose.
See the documentation for instructions on setting up external media storage.
Keep the Git history clean and slim
Keep the repository focused on source code and configuration. Avoid committing:
Large binary files (images, videos, archives).
node_modules or other package manager directories.
Temporary or generated files.
Every file committed to the repository stays in the Git history, even after it is deleted. This means a single large file committed by mistake will continue to bloat the repository until the history is cleaned up.
Use a .gitignore file
Ensure your project includes a .gitignore file that excludes common non-essential files. A well-configured .gitignore prevents accidental commits of build artifacts, editor configuration files, and other files that do not belong in the deployment repository.
Recommended Repository Size Limits
The size of your deployment repository directly affects how quickly environments can be cloned, provisioned, and deployed. Use the following guidelines to assess the health of your repository:
<= 75 MB
75 MB - 150 MB
> 150 MB
Large repositories cause problems because every deployment and environment clone requires downloading the full Git history. This affects:
Deployment speed - Larger repositories take longer to push and pull.
Environment provisioning - Creating new environments requires cloning the full repository.
Local development - Cloning the repository becomes slow.
How to Reduce Your Repository Size
If your repository has grown too large, follow these steps to identify and remove the files causing the bloat.
Identify large files
Use the following Git commands to find the largest files in your repository history:
Remove large files from Git history
Once you have identified the problematic files, use a history-rewriting tool such as to remove them.
Rewriting Git history is a destructive operation. It changes commit hashes and requires a force push. Coordinate with your team before proceeding and ensure everyone re-clones the repository after the cleanup.
Push the cleaned repository
After cleaning the history, push the updated repository back to Umbraco Cloud. You may need to force push if commit hashes have changed.
See the documentation for instructions on cloning down a Cloud environment and pushing changes back.
Working with a Locally Cloned Umbraco Project
It is recommended to create a Cloud project with at least two environments: a Live environment, including one extra mainline environment. Work with a local copy of the site by cloning down the left-most environment. This repository is different from your source control repository.
Once you're happy with the results or wish to see how your website has progressed, you push the changes back to the Cloud. If everything is working as expected, deploy your changes to the Live environment.
Code Deployment Summary
In the above diagram, the Umbraco Git repository contains the source code of a class library CS project.
Once you commit your code in the Umbraco Cloud Git repository, your C# source code is built and then deployed to the wwwroot folder.
Disadvantages of using an Umbraco Cloud Project repository as a source code repository
Configuring a CI/CD pipeline
Learn how to configure a CI/CD pipeline using the sample scripts provided.
In this section, you can learn how to configure a CI/CD pipeline using either Azure DevOps or GitHub Actions Workflows.
You'll find sample shell scripts and pipeline configurations in the Sample scripts section. These cover both Azure DevOps and GitHub Actions Workflows.
Samples are provided "AS IS" to get you started. Please familiarize yourself with them and feel free to change them to fit your needs.
Why configure a sample CI/CD pipeline?
Umbraco Cloud repositories are not meant as source code repositories. For more information on repositories, see the article.
Once you commit your code to the Cloud, the build pipeline converts your C# code into DLLs and deploys them to the respective environment.
In Umbraco Cloud, only C# code is built. This means that all frontend artifacts need to be built before they are committed to the repository.
You can use Azure DevOps as an external repository, and with the pipelines, it will automatically keep your Azure DevOps source code repository in sync. The sync is done with the git repository of the Umbraco Cloud environment that you are targeting.
Setting Up an Umbraco Cloud Project
Before proceeding, you'll need an Umbraco Cloud project and a CI/CD pipeline. You will also need the required files to add to your pipeline for successful interaction with the Umbraco Cloud API.
Pick an Umbraco Cloud project, preferably with more than one environment (but not a requirement).
Create a new Umbraco Cloud Project.
You can take a .
In this guide, deployments target the left-most environment in your Umbraco Cloud setup. This means if you have more than one environment, the left-most environment will automatically be selected for deployment. If only a single environment exists, this environment will be used.
Obtaining the Project ID and API Key
To get started with API interactions, you'll need to obtain your Project ID and API key. If you haven't already enabled the CI/CD feature, follow these steps:
Navigate to the and select your project.
Go to Configuration -> CI/CD Flow.
Toggle "Activate CI/CD Flow" to enable the feature.
The box will expand to show your Project Id and two API keys. You can use either key to interact with the APIs.
The API keys are tied to the specific project for which it is generated. Ensure to keep the one you use secure in Azure or GitHub. It will be used for all subsequent API interactions related to that project.
Regenerate API Keys
The regenerate button next to each API key allows you to regenerate the key.
If you regenerate a key that is currently used in your pipeline, you must update the value in your pipeline configuration. It is not possible to restore an API Key to its previous value. If an invalid API key is used, the API will respond with 401 Unauthorized errors.
Getting environment aliases to target
When the CI/CD flow feature is enabled, navigate down to the section called "Environment targets". This section expands to show a table with all your environments.
The table shows you which environments you can currently target with CI/CD Flow. The environment aliases in the tables are the ones you need. You can click the button next to the environment alias to copy it and save it for later use.
If the alias is greyed out and without a check mark, it is currently not a valid target through the Umbraco CI/CD flow API.
By default, flexible environments and the left-most environment are considered valid targets.
You can enable all environments to be valid targets by enabling the "Deploy to any target" toggle in the "Advanced configuration" section.
If you are using the old CI/CD samples targeting the V1 endpoint, you can only target the left-most environment.
If you are setting up CI/CD Flow for the first time, you should skip ahead to the section about .
Advanced configuration
The "Advanced configuration" section expands the capabilities of CI/CD Flow.
This setting is for advanced users.
Enabling "Deploy to any target" will drastically change the deployment workflow between environments in the Cloud Portal for the affected project.
Deploy to any target
By default, CI/CD flow only allows deployments to the left-most or the flexible environment. With the "Deploy to any target" toggle you now have control to enable CI/CD Flow deployments to all your environments.
When the setting is enabled, the ability to deploy between environments through the Cloud Portal is disabled. All deployments should now be handled by you through CI/CD Flow.
The environments overview on your project will no longer show:
Pending changes indicator; you will not be able to see how far ahead your environments are compared to the next.
The Deploy button is removed; you will not be able to push changes forward by using the Cloud Portal UI.
Instead you will now be able to see which artifact is deployed to your environment.
The git repository under the environment can still receive changes from outside of the CI/CD flow:
Adding or removing an environment will in most cases write to each affected environment.
Auto upgrades on Cloud also create commits.
Adding or editing Document types in the backoffice (or other work that changes schema) on the cloud environment will also create commits.
If changes outside CI/CD have been applied to an environment, the environment card will indicate how far ahead it is of the latest deployment.
You are in control of deploying to all environments through your CI/CD setup.
Next step after enabling "Deploy to any target": .
Disabling "Deploy to any target" will change the UI back to Umbraco Clouds original environments overview. Bringing back Deploy-buttons and pending changes on the environments cards.
A note about disabling "Deploy to any target"
The default behavior is to promote changes between environments using the Cloud Portal. This keeps environments aligned following the left-to-right flow, and they will eventually share the same commits. The Portal uses this alignment to track pending changes between environments.
Sticking to this flow means pushing locally or via CI/CD to the leftmost environment, then promoting changes rightward through the Portal.
When "Deploy to any target" is enabled, commits are no longer pushed between environments. The Portal can no longer track changes between environments in the traditional way. Instead, each CI/CD deployment creates a new unique commit on each receiving environment. For example, deploying the same artifact to two environments results in two different commits — one per environment.
Sample pipelines
Below are a couple of examples on how to set up a CI/CD Pipeline using either Azure DevOps or GitHub Actions.
Each guide describes:
How to set up a new repository in either GitHub or Azure DevOps.
How to get a copy of your Umbraco Cloud project into that repository.
How to configure a new pipeline using the provided samples.
The sample pipelines use either Bash or PowerShell scripts to facilitate communication with the Umbraco CI/CD API.
During the guides, you will have the option to choose between PowerShell or Bash scripts. You can select the scripting technology you feel most comfortable with.
Azure DevOps sample
Covers setting up a CI/CD pipeline using Azure DevOps.
GitHub Actions sample
Covers setting up a CI/CD pipeline using GitHub Actions.
Samples for version 1
If you are using version 1 endpoints, use the guides referenced below:
Migrate from V1 to V2
Learn how to migrate your CI/CD setup from version 1 to version 2.
Scripts and pipeline files have changes.
Familiarize yourself with the new samples.
If you customized the flow or the version 1 scripts, take extra care to incorporate your changes.
What has changed in version 2?
While you can continue to use the version 1 endpoints, the version 2 endpoints contain improvements that enhance the CI/CD feature. Follow the migration guide below to start reaping the full benefits of this workflow.
The biggest enhancement is the ability to target different environments. You can target both the flexible and the left-most mainline environment.
The new endpoints are created to accommodate this enhancement, meaning you will have to supply a target environment alias in some requests.
The initial flow has been slightly changed. Uploading a deployment package is no longer tied to "deployment-meta" and is now a separate step. Every uploaded artifact can be queried in the API. This works similarly to querying deployments via the API.
When you request a deployment, you now also need to supply an artifactId. Additionally, more options are available when deploying.
Updated samples are provided to showcase how to use the version 2 endpoints and flow.
Migrate Azure DevOps
Follow the migration steps below if you are using Azure DevOps.
Delete the scripts and YAML files you initially got from the CI/CD samples:
YAML files
PowerShell files
Bash files
Copy the scripts from the sample repository's to the corresponding folder in your repository:
PowerShell files:
File Type
Sample location
Move to
Bash files:
File Type
Sample location
Move to
Fetch the following values from your Cloud project: Project ID and Target environment alias.
You can use any of the available aliases, but to get similar functionality as before, select the environment described as Leftmost mainline.
Migrate GitHub
Follow the migration steps below if you are using GitHub.
Delete the scripts and YAML files you initially got from the CI/CD samples:
YAML files
PowerShell files
Bash files
Copy the scripts from the sample repository's to the corresponding folder in your repository:
PowerShell files:
File Type
Sample location
Move to
Bash files:
File Type
Sample location
Move to
Fetch the Target environment alias from the Cloud project.
The section explains how to get the environment alias.
Go to your GitHub repository and enter the Settings section.
You can use any of the available aliases, but to get similar functionality as before, select the environment described as Left-most mainline.
Manage Hostnames
When you create an Umbraco Cloud project, the project URLs are based on the name of your project.
Let's say you have a project named Snoopy. The default hostnames will be:
The more you use "Deploy to any target", the more each environment's git repository will diverge. Disabling the feature later is problematic, as realigning the environments is a time-consuming task.
We only guarantee to maintain and keep the master branch. If there are any other branches, they might be removed without any notification causing data loss.
You will need to commit your frontend artifacts as the build pipeline only builds dlls from your C# code.
Code Deployment Summary
Umbraco cloud overview Legacy versions
In the above diagram, the external git repository contains the source code of a class library CS project with a class library project.
With this setup, you commit your changes twice. Once to commit your code in your source control and the other commit to the Umbraco Cloud Git repository to deploy your website. Your source code is not hosted on Umbraco Cloud but only your cloned project will be in the Umbraco Cloud Git Repository. Your code is built and compiled into the cloned project and then pushed to Umbraco Cloud. Thus updating the site with your latest code changes.
Disadvantages of using an Umbraco Cloud Project repository as a source code repository
We only guarantee to maintain and keep the master branch. If there are any other branches, they might be removed without any notification causing data loss.
You will always need to commit your dll files.
Healthy
Warning
Needs fixing
Your repository is in good shape. No action is needed.
Your repository is growing large. Review what is being committed and remove any unnecessary files. Check for accidentally committed media files, build artifacts, or large binaries.
Your repository is too large and may cause deployment failures, slow environment provisioning, and degraded performance. Immediate cleanup is recommended.
# List the 10 largest files currently tracked
git ls-tree -r -l --abbrev HEAD | sort -rnk4 | head -10
# List the largest objects in the entire Git history
git rev-list --objects --all | \
git cat-file --batch-check='%(objecttype) %(objectname) %(objectsize) %(rest)' | \
sed -n 's/^blob //p' | sort -rnk2 | head -10
The hostnames contain the region on which your project is hosted. The options available when choosing a region for your Umbraco project are:
West Europe (euwest01)
East US (useast01)
South UK (uksouth01)
Australian East (aueast01)
Canada Central (cacent01)
To access the backoffice, add /umbraco at the end of the Live, Development, or Staging URL.
Limitations
When working with hostnames on Umbraco Cloud, there are some limitations to be aware of:
Umbraco ID Login - You can only enable a maximum of 100 hostnames for Umbraco ID login.
Domains
To add and manage your hostnames on Umbraco Cloud, follow the steps below:
Go to your project on Umbraco Cloud.
Go to Configuration in the side menu.
Click on Hostnames in the menu.
Click Add new hostname to add a new hostname.
Manage hostnames
Ensure that the hostname you are binding to your Umbraco Cloud environment has a DNS entry that resolves to the Umbraco Cloud service. The DNS settings can either use a CNAME or an A & AAAA record:
CNAME: Usually used for domains with "www" in the URL.
This is recommended to use, if possible, as the record is not changed as often as A & AAAA IPs are. When setting up a CNAME it needs to point to dns.umbraco.io.
A & AAAArecords: Are usually used for the Apex domain (without "www" in the URL).
It needs to be created at the root of your domain.
A-records to either or both IPv4 addresses:
162.159.140.127
172.66.0.125
AAAA records to either or both IPv6 addresses (to support IPv6 connectivity):
2606:4700:7::7d
2a06:98c1:58::7d
If you're using the Former A and AAAA records consider changing them to the new A & AAAA records above.
Former A and AAAA records
The following Records are now obsolete and remain here for documentation purposes.
A Records
104.19.191.28
104.19.208.28
104.17.17.9
104.17.18.9
AAAA Records
2606:4700::6813:bf1c
2606:4700::6813:d01c
Once you have updated your DNS records, remove the hostname and re-add it from Umbraco Cloud to re-validate the certificate with Cloudflare.
You can also check the DNS propagation using a site like What is my DNS?.
Check with your DNS host or hostname registrar regarding configuration details for your Hostnames.
To specify the hostname for each root node using a multisite setup, follow these steps:
Go to the Backoffice of the project.
Right-click the root content node.
Select Culture and Hostnames.
Click Add New Domain in the Culture and Hostnames window.
Enter your Domain name and select the Language from the drop-down list.
Enter domain and select Language.
Click Save.
Once you've assigned a Hostname to your Umbraco Cloud environment, you may want to hide the default umbraco.io URL (e.g. snoopy.euwest01.umbraco.io). To do so, see the Rewrites on Cloud article.
Using special characters
Umbraco Cloud supports Internationalized Domain Names (IDN) allowing you to configure domain names including special characters.
When using an IDN direct access to the Umbraco backoffice from that domain is unavailable. If you have configured måneskin.dk as a domain, you cannot access the backoffice using måneskin.dk/umbraco. The backoffice will still be accessible using the default Cloud URL (maaneskin.euwest01.umbraco.io/umbraco), or from other domain names that do not include special characters.
Automatic Transport Layer Security (TLS)
All hostnames added to an Umbraco Cloud project's environment will get a TLS (HTTPS) certificate added, by default. The certificate is issued by Cloudflare and valid for 90 days after which it will be automatically renewed. Everything around certificates and renewals is handled for you and you only need to ensure the DNS records are configured according to our recommendations above.
You will need to remove the old DNS entry before the Cloudflare service generates a new certificate for your Hostname.
Is your hostname managed/proxied in your own Cloudflare account?
Cloudflare is a popular DNS provider, which offers a variety of different services to improve performance and security. We also use it for DNS and Hostnames on Umbraco Cloud.
When adding a hostname to your project hosted on Umbraco Cloud, using your own Cloudflare account the process is slightly different.
Set Proxy Status to DNS Only when creating a CNAME or A-record for your hostname in Cloudflare.
Change Proxy Status to Proxied once your hostname is Protected on the Hostname page for your Cloud project.
Using Certification Authority Authorization (CAA) for your domain?
CAA is a DNS resource record defined in Resource Record (RFC) 6844. It allows domain owners to specify which Certification Authorities (CAs) can issue certificates for their domains. If you use CAA records on your domain, you will either need to remove CAA entirely or add the following through your DNS provider:
This is necessary because Google Trust Services is the Certificate Authority for the certificates issued on Umbraco Cloud.
CAA records can be set on the subdomain, but it's not something that is commonly used. If there’s a CAA record at, e.g., app.example.com, you’ll need to remove or update it. If you want to use wildcards and allow certificates for any subdomain, the CAA record should look like this:
The Certificate Authority (CA) used to issue certificates for all Umbraco Cloud sites' custom hostnames was changed on September 26, 2022. From October 31, 2022, certificate renewals for existing hostnames will also be updated to use the new CA.
No action is required unless you set a Certificate Authority Authorization (CAA) record on your domain. In that case you need to update the CAA record before renewal. Please follow the Migrate to new Certificate Authority for custom hostnames documentation.
On the Professional and Enterprise plans, you can manually add your certificate to your project and bind it to one of the configured hostnames.
Using a custom Web Application Firewall (WAF) or a proxy on Umbraco Cloud
This section covers common configurations for using a custom WAF or proxy with your Umbraco Cloud website.
Configuration may vary depending on which WAF you are using, so you should always consult your vendor for best practices and recommendations or reach out to Umbraco Cloud Support.
Proxying to the custom hostname
If your hostname can't point to dns.umbraco.io, Umbraco Cloud won't be able to reissue a certificate for your hostname during future renewals (3 months). You can publish a Domain Control Validation (DCV) record or use a custom certificate.
The DCV record is a CNAME record with key _acme-challenge.<hostname> pointing to <hostname>.0df3da1ce1ef695a.dcv.cloudflare.com. For example, www.example.com - CNAME _acme-challenge.www.example.com points to www.example.com.0df3da1ce1ef695a.dcv.cloudflare.com
The DCV record will ensure that Umbraco Cloud can always issue/renew the certificate for the custom hostname.
Proxying to default Umbraco Cloud hostnames *.{region}.umbraco.io
You can proxy freely to the default Umbraco Cloud hostname. The application runtime will see *.{region}.umbraco.io as the application URL. Multisite set-ups aren't supported when proxying to default hostnames.
Learn more about best practices for working with rewrite rules on Umbraco Cloud projects.
example.com. IN CAA 0 issue "pki.goog"
example.com. IN CAA 0 issuewild "pki.goog"
Manual upgrade of Umbraco CMS
Learn how to manually upgrade your Umbraco Cloud project to run the latest version of Umbraco CMS.
Projects on Cloud will either be automatically upgraded with patch releases or it can be done through the portal when new minors are available.
In rare cases, your project might not be on the latest patch or minor and you will need to upgrade the project manually.
This article will give you a step-by-step on how to manually upgrade your Umbraco Cloud project.
Prepare for the upgrade
When upgrading a Umbraco Cloud project manually, the first step is to either or pull down the latest changes for your left-most mainline environment.
Navigate to the /src/UmbracoProject/ folder to find the .csproj file.
Make sure you can run your Cloud project locally and restore content and media. It's important that you check that everything works once the upgrade has been applied and for this, you need to have a clone locally that resembles the Cloud environment as much as possible.
Get the latest version of Umbraco
For Cloud projects using legacy Umbraco versions (7 or 8), follow the specific steps outlined in the section.
To get the latest version of Umbraco, follow these steps:
Run the dotnet add package Umbraco.Cms command in the directory that contains your project files. If you want a specific version, run the dotnet add package Umbraco.Cms --version <VERSION> command.
Run dotnet restore to install the package.
Open your
Alternatively, you can also update Umbraco via the NuGet Package Manager in Visual Studio:
Manual upgrades for legacy Umbraco
Get the latest version of Umbraco
Unzip the folder to your computer
Run the upgrade locally
After updating the NuGet packages, follow these steps to complete the upgrade. Make sure everything is functioning correctly before pushing the changes to your Umbraco Cloud project.
Run the project locally
When the project spins up, you'll be prompted to log in to verify the upgrade
On the installation screen, you need to verify the upgrade:
Hit Continue - this will complete upgrading the database
The upgrade will finish up
When it's complete you will be sent to the Umbraco backoffice
Make sure that everything works on the local clone and that you can run the project without any errors.
Push upgrade to Cloud
Before you deploy the upgraded project to the Cloud, it's important that you check if there are any on the new Umbraco version.
If updates are available for Umbraco Forms or Umbraco Deploy then you can upgrade those locally as well, before moving on.
When you've upgraded everything locally, and made sure that everything runs without any errors, you are ready to deploy the upgrade to Umbraco Cloud.
Stage and commit all changes in Git
Push the changes to the Cloud environment
When everything is pushed, head on over to the Umbraco Cloud Portal
Again it's important that you make sure everything runs without any errors before moving on to the next Cloud environment.
Migrate to Umbraco Cloud
A guide to help you migrate your Umbraco CMS site to Umbraco Cloud.
One way to start your Umbraco Cloud journey is to migrate an existing Umbraco CMS project to the platform. There are some requirements that this project needs to meet as well as some specific steps to follow.
In this article, you can find all the information you need to migrate your existing Umbraco CMS project to Umbraco Cloud.
Requirements
To properly migrate your Umbraco CMS project to Umbraco Cloud it is important to ensure that your project meets the requirements.
Project Settings
When working with an Umbraco Cloud project, you can handle the project configuration directly in the Umbraco Cloud Portal. You can manage the following configurations from the left-side menu:
Overview
Legacy Umbraco Visual Studio Setup
This page describes how to set up your Visual Studio solution to work locally with an Umbraco 7 or 8 Cloud project.
This article is only relevant if you are working on a Umbraco Cloud project running Umbraco 7 or Umbraco 8 (legacy Umbraco).
if you are on a later version, follow the
Troubleshooting
Learn how to troubleshoot and debug different scenarios you might encounter while using the CI/CD feature.
Special Cases
Using RestorePackagesWithLockFile in your
A video showing how to use partial restores between Umbraco Cloud environments.
A video tutorial covering how to configure SMTP settings on an Umbraco Cloud project.
.csproj
file and confirm that the
Umbraco.Cms
package reference shows the correct version.
Copy the following folders from the unzipped folder to your Cloud project folder:
/bin
/Umbraco
Merge configuration files
In this step, you need to merge the configuration files containing changes. For this, it is recommended to use a tool like WinMerge or DiffMerge.
Avoid overwriting these files, as it will overwrite any custom configuration and Umbraco Cloud-specific settings. Read more about which Cloud-specific details you should watch out for in the following sections.
Web.config
When merging the web.config file make sure that you do not overwrite/remove the following settings:
<configSettings>
<appSettings>
<connectionString>
<umbraco.deploy>
Dashboard.config
This section only applies to Umbraco 7 projects.
When merging the Dashboard.config file make sure that you do not overwrite/remove the following settings:
Deploy
StartupFormsDashboardSection
Do not merge the following section from the new version of Umbraco:
Other config files
The following config files contain differences, and in most cases, you need to keep the ones from your Cloud project:
/Splashes/noNodes.aspx
trees.config
umbracoSettings.config
This concludes the steps specific to the legacy Umbraco versions. To continue, follow the steps below.
Access the backoffice of the Cloud environment you pushed the upgrade
You will again be prompted to log in to complete the database upgrade
You will be sent to the backoffice once the upgrade is complete
<connectionStrings>
<remove name="umbracoDbDSN" />
<add name="umbracoDbDSN" connectionString="Data Source=|DataDirectory|\Umbraco.sdf;Flush Interval=1;" providerName="System.Data.SqlServerCe.4.0" />
<!-- Important: If you're upgrading Umbraco, do not clear the connection string/provider name during your web.config merge. -->
</connectionStrings>
Each requirement outlined below is presented with recommended suggestions when a project does not meet the requirements.
Use a supported version of Umbraco CMS
The project needs to run one of the currently supported versions of Umbraco CMS.
One of the first steps in this migration guide is to create a new project on Umbraco Cloud. You can only create Umbraco Cloud projects that use supported versions of Umbraco CMS, which requires you to upgrade your project accordingly.
Recommendation
Upgrade the project to the latest Long-Term Supported (LTS) version of Umbraco CMS.
Find more details on upgrading in the .
If you prioritize new features over long-term support, you can upgrade to the latest support Short-Term Supported (STS) version instead.
Learn more about the versioning strategy including which versions are currently supported in the .
Ensure all packages and add-ons are compatible
In case the project uses packages or add-ons, these will need to be compatible with both Umbraco Cloud and the Umbraco CMS version used.
Most packages and add-ons are compatible with Umbraco Cloud. It is recommended, however, to verify the compatibility for each package and add-on used, before continuing the migration. This is especially true for packages and add-ons that store data in the Umbraco project.
Recommendations
Use the to verify compatibility for each package/add-on used on your Umbraco CMS project.
Verify version compatibility for all packages and add-ons used.
Verify Umbraco Cloud compatibility for all packages and add-ons used.
Contact the package/add-on owner if in doubt.
Remove any packages and add-ons not compatible with Umbraco Cloud or the Umbraco CMS version.
Optionally, look for alternative packages to replace any incompatible packages used on the project.
Avoid legacy code
Due to incompatible legacy code in old Umbraco CMS versions, we strongly recommend avoiding migrating projects upgraded from versions older than version 7.
Was the project created using Umbraco 6 or older versions, both the source code and the database can contain legacy code. This code is incompatible with modern versions of Umbraco CMS and Umbraco Cloud and cannot be migrated.
Recommendation
Build a new project using a supported Umbraco CMS version, instead of migrating.
Reach out to our support team to discuss recommendations moving forward from here.
Prepare your project
Before initiating the migration, the project should be cleared of unnecessary files and data. This includes emptying recycle bins in the Umbraco backoffice and deleting temporary files in the project repository.
Follow the cleanup steps on the local environment/clone of the Umbraco CMS project.
Run the project.
Access the Umbraco Backoffice.
Empty the Recycle bin in the Content section.
Empty the Recycle bin in the Media section.
Stop the project.
Delete the following folders from the project directory:
umbraco/Data/TEMP
umbraco/Logs
Create a database backup file
The data from the Umbraco CMS project will be migrated to Umbraco Cloud by uploading a database .bacpac file. The next steps will guide you through creating a .bacpac file from the project database.
Creating a bacpac file requires that the project use an SQL Server database. If the project is using an SQLite database a couple of different options are available:
Find an external tool to convert the SQLite database to SQL Server.
Migrate your content and data to Umbraco Cloud using .
When migrating a project to Umbraco Cloud it is important to do so with a clean project. Using a clean project ensures that no unknown factors can come into play during the migration.
You can create a new Umbraco Cloud project in one of the two ways:
Following this guide, the Umbraco CMS project has been migrated to the Umbraco Cloud Development environment. For the migration to be complete, it should be deployed to the Umbraco Cloud Live environment.
Hostname monitoring allows you to track the availability and response times of your websites. You can configure monitors for multiple hostnames, set check frequency and locations, and view historical ping results. This helps ensure optimal website performance and alerts you to potential downtime or performance issues.
View the usage of Custom Domains, Media Storage, Bandwidth, and Bandwidth History for your project.
Check whether the project is using above or below the allowed amount for its plan.
View the top 10 bandwidth usage paths, referrers, and the top 50 media files.
Usage
Environment Logs
Each environment has an error log that appears only if there are any unread errors in that specific environment. You can view the errors by clicking on Environment logs in the Insights menu.
During development, too many errors can slow down the error page. To fix this, connect to the environment's database locally and delete the errors. Learn how to connect to the database in the Database on Umbraco Cloud section.
Environment errors are stored in the UCErrorLog table.
The query below deletes 90% of the errors. The query always deletes the oldest errors first. You can tweak the query to delete any percentage of errors by changing the number in the first row.
The Connections section provides connection details for your Umbraco Cloud databases. You need to allow your IP to connect to the databases with your local machine.
The Automatic Upgrades section handles minor and patch upgrades for the Umbraco components used by Umbraco Cloud. By default, new projects have automatic upgrades enabled.
You can manage whether your site is automatically upgraded with the latest patch and minor version(s) of Umbraco CMS, Forms, and Deploy.
For information about opting out of automated upgrades, see the Product Upgrades article.
You can configure deployment webhooks for your environments in this section. Webhooks are triggered upon successful deployments, and you can specify where the deployment information is sent.
Enable IIS logging for each environment. The log files can be accessed in Kudu at C:\home\LogFiles\http. IIS logs have a rolling size limit of 100 MB, overwriting the oldest files once the limit is reached.
Change the .NET framework runtime for each environment of your Umbraco Cloud project.
Change the value of the DOTNET_ENVIRONMENT environment variable for each environment of your Umbraco Cloud project. To learn more about working with multiple environments in ASP.NET Core, refer to the .
to control Proactive Auto-Heal and Always On for your environments. Managing these settings is available only for environments on a Dedicated plan.
Enabling IIS logging will cause the site to restart. For additional information, refer to the Microsoft Documentation.
Changing the .NET framework runtime or the DOTNET_ENVIRONMENT environment variable will also cause your website to restart.
When using WebApplication, DOTNET_ENVIRONMENT takes precedence over ASPNETCORE_ENVIRONMENT. When using the legacy WebHost, ASPNETCORE_ENVIRONMENT takes precedence instead.
You can also override the environment value by setting the ASPNETCORE_ENVIRONMENT variable in your web.config file.
By default, Public access is available for projects created after the 10th of January 2023.
The Umbraco.Cloud.Cms.PublicAccess package can be installed to enable Public access for projects created before the 10th of January 2023.
The Public access setting, found under the Security tab, allows you to deny access to your project. Users who are not part of the project or whose IP addresses have not been allowed will not be able to access the project.
You can enable or disable this setting on the Public access page. Access to manage Public access requires your project to be on the Standard plan or higher.
External Login Providers allow you to integrate third-party authentication systems to manage backoffice user logins securely. Using OpenID Connect, you can connect providers like Microsoft Entra ID, Auth0, and Google to simplify login management and improve security for your teams.
The Transport Security section enables you to manage transport security settings for your project. You can configure specific transport security options for all hostnames or individual hostnames within your project.
The Management API Security section allows you to secure access to the backend services of your project. This can be managed from the Security menu on the Umbraco Cloud Portal.
The Secrets Management section is used for storing sensitive information such as API keys, encryption keys, and connection strings used by your Umbraco Cloud project.
A Baseline is a project that serves as a template for creating child projects. When you set up a baseline project, you can quickly spin up new projects with the same packages, components, and configuration. Any changes you make to the baseline can be pushed to all connected child projects, keeping them in sync.
You can change your Umbraco Cloud project to run in a dedicated setup with additional computational resources compared to the shared setup. You can choose between different dedicated options depending on the number of resources you will need for your project.
Dedicated Resources
Change Plan
You can change your Umbraco Cloud plan to upgrade to a higher plan or downgrade to a lower plan depending on your project needs. You can manage plan changes and dedicated resources from the Management menu.
Change Plan
Rename Project
You can rename your Umbraco Cloud project from the Management menu.
If you are working locally, you need to update the origin of your local git repository to point to the new clone URL. Alternatively, you can make a fresh local clone of the project once you’ve changed your project name.
You can rename your project from the Rename Project section in the Management menu on the Umbraco Cloud Portal. When you rename a project, the default hostnames and clone URLs assigned to the project are updated to match the new project name. You can also rename your project files and folders locally.
Delete Project
You can delete your Umbraco Cloud project from the Management menu. Deleting your Umbraco Cloud project is permanent - all data, media, databases, configuration, setup, and domain bindings are removed in the process.
Deleting your Umbraco Cloud project will also cancel any subscriptions you have set up for the project.
Delete Project
Settings menu
DELETE TOP(90) PERCENT
FROM [dbo].[UCErrorLog]
WHERE [Read] = 0
The Visual Studio Solution
If you're writing a lot of custom code (or like Intellisense), we recommend the following setup:
A Visual Studio solution with a
Website Project for the Umbraco site (coming from the cloned git repository from the Umbraco Cloud Project), and
Class Library Project for the code that will be created for the Umbraco site - this can be MVC Controllers, WebApi Controllers, Surface Controllers or data access plus whatever else you might need to write code for.
Below is a screenshot of our recommendation on how the projects should be configured. We use the following naming conventions: *.Web for the Umbraco website and *.Core for the accompanying code.
Visual Studio Project setup
Prerequisites
Visual Studio 2017 v15.9.6 or later
Git and/or Git Credential Manager for Windows
Are you used to using a Git client like GitKraken or SourceTree? You still need to make sure that you have Git CLI installed. Git CLI is used by the UaaS.cmd tool to clone down your Cloud project.
Video tutorial
Generate a Visual Studio Solution
Important: The UaaS.cmd tool is no longer supported by Umbraco HQ.
Manually creating and configuring a Visual Studio solution with the right projects can take a bit of time. We have made a little command line tool that will set the solution up for you.
Download the UaaS.cmd tool from umbra.co/uaas-cmd and place it in the folder you want the solution in.
Important: To use the UaaS.cmd tool you will need to have Visual Studio 2017 version 15.9.6 or any later version installed.
Important: Be aware if you run the Uaas.cmd tool as an administrator it will generate the files in your Windows/System folder.
This is a recommended setup. If you don't like the setup then you can play with it and make it your own. There's nothing magic about this setup. It is adding a few files to your Umbraco Cloud website to give you a flying start to begin working with Visual Studio.
What follows is a recommendation and not the only way to work with Visual Studio.
Before running the UaaS.cmd tool you will need the git clone URL for your Umbraco Cloud Project.
Go to the Project in the Portal
Copy the URL from "How to connect my machine"
Clone down Umbraco Cloud project
Running the UaaS.cmd tool will download the latest Visual Studio generator (waasp.exe) and prompt you to enter the clone URL for your Project. Then enter the "Namespace", which will be the name of the Visual Studio solution and thus the namespace for the solution as well.
Does an error appear where the tool says: "Unable to connect to the remote server", but you can still add the clone Url? You then need to allow the UaaS.cmd through your firewall/antivirus.
If you haven't cloned the repository before, you will be asked to enter the username and password for the Umbraco Cloud Project. This also happens if you do not have a git credentials manager installed. In both cases, use the credentials you use to access the Portal and the Umbraco backoffice.
Cloning down using Command line
Once it's done running the tool will have created a Visual Studio solution file *.sln and two Projects.
*.Web contains the Umbraco site that was (git) cloned from your Project
*.Core is a Class Library that you can use for your custom code, as mentioned above
Both projects are configured with the NuGet packages for Umbraco using the version that corresponds to the site cloned from Umbraco Cloud.
The result should look something like this within the folder where the UaaS.cmd tool ran:
The Generated Umbraco Solution
You can now open the solution in Visual Studio and hit F5 to start the site directly from Visual Studio.
The Git repositories
One thing to notice about this setup is that you will get two git repositories as well as two projects.
The site cloned from your Umbraco Cloud Project will be contained within a git repository that is connected to your Project on Umbraco Cloud. Whenever you want to deploy changes to your (remote) Umbraco Cloud site you should commit everything within the *.Web folder. This is where the git repository for Umbraco Cloud is also located.
Going up one level to where the *.sln file is located you will notice a .git folder. This is the second git repository. You should use this repository for all the code you write as well as the solution and project files for Visual Studio.
Think of everything within the *.Web folder as your deployment repository, and everything surrounding that folder as your source code repository. The Umbraco Cloud repository (within the *.Web folder) will not (and should not) be committed to the other git repository.
What's next?
Now that you've added your own touch to your site, you're ready to deploy to your Umbraco Cloud environment. The key thing to know is that your custom code from the *.Core project will be built into a .dll file in your *.Web project. This .dll file is what you need to push up to the Cloud repository.
Once you have everything your site will need committed you can follow the deployment workflow to complete the deployment.
Working with Visual Studio
As mentioned in the previous section, you will start with two projects in Visual Studio. A *.Web project with the Umbraco site configured as a Website project, and a *.Core project configured as a class library.
So what goes where?
Anything that is used within Umbraco, like plugins and configuration, should by default be placed in the *.Web project. Here is a list of other elements that you want to place in the *.Web project:
Website assets like CSS, JavaScript and related images
Views, Partial Views and Partial View Macros
Configuration (web.config and all the Umbraco specific or related config files in ~/Config/)
Usercontrol ascx-files
Plugins (typically located in App_Plugins)
Meta data (the files that Umbraco Deploy uses in the folder ~/Data/Revision/)
Media files will also be placed under the *.Web folder. As Website projects show all files on disk by default you will be able to see these through Visual Studio. Media files from the /Media/ folder should not be committed to the git repository, but more on that in the next section.
We recommend placing all your code in the *.Core project (instead of, for example, using App_Code for that). This includes, but is not limited to:
Controllers for MVC, Web Api
Controllers for Umbraco Plugins, Surface, API
Models and ViewModels
Data Access (the *.Core project references Umbraco so you can use the Umbraco datalayer as needed)
Extensions methods
Using ModelsBuilder and IntelliSense
To use ModelsBuilder with IntelliSense in Visual Studio, you'll need to make some configuration changes to the web.config file of your *.Web project. This is to ensure that the models produced by ModelsBuilder are stored in the right place for compilation.
Make sure ModelsBuilder.Enable is set to true (default): <add key="Umbraco.ModelsBuilder.Enable" value="true" />
Set the Mode to AppData or LiveAppData. This will ensure you can use ModelsBuilder with Visual Studio. So in your Web.config, you should to have: <add key="Umbraco.ModelsBuilder.ModelsMode" value="AppData" />
Create a directory called "Models" in your App_Code folder in the *.Web directory of your site. Then add: <add key="Umbraco.ModelsBuilder.ModelsDirectory" value="~/App_Code/Models/" /> to Web.config.
Are using the Visual Studio Extension for ModelsBuilder and getting the error message Unauthorized when generating models? You'll need to use or create a backoffice user in your local installation. You then need to supply the credentials for this user in the Visual Studio options. This is necessary because the extension is not able to authenticate against Umbraco ID.
Using Umbraco namespaces in your *.Core project
In order to use Umbraco's features in your *.Core project, you have to add references to the DLLs in your *.Web/bin.
You can do this by right-clicking on References and selecting Add Reference. Browse and select the DLLs you'd like to use and then hit OK. Don't forget to build.
Add references to DLLs
Git - what should be committed
When working with this solution setup it's important to remember that you are operating with two different git repositories:
One for your source code, and
One within the *.Web folder for committing and deploying your changes to Umbraco Cloud.
The cloned git repository from Umbraco Cloud comes with its own .gitignore so files that should not be committed are already handled.
All files that are required to run the Umbraco site should be committed to the git repository in the *.Web folder. From there they can be deployed to Umbraco Cloud. This includes assemblies (*.dll).
To ensure your .dll files are created in release mode, switch to "Release" mode instead of "Debug" mode when building the project.
It is recommended to build the project in release mode, before deploying the changes through Git.
For the *.Core part of the solution as well as the solution file and default .gitignore file you commit that to the source code repository. You should ideally set a remote for this git repository to your own git host like GitHub, BitBucket or Visual Studio Team Services.
These are the files and folders you typically want to commit in your own source code repository:
The project and code files in *.Core
The solution file *.sln
.gitignore
UaaSClone.cmd (used for re-establishing the *.Web folder with the git repository from Umbraco Cloud)
Setup for new team members
When you are working in a team you will have additional people that will use this same setup. However, they will only clone your source code repository from your GitHub, Bitbucket, or Visual Studio Team Services account. They will, by default, not get the *.Web folder and the Umbraco site, because that part is not contained within the source code repository.
To help to get up and running we added a UaaSClone.cmd, which can be run after cloning the source code repository. Running this command line tool will clone the Umbraco Cloud repository to the right folder, and set up Visual Studio for them.
Working with NuGet
Some Umbraco packages are available on NuGet and you can install NuGet packages into the *.Web project to add functionality to your site. Remember, this is a normal Visual Studio solution, so you can work with NuGet packages exactly like you're used to.
If you need to program something that depends on a NuGet package you should install that NuGet package in both projects.
Install it in *.Core so you can write the code you need against the library you working with (obtained from NuGet)
Also install it in *.Web so that the library files also end up in your website and your compiled code works there as well
If RestorePackagesWithLockFile is set to true, you will experience that no changes are made to the website.
This happens even though the CI/CD deployments were successfull, and files were updated as expected in the Cloud repository. The reason for this is that the Kudu deployment process fails. This process takes the newly committed files from the Cloud repository and runs the restore, build, and publish operations on the Cloud environment.
How to resolve the issue
To resolve this issue, you need to ensure that when the site is restoring on Umbraco Cloud it is not using the lock file. You can do this by adding this line in your csproj file:
Deployment report: No changes detected - cleaning up
The package you uploaded didn't contain any changes that would affect the Git repository on the Cloud Environment. The CI/CD job will skip the remaining steps and complete.
How to resolve the issue
If you expected the deployment to create changes in the Cloud Environment, make sure you are uploading the correct ZIP file.
Cloud Sync
The project's left-most mainline environment has changed
The mechanism to determine changes since the last deployment can't do so when the left-most mainline environment has changed.
This happens when you either add or remove a mainline environment. The 'get diff' endpoint responds with status 409 and the following JSON payload:
How to resolve the issue
You need to manually ensure that all the latest changes on your left-most mainline environment are also present in your local copy.
Once this is done, you can run a new deployment that skips the cloud-sync step.
The sample pipelines are naively trying to apply any changes from the generated patch file on the Cloud. This doesn't always work, and you might see an error similar to the following:
The root cause is due to conflicts between your source and the code in the repository on Umbraco Cloud. This is usually due to one of two things:
The Cloud project package(s) have been auto-upgraded, and that diff was already applied.
Ensure your GitHub repository is up-to-date with any changes in your Umbraco Cloud environment.
Locate the main.yml file in the following directory: {projectname}.github\workflows on your local project.
Open the main.yml file in a text editor and navigate to the “jobs” section.
Comment out the entire “cloud-sync” section and the “needs: cloud-sync” under “cloud-deployment”.
The screenshots below provide an example:
Cloud sync code highlight
Commit the changes and push them to GitHub. This action will trigger a build and run the pipeline.
At this point, the pipeline should execute successfully, and your changes will be pushed to Umbraco Cloud. If this is the case, proceed to the next step.
Remove the comments added in step 4 and make a new commit.
Optional: Add "[skip ci]" to the last commit message, to avoid automatically triggering the pipeline
Navigate to your azure-release-pipeline.yaml and comment out these two lines:
Ensure that your Azure DevOps repository is up to date with any changes in your Umbraco Cloud environment.
Find the pipeline in Azure DevOps.
Click on "Run Pipeline" in the top right corner.
Run Pipeline in Azure DevOps
Click on "Stages to run."
The Run Pipeline View
Uncheck the "Umbraco Cloud Sync" checkbox.
Confirm on "Use selected stages".
The Stages to run View
Click on "Run" back in the "Run Pipeline" view.
As no changes were made to your pipeline, it will run as usual on the next push to Azure DevOps.
Upload Errors
Failed to read the request form. Multipart body length limit 134217728 exceeded
The current size limit is set to 134217728 bytes (or about ~128 MB).
How to resolve the issue
Ensure that the package you are trying to upload does not contain any unnecessary items.
You can see an example of how to zip your repository before uploading it, by referring to our GitHub or Azure DevOps samples.
Deployment failed
File missing: The .umbraco file cannot be found in the root of the repository
The .umbraco file is missing or has been renamed. This file must be present at the root of the zip file.
Below is an example of the default .umbraco file that comes with a new Umbraco Cloud project.
File format Error: The .umbraco file is not valid
The .umbraco file has invalid characters. Sometimes you might need to change the repository's folder structure and the default project's name. Ensure that the base field does not use backslashes ('') as the folder denominator.
See an example of the default .umbraco file in the section above.
Cannot apply update because the following packages would be downgraded: Package: Umbraco.{abc}, Version: {x.y.z}
The service goes through all .csproj files in the uploaded package and compares them to the versions running in your left-most cloud environment. This is done to try to prevent you from downgrading the crucial Umbraco packages used by the cloud.
The full error could look like this:
The error tells you which package to look for and which version is currently in your left-most cloud environment. The error also contains the problematic incoming .csprojfile and the version referenced by it.
If the incoming package references multiple lower-versioned packages, the error will list each one.
How to resolve the issue
Align the package versions in your .csproj files with the higher version mentioned in the error for that package.
If you have orphaned .csproj files, remove or rename them. Orphaned would be backup .csproj files or files not referenced by any of the main project files nor referenced in a .sln file.
Could not find /app/work/repository/Readme.md to stat: No such file or directory
In some cases, you might see an issue where filename casing causes an error.
How to resolve the issue
Rename the Readme.md file in the root of your repository to something different. The file can keep the markdown extension.
Commit the change to your repository.
Run the pipeline.
If you want, you can change the filename back to Readme.md after a successful CI/CD deployment.
The site can't be upgraded as it's blocked with the following markers: updating
In rare cases, deployments fail, and the Cloud infrastructure doesn't clean up correctly. This leaves behind an "updating" marker. The next time you try to deploy through your pipeline, you will encounter an error.
How to resolve the issue
To fix this issue, use Kudu to remove the leftover marker file.
Access Kudu on the affected environment.
If you only have one environment, you want the live environment.
If you use V1 endpoints and have more than one environment, you want the left-most mainline environment.
Navigate to the site > locks folder.
Locate the file named updating.
Remove the updating file.
Run the pipeline to verify whether the issue has been resolved.
Unable to verify the deployment has finished
This error will be shown when the system can't verify that the latest deployment has been pushed and deployed in Kudu. When a change is pushed to a Cloud Environment, the Kudu deployment is started. CI/CD is also utilizing this flow.
The Project History page offers information on CI/CD flow deployments. Navigate to the deployment and inspect the Deployment Kudu Log for insights.
How to resolve the issue
Below is a list of different options for fixing the issue:
Ensure your code can compile and run (relevant only if you have enabled the skipBuildAndRestore toggle in V2).
For a project running Umbraco 15 or later, make sure the CompressionEnabled setting is set to false.
The static assets compression operation on the app service is resource-intensive and slows down the Kudu deployment.
Running npm commands via .csproj files is generally unsupported on Umbraco Cloud.
Create and commit a small change and try deploying again.
A small change can be adding a dummy text file next to your code files or adding a comment in a .cs file.
Make sure your artifact is following .
Environment errors after deployment
Unable to determine environment by its {environment-id}
This happens when using CI/CD to deploy changes to your live environment, and later add a new Cloud environment. Your environment will fail to boot up and will show the following error message:
This issue arises because the environment is missing in the local umbraco-cloud.json file.
How to resolve the issue
To resolve this issue, follow these steps:
Navigate to Kudu in your Live environment.
Select “Debug console” and choose “CMD”.
Find the umbraco-cloud.json file. The path to this file may vary depending on your setup, but the default location on the cloud is C:\home\site\repository\src\UmbracoProject.
Click ‘edit’ on the file and copy all its content. This content is consistent across environments, so it’s safe to do so.
Paste the copied content into the umbraco-cloud.json file in your local project and push the changes.
After completing these steps, your left-most mainline environment should be correctly registered across all environments, allowing you to continue your work without any issues.
{
"type":"LeftMostEnvironmentChanged",
"title":"The projects left-most environment has changed",
"status":409,
"detail":"Unable to calculate changes based on a different left-most environment",
"traceId":"..."
}
error: patch failed: src/UmbracoProject/UmbracoProject.csproj:9
error: src/UmbracoProject/UmbracoProject.csproj: patch does not apply
[project]
base = "src/UmbracoProject"
csproj = "UmbracoProject.csproj"
Cannot apply update because the following packages would be downgraded: Package: Umbraco.Cms, Version: 13.4.0 ==> Project file: /Update/src/MyAwesomeProject.Code/MyAwesomeProject.Code.csproj contains lower Version: 13.1.0 .
“System.InvalidOperationException: Unable to determine environment by its {environment-id}”
Migrate from Umbraco 8 to the latest version
This article will provide steps on how to migrate a Cloud project from Umbraco 8 to Umbraco 10.
It is currently not possible to upgrade directly from Umbraco 8 to the latest version.
The recommended approach for upgrading from version 8 to the latest version is to use this guide to upgrade from Umbraco 8 to Umbraco 10 . Umbraco 10 contains the database migrations that must be upgraded from Umbraco 8. You can then use the Major Upgrades steps to upgrade from Umbraco 10 to the latest version.
Since the underlying framework going from Umbraco 8 to the latest version has changed, there is no direct upgrade path. That said, it is possible to re-use the database from your Umbraco 8 project on your new project in order to maintain the content.
It is not possible to migrate the custom code as the underlying web framework has been updated from ASP.NET to ASP.NET Core. All templates and custom code will need to be reimplemented.
You also need to make sure that the packages that you are using are available on the latest version.
Prerequisites
A Umbraco 8 Cloud project running the latest version of Umbraco 8.
A clean Cloud project running the latest version of Umbraco with at least two environments.
A backup of your Umbraco 8 project database.
It is recommended to have at least two environments on the new Umbraco project.
If your Umbraco 8 site is using Umbraco Forms, ensure you configure it to save data in the database, before starting this tutorial. For more information on migrating Umbraco Forms data to the database, see the article.
Should something fail during the migration, the left-most environment can be removed and re-added to start over on a clean slate.
Video Tutorial
Step 1: Content Migration
If you use Umbraco Forms, make sure to have to True before step 1.
Create a backup of the database from your Umbraco 8 project using the .
Alternatively, you can clone the environment down and take a backup of the local Database after restoring. Make sure to restore both content and media from your Cloud environment after cloning it down.
Import the database backup into SQL Server Management Studio.
As you are cloning down a brand new Cloud project there is nothing the restore. Select the "Skip restore and open Umbraco" link when starting up the project locally to go directly to the backoffice.
Update the connection string in the new Cloud projects appsettings.json file so that it connects to the Umbraco 8 database:
You can add the 'umbracoDbDSN_ProviderName' attribute to set the .NET Framework data provider name for the DataSource control's connection. For more information on the data providers included in the .Net Framework, see the .
Enable to authorize the database upgrade.
Run the new Cloud project locally and login to authorize the upgrade.
Select "Continue" when the upgrade wizard appears.
This is only content migration and the database will be migrated.
You need to manually upgrade the view files and custom code implementation. For more information, see Step 3 of this guide.
Step 2: File Migration
The following files/folders need to be copied from the Umbraco 8 folder into the new Cloud project folder:
~/Views - Do not overwrite the default Macro and Partial View Macro files unless changes have been made to these.
Any files/folders related to Stylesheets and JavaScript.
Step 3: Custom Code in the latest version
The latest version of Umbraco is different from Umbraco 8 in many ways. With all the files and data migrated, it is now time to rewrite and re-implement all custom code and templates.
Examples of changes
One of the changes is how published content is rendered through Template files. Due to this, it will be necessary to update all the Template files (.cshtml) to reflect these changes.
Read more about these changes in the section of the Umbraco CMS documentation.
Template files need to inherit from Umbraco.Cms.Web.Common.Views.UmbracoViewPage<ContentModels.HomePage> instead of Umbraco.Web.Mvc.UmbracoViewPage<ContentModels.HomePage>
Template files need to use ContentModels = Umbraco.Cms.Web.Common.PublishedModels instead of ContentModels = Umbraco.Web.PublishedModels
For more information on the correct namespaces or custom code, you can find the references in the .
Depending on the extent of the project and the amount of custom code and implementations, this step is going to require a lot of work.
Step 4: Deploy and Test on Umbraco Cloud
After the project runs locally without errors, deploy and test it on the Cloud's left-most mainline environment.
Push the migration and changes to the Umbraco Cloud left-most mainline environment.
The deployment might take a bit longer than normal as a lot of changes have been made.
Go to the backoffice of the left-most mainline environment once everything has been pushed.
Go to Settings and open the Deploy Dashboard.
Click on Export Schema to Data Files in the Deploy Operations section.
Step 5: Going live
Test everything in the left-most mainline environment until it runs without any errors.
Setup rewrites on the new Cloud project if relevant.
Assign hostnames to the project if relevant.
Hostnames are unique and can only be added to one Cloud project at a time.
Related Information
Organization Login Providers
Learn how to configure and use external login providers via your Umbraco Cloud organization.
The External Login Providers feature in Umbraco Cloud enables you to integrate third-party authentication systems for managing Portal user logins securely and efficiently. This functionality is built for teams that want to manage login using an existing identity setup.
Using OpenID Connect, Umbraco Cloud supports external login providers like Microsoft Entra ID, Auth0, and Google. The feature helps administrators manage backoffice access, assign user roles, and improve security.
This is exclusively for Cloud Portal access and access to Project features only available within the portal. .
External Login Providers
Configure an External Login Provider for access to the backoffice of your Umbraco Cloud project environments.
The External Login Providers feature in Umbraco Cloud allows you to integrate third-party authentication systems to manage backoffice user logins securely and efficiently. This functionality is especially useful for teams that want to simplify login management or use their existing identity systems.
This page describes how to set up external login providers for the Umbraco backoffice.
External login providers can also be configured for access to the Cloud Portal. For more information, see .
Using OpenID Connect, Umbraco Cloud supports external login providers such as Microsoft Entra ID, Auth0, Google, and so on. This feature helps administrators manage backoffice access, assign user roles, and improve security.
Working with a Local Clone
This article explains how you can work with a local clone of your Umbraco Cloud project. The tutorial works with both Windows and Mac.
Video Tutorial
Tools
Azure DevOps
This section provides a step-by-step guide to setting up a CI/CD pipeline in Azure DevOps using a provided sample.
Before setting up the pipeline in Azure DevOps, make sure that the following steps from the article are complete:
Pick a Cloud project.
Activate CI/CD Flow.
Next, you will need to define your pipeline in YAML and use it to interact with the Umbraco Cloud API.
All Umbraco HQ packages and add-ons are compatible with Umbraco Cloud.
As of Umbraco Forms version 9, it is only possible to store Forms data in the database. If Umbraco Forms was used on the Umbraco 8 project, the files need to be migrated to the database.
Run the new Cloud project locally.
It will give you an error screen on the frontend as none of the Template files have been updated. Follow Step 3 to resolve the errors.
Go to the backoffice of the project.
Navigate to the Settings section and open the Deploy dashboard.
Click on Export Schema to Data Files in the Deploy Operations section in order to generate the UDA files.
Once the operation is completed, the status will change to Last deployment operation completed.
Check ~\umbraco\Deploy\Revision folder to ensure all the UDA files have been generated.
Return to the Deploy dashboard.
Click on Update Umbraco Schema from Data Files in the Deploy Operations section to make sure everything checks out with the UDA files that were generated.
The deployment will result in either of the two:
Last deployment operation failed - something failed during the check.
Select Clear Signatures from the Deploy Operations section.
Select Update Umbraco Schema from the Deploy Operations section to clear up the error.
Last deployment operation completed
Everything checks out: The left-most environment has been upgraded.
Transfer Content and Media from the local clone to the left-most mainline environment.
The Organization Areas are only available for users logged in with Umbraco ID. Additionally, the Login Providers Section can only be accessed by a user who has Admin rights to the Organization.
This guide shows you how to set up and configure external login providers for the Cloud Portal, including related Project Permissions. It includes the following steps:
If you need a special metadata address for your External Login Provider, you can set it here. By default, the system resolves the metadata address from the Authority URL, making the property optional.
A common scenario for using a special metadata address is when working with Entra ID and configuring claims mapping. In this case, you must set the metadata address to the following: https://login.microsoftonline.com/{tenant}/v2.0/.well-known/openid-configuration?appid={client-id}.
User Mapping Claim Name
Your provider may assign users to specific roles. For example: Admin, Editor, Viewer.
The User Mapping Claim Name is the field in the authentication token (claim) that identifies these roles. The system reads this claim to determine a user's permissions.
For example, if the roles claim is called user_roles in your provider, you set the User Mapping Claim Name to user_roles.
If the field is left blank, the system will default to use http://schemas.microsoft.com/ws/2008/06/identity/claims/role as the claim name.
Signing in using the Login Provider
When trying to access Umbraco Cloud Portal through s1.umbraco.io, you are greeted by an Umbraco ID sign-in screen.
To sign in with your login provider, you must use a special sign-in URL that is unique to your Login Provider.
Go back to Cloud Portal, where you registered the Login Provider.
Click on the Sign-in and Redirect URLs button.
How to retrive the Sign in Url
Give the URL to the Organization members you want to sign in using your Login Provider.
Project Permissions
Project Permissions lets you set up access to Projects in the Portal while signed in with your Login Provider.
You must add one Project Permission model per Project and one per Login Provider. It is not required to add Project Permissions to all projects. Projects without a Project Permissions tied to a Login Provider will not be shown to a user logged in with that particular Login Provider.
Project Permission Screen
To set up Project Permission, follow these steps:
Select a Project on the left side of the screen.
Click on "+ Add" on the Login Provider you want to add Project Permissions for.
Add Project Permission
Fill in the fields in the modal:
Default Access Level (required)
No Claim Found Behavior (required)
User Mapping Claim Name
Project User Mappings
Consists of two fields: "Provider Role Value" and "Project Access Level"
How to fill in the Project Permissions
Default Access Level
Select the level of access you want users to get for this project.
The dropdown has two possible permissions:
Read
Write
Read
A team member with Read permissions can only view the project in the portal and the backoffice. They are not able to deploy or change anything on the project itself.
Write
A team member with Write permissions can do everything on a project except delete it and edit the team. A user with Write permissions can deploy changes between environments through the portal.
This value is works as a fallback value and can be overwritten by the "Project User Mappings" setting. If there are no Mappings available for the user, the "No Claim Found Behavior" setting will evaluate if this fallback permission is used or "NoAccess".
No Claim Found Behavior
This setting is used for adding granular control.
You can use the Role Claim from your Login Provider to assign Permissions to your users.
The setting has two options:
NoAccess
Use Default Access Level
When NoAccess is selected, it will block the user's access to the Project if they do not have the correct Role assigned.
Using the "Use Default Access Level" option, all users in your Login Provider will automatically get the permission you selected in "Default Access Level". The only exception is when they have a hit on the Project User Mappings.
User Mapping Claim Name
This is used for the name of your provider's default or custom Role claim name. Use this if you want to override the one already entered in the Login Provider configuration.
Project User Mappings
Use this to map the Provider Role Value (a role coming from your external login provider) to a Project Permission Level in the portal.
If your external login provider is configured to assign roles to users, those role values are included in the ID token. You can then use these values to automatically assign the appropriate access level when the user signs in to the portal.
For example, a role like Happy.Write from your identity provider could be mapped to the Write permission level for your Cloud project.
Audit
Use the Audit section to troubleshoot your Login Providers and keep an eye on user Sign-ins.
There is an audit log for each Login Provider. If you remove the Login Provider, the audit log will also disappear.
Audit page
The following audit types are listed:
Type
Sub-Type
Description
User Sign-ins
-
See information about Project Permissions evaluated at the Sign-in.
External Login Providers
Added and Updated
Entries include the changed properties. The Client Secret is always redacted.
The alias must be unique across different login providers in the same environment.
Click Create to add the new configuration.
Select Redirect URIs.
Take note of the Redirect URI.
Head back to the configuration for your external login provider.
Click on Authentication.
Select Add a platform.
Select Web and add the Redirect URI.
Add more Redirects URIs if needed.
Under Implicit grant and hybrid flows check the following options:
Access Tokens (used for implicit flows)
ID tokens (used for implicit and hybrid flows)
Click Configure to complete the configuration.
Navigate to the Settings section.
Scroll down to find the Application URIs.
Add the Redirect URI to the Allowed Callback URLs.
Open the Credentials created earlier through this guide.
Select Add URI.
Add the Redirect URI.
Configuration Fields
Learn about what type of data and information you need for each field in the configuration form.
Field
Description
Formatting
Alias
A unique alias for the provider.
Use only lowercase.
Spaces are not allowed.
Client ID
A unique Client ID generated in the external login provider.
Entra ID: Guid
Auth0: Random characters
Google: {randomchars}.apps.googleusercontent.com
Handling invites when using an External Login Provider
When using an External Login Provider, the invitation flow to the backoffice can no longer be managed within Umbraco. This is because users must first be created in the External Login Provider before they can log in. Umbraco Cloud does not handle this integration.
As an administrator, you are responsible for managing user access to the backoffice.
Send users an email with a backoffice link, instructing them to click "Login with [your login provider]".
Configuration scenarios
The following scenarios showcase how to use the configuration options when setting up the external login provider.
You can use the scenarios to learn how to configure the External Login Provider to fit your needs.
Scenario 1: Default User Group for all users
Any user that will be authenticated via the external login provider will end up in a default Umbraco backoffice User Group. As an admin, it will be your job to distribute the users into groups if needed.
Configure the Default User Group field, to specify which group all users should be added to by default.
Scenario 2: Evaluate the User Group on each login
Any user authenticated via the external login provider will always end up in the same Umbraco backoffice User Group. The group will be re-evaluated on each login, allowing you to change the group all users are in.
Configure the Default User Group field with the User Group all users should be added to.
Enable the Enforce User Group on login.
Scenario 3: Role-based User Group mapping with fallback to Default User Group
Any user authenticated via the external login provider can have a role claim associated with its login. This claim can then map to a backoffice User Group. A user with a role that cannot be mapped will end up in a default group.
Configure the Default User Group with the User Group that should be the fallback group.
Select User Default User Group under the No User Group Found Behaviour setting.
Fill in the User Group Mappings map.
Enable Enforce User Group on login.
Scenario 4: Role-based User Group mapping with fallback to deny access
Any user authenticated via the external login provider can have a role claim associated with its login. This claim can map to a backoffice User Group. If no roles match this claim, the user is denied access to the Umbraco backoffice.
Select Unauthorized in the No User Group Found Behaviour setting.
or - for running the project on your local machine.
In the root of your local project, you'll find a README file with details about the project structure and build process on Umbraco Cloud.
Cloning an Umbraco Cloud Project
To clone an Umbraco Cloud project, follow these steps:
Open the project you wish to clone in the Umbraco Cloud Portal.
Click on the arrow next to the Development environment.
Select Clone project.
Clone project option
Copy the clone URL to copy the Development environment's git repository endpoint.
Copy the clone URL
Use your favorite Git client to clone down the project. In this guide, we will use Git Bash.
Type the following command in the Git Bash terminal:
The <Git clone URL> should be the URL you copied from the Cloud Development environment.
Press Enter.
Once the project has been cloned, you will get a folder with files for your Umbraco Cloud project. Now, you have a copy of your Umbraco Cloud Development environment that you can run locally.
Cloned Project
Running the site Locally
To run your Umbraco Cloud project locally, you will need to install the latest .NET SDK (if you do not have this already).
With dotnet installed, run the following commands in a terminal application of your choice. You can also refer to the Readme file in the project folder.
Navigate to the newly created project folder.
Run the following commands:
Build and run the project:
The terminal output will show the application starting up and will include localhost URLs which you can use to browse to your local Umbraco site.
Terminal Output
We recommend setting up a developer certificate and running the website under HTTPS. If you haven't configured one already, run the following command:
dotnet dev-certs https --trust
The first time the project is run locally, you will see the Restore from Umbraco Cloud screen. If the cloned environment has Umbraco Deploy metadata files, they are automatically extracted with the option to restore content from Cloud to the local installation.
clone dialog
Click Restore to restore your site's content if any. Wait until this process is completed as it also creates the local SQLite database for your site.
Working with Visual Studio
When working locally, we recommend using Visual Studio but you can use any other development tool of your choice.
Once the project has been cloned down, you will get a folder with files for your Umbraco Cloud project.
Umbraco files
Navigate to src/UmbracoProject. Here, you will find the files for your Umbraco installation.
Umbraco files
Open the UmbracoProject.csproj file in Visual Studio.
Build and run your solution in Visual Studio.
You can create content, add media, and create your custom code. When you're ready to deploy your changes make sure to have a look at the deployments documentation.
If you have more than "a few" media items, see our recommendations for working with Media on Umbraco Cloud.
Adding a Solution File to your Cloud Project
To collaborate effectively in an Umbraco Cloud project, ensure you have a solution file in Visual Studio. This allows for adding additional projects.
If you want to add a solution file for your Cloud project, you can do it either:
Run the following commands to add additional projects to your solution:
Visual Studio
Open the UmbracoProject.csproj project in Visual studio.
Click on the solution:
Solution
Right-click the solution and choose Add -> New Project...
add new project
Add a class library using the latest .NET SDK to your project:
Class library
Once the Class library (.Core) has been added, you can see the project(s) that have been added in Solution Explorer.
New project added
Renaming the Project Files and Folders
To rename your Umbraco Cloud project files and folder, do the following:
Navigate to the .umbraco file at the root of the project and view the following:
The base property provides the folder location which contains the application and the csproj property is the name of the .csproj file.
Rename the UmbracoProject directory and .csproj file.
Update the .umbraco file with the new name and any C# code namespaces reflecting the name of your project.
Additionally, if you prefer to organize your code, you can add additional Class Library projects that are referenced by the Umbraco application .csproj file.
For example: Rename UmbracoProject.csproj to MyAwesomeProject.Web.csproj and have one or more additional class library projects such as MyAwesomeProject.Code.csproj
It's a good practice to update the namespaces in the Program.cs, Startup.cs, and _ViewImports.cshtml files to ensure consistent naming throughout your project. After making these updates, be sure to clear the bin and obj folders locally to prevent any build errors. Once you have completed these steps, commit your changes and push them to the cloud.
If you've built and run the project locally, update your local Git repository to reflect any changes made. When a Cloud project first runs, a Git hook is created. It triggers a schema update via Umbraco Deploy when changes are pulled from an upstream environment.
The file you'll need to update is post-merge within .git/hooks/ in your cloned environment files. It can be opened with a text editor. You can either delete the file so it will be recreated with the new path or update it. The default contents are shown below and can be updated to reflect the new path to the umbraco/Deploy folder.
Working with Linux/macOS
You can work locally with your Umbraco Cloud site without needing a Windows machine or a local web server installed. This enables users on macOS or Linux-based operating systems to use their preferred editor to modify code in their Umbraco Cloud site.
The Solution
On the Umbraco Cloud portal, go to your project and clone the site using your favorite Git client.
Clone project down
Configure a SQL Server connection string using ConnectionStrings in appsettings.json or appsettings.Development.json (the launchSettings.json configures the local instance to run as 'Development'):
"ConnectionStrings": {
"umbracoDbDSN": ""
}
Configure the local instance to install unattended by adding the following settings to appsettings.Development.json:
The UnattendedUserName, UnattendedUserEmail, and UnattendedUserPassword are optional. They are only required if you want to create a local backoffice user. You can alternatively use your Umbraco ID to sign in.
In your terminal, navigate to the src/UmbracoProject folder and run the following commands to start the project:
dotnet build
dotnet run
When running the site for the first time, the database schema will be inserted automatically into the database (with "InstallUnattended": true in appsettings.Development.json), so the site will start up ready for use.
The pipeline needs to know which Umbraco Cloud project to deploy to. To define this, you need the Project ID and the API Key. The Obtaining the Project ID and API Key section describes how to get these values.
You will also need the alias for your target environment. The Getting environment aliases to target section describes how to view the list of environments you can target.
Note down the Project ID, API Key and the environment alias.
Go to the repository in Azure and click on "Set up build".
Azure DevOps Repository
Select "Existing Azure Pipelines YAML file" on the next screen.
Configure pipeline with existing YAML file
Select main in Branch.
Select /devops/azure-release-pipeline.yaml in Path and continue.
Select Branch and Path
Now you are on the "Review your pipeline YAML" screen
Replace the ##Your project Id here## with the Project Id you got from the Umbraco Cloud Portal.
Replace the ##Your target environment alias here## with the alias of the environment you want to target.
Click on "Variables".
Pipeline variables in Azure DevOps
Add the variable umbracoCloudApiKey with the value of the API Key you got from Umbraco Cloud Portal.
Toggle the "Keep this value secret" checkbox to ensure the API Key is handled as a secret.
You can customize the variable names as you like. However, this requires renaming the affected variables in azure-release-pipeline.yaml.
Check that the references to the variables in the YAML files match the variable syntaxes in the created variable. Example: umbracoCloudApiKey = UMBRACOCLOUDAPIKEY.
When you click on "Save and Run", your first deployment will be triggered. This means Azure DevOps is set up with all the required information to deploy your Cloud project back to Umbraco Cloud.
Optional: Test the pipeline
With everything set up, it is recommended to run a test deployment to confirm that the pipeline works.
While working on your project locally:
Add a new Document Type.
Commit the change to the main branch and push it to your repository.
Wait for the pipeline to complete.
Log in to Backoffice on your left-most environment in Umbraco Cloud.
Go to the Settings section and see that your new Document Type has been deployed.
High-level overview of the pipeline components
The mentioned scripts are provided as a starting point.
It is recommended that you familiarize yourself with the scripts and documentation related to using Azure DevOps.
The scripts demonstrate the following:
How to sync your Azure DevOps repository with an environment in Umbraco Cloud via the environment alias.
How to prepare and upload an artifact that can be used for a deployment.
How to deploy changes to an environment in Umbraco Cloud, targeted via the environment alias.
Main
The azure-release-pipeline.yaml defines the main pipeline, and is the one that will be triggered on a push to the main branch in your repository. You can configure a different trigger behavior in this file.
You can add your Build and Test stage between the cloudSyncStage and cloudPrepareArtifact stages. Keep in mind that you do not need to retain the dotnet build artifact for upload later. The cloudPrepareArtifact job will handle packaging all your source code and uploading it to Umbraco Cloud.
Make sure that you check out the potentially updated code if you add Build and Test steps.
Cloud-sync
The cloud-sync.yml shows how to sync your Azure DevOps repository with your Cloud environment. In this sample, it accepts any change from the API, applies it, and commits it back to the branch that triggered the pipeline. The commit does not trigger the pipeline again.
If you don't want the pipeline to commit back to the triggering branch, this is where you need to change the pipeline.
Cloud-artifact
The cloud-artifact.yml shows how to prepare and package an artifact and finally upload it to Umbraco Cloud.
There are a couple of things here to be aware of:
The sample is overwriting the .gitignore file with cloud.gitignore. This is a way to accommodate your gitignore needs when working locally. For instance, you might want to ignore frontend builds, but want them built and published to the Cloud.
The sample contains a special cloud.zipignore file. This is a convenient way to tell the pipeline which files not to include when creating the zip package to send to the Cloud.
If you want to customize the artifact, take a look at the Artifact Best Practice article.
Cloud-deployment
The cloud-deployment.yml shows how to deploy to a named environment of your Cloud project. The sample shows how to request the deployment and wait for the Cloud to finish the operation.
If you have frontend assets that need to be built (using tools like npm/yarn or others), you should add the required steps before cloudPrepareArtifact. This ensures that the fresh frontend assets are included in the package sent to Umbraco Cloud.
Next steps
After following the guide in this article, you can advance your knowledge further by diving into the following articles:
This section provides a step-by-step guide to setting up a CI/CD pipeline in GitHub Actions using provided samples.
Before setting up the pipeline in Azure DevOps, make sure that the following steps from the Configuring a CI/CD pipeline article are complete:
Pick a Cloud project.
Activate CI/CD Flow.
Next, you will need to define your pipeline in YAML and use it to interact with the Umbraco Cloud API.
Are you using version 1 endpoints? Follow the .
Before you start
The Umbraco CI/CD Team has created a sample pipeline for GitHub Actions.
The Scripts are provided as is. This means the scripts will do the bare minimum for a pipeline to utilize the CI/CD flow.
Adapt and integrate the script into your pipelines to enable deployments to your Umbraco Cloud projects.
The sample includes YAML files and custom PowerShell and Bash scripts to interact with the Umbraco Cloud API.
You can get the samples for both Azure DevOps and GitHub Actions from the .
Samples that target the endpoints described here are located in the V2 folder.
Since following this guide involves using your custom pipeline, any issues that arise will need to be resolved by you.
Import Cloud project repository to GitHub
Follow these steps to import your repository to GitHub:
Go to your repositories in GitHub and click on "New".
Create a new empty repository, and note down the clone URL.
Go to the Umbraco Cloud Portal and .
Remove the Git Remote called
Rename master branch to main.
Add a new remote called origin and point it to the GitHub clone URL.
Push the changes.
Set up GitHub repository variables
The pipeline needs to know which Umbraco Cloud project to deploy to. To do this, you need the Project ID and the API Key. The section describes how to get these values.
You will also need the target environment alias. The section describes how to view the list of environments you can target. Note down the alias of the environment you want to target.
Note down the Project ID, API Key and the environment alias.
Go to the repository in GitHub, and navigate to the Settings section.
Expand Secrets and Variables in the left-hand menu titled Security and select Actions.
Create a repository secret called UMBRACO_CLOUD_API_KEY with the API Key value from the Umbraco Portal.
Create another repository secret with the name PROJECT_ID and the Project ID value from the Umbraco Portal.
If you want to use different names for secrets and variables, you need to rename the secrets and with variables in each of the main.yml files jobs.
GitHub is now configured with the required information to enable deployments back to Umbraco Cloud.
Allow GitHub to commit to your repository
The sample pipelines have a job called cloud-sync. This job checks for changes in your Umbraco Cloud project, fetches them, and applies them back to your repository. For this to work, you need to give the GITHUB_TOKEN write permissions to the repository during workflow runs.
This is how you can grant these permissions:
Navigate to your repository on GitHub.
Click on Settings in the top right.
Select Actions from the left-side menu, and locate the General section.
Set up the GitHub Actions pipeline
While working with the project on your local machine, follow these steps to prepare the pipeline, using the .
Download the provided sample scripts as a ZIP from the .
Click on "Code" and choose "Download ZIP".
Unzip it and use the appropriate files from the V2 folder for the next steps.
The next steps are outlined based on the scripting language you prefer using.
For a pipeline that uses PowerShell scripts, you will need the following files:
To learn more about the components used in the pipeline, read the section further down this article.
Optional: Test the pipeline
With everything set up, it is recommended to run a test deployment to confirm that the pipeline works.
While working on your project locally:
Add a new Document Type.
Commit the change to the main branch and push it to your repository.
Wait for the pipeline to complete.
High-level overview of the pipeline components
The mentioned scripts are provided as a starting point.
It is recommended that you familiarize yourself with the scripts and documentation related to using GitHub Actions.
The scripts demonstrate the following:
How to sync your GitHub repository with an environment in Umbraco Cloud via the environment alias.
How to prepare and upload an artifact that can be used for a deployment.
How to deploy changes to an environment in Umbraco Cloud, targeted via the environment alias.
Main
The main.yml is the main pipeline, and is the one that will be triggered on a push to the main branch. You can configure a different trigger behavior in this file.
You can add your Build and Test jobs between the cloud-sync and cloud-artifact jobs. Keep in mind that you do not need to retain the dotnet build artifact for upload later. The cloud-artifact job will package all your source code and upload it to Umbraco Cloud.
Make sure that you check out the potentially updated code if you add Build and Test steps.
Cloud-sync
The cloud-sync.yml shows how to sync your GitHub repository with the Cloud environment. In this sample, it accepts any change from the API, applies it, and commits it back to the branch that triggered the pipeline. However, the commit does not trigger the pipeline again.
If you don't want the pipeline to commit back to the triggering branch, this is where you need to change the pipeline.
Cloud-artifact
The cloud-artifact.yml shows how to prepare and package an artifact and finally upload it to Umbraco Cloud.
There are a couple of things here to be aware of:
The sample is overwriting the .gitignore file with cloud.gitignore. This is a way to accommodate your gitignore needs when working locally. For instance, you might want to ignore frontend builds, but you want them built and published to the Cloud.
The sample contains a special cloud.zipignore file. This is a convenient way to tell the pipeline which files not to include when creating the zip package to send to the Cloud.
To customize the artifact, take a look at .
Cloud-deployment
The cloud-deployment.yml shows how to deploy to a named environment of your Cloud project. The sample shows how to request the deployment and wait for the Cloud to finish the operation.
If you have frontend assets that need to be built (using tools like npm/yarn or others), you should add the required steps before cloud-artifact. This ensures that the fresh frontend assets are included in the package sent to Umbraco Cloud.
Next step
After following the guide in this article, you can advance your knowledge further by diving into the following articles:
Further information
Adding hostname and configuring Content Delivery Network (CDN) and Cache
Creating a Trial Project
Both files should be in the root of your repository.
Add the line **/git-patch.diff to the bottom of the .gitignorefile.
Create a folder in the root, and call it devops.
Copy the 4 YAML files from the powershell/azuredevops folder into the devops folder.
Create an additional folder within devops, and call it powershell.
Copy the PowerShell scripts from the powershell folder to the powershell folder.
Commit all changes and push to Azure DevOps.
cloud-sync.yml
apply-patch.sh
cloud-artifact.yml
upload_artifact.sh
cloud-deployment.yml
start_deployment.sh
get_deployment_status.sh
Prepare the pipeline
Copy the cloud.zipignore file to the root of your repository.
Make a copy of the .gitignore from your repository and call the copy cloud.gitignore.
Both files should be in the root of your repository.
Add the line **/git-patch.diff at the bottom of the .gitignore file.
Create a folder in the root and call it devops.
Copy the 4 YAML files from the bash/azuredevops folder into the devops folder.
Create an additional folder within devops and call it scripts.
Copy the Bash scripts from the bash folder to the scripts folder.
Commit all changes and push to Azure DevOps.
Get-ChangesById.ps1
cloud-sync.yml
Apply-Patch.ps1
cloud-artifact.yml
Add-DeploymentArtifact.ps1
cloud-deployment.yml
Start-Deployment.ps1
Test-DeploymentStatus.ps1
cloud.zipignore
get_latest_deployment.sh
azure-release-pipeline.yml
get_changes_by_id.sh
Give the application a name and select Regular Web Application.
Go to the Settings section.
Identify and note down the following keys:
Domain URL (Authority URL)
Client Id
Client Secret
Select the Internal User Type and click Create.
Fill in the required information.
Add Authorized domains from where login should be allowed.
Click Save and continue.
Navigate to Credentials.
Select + Create Credentials and choose OAuth client ID.
Choose Web Application as the application type.
Fill in the required fields.
Click Save to complete creating the credentials.
Before you move on, take note of the following keys:
Client ID (generated through the steps above)
Client Secret (generated through the steps above)
Authority URL (https://accounts.google.com)
Add the Redirect URI to the Allowed Logout URLs as well.
Add the Redirect URI to the Allowed Callback URLs
Add more Redirect URIs if needed.
Click Save to complete the configuration.
Project Permission
Added, Updated, and Deleted
Shows information on the changed properties and stored Role mapping options
Select Create Application to get started
Give the application a name and select Regular Web Application.
Go to the Settings section.
Identify and note down the following keys:
Domain URL (Authority URL)
Client Id
Client Secret
Select the Internal User Type and click Create.
Fill in the required information.
Add Authorized domains from where login should be allowed.
Click Save and continue.
Navigate to Credentials.
Select + Create Credentials and choose OAuth client ID.
Choose Web Application as the application type.
Fill in the required fields.
Click Save to complete creating the credentials.
Before you move on, take note of the following keys:
Client ID (generated through the steps above)
Client Secret (generated through the steps above)
Authority URL (https://accounts.google.com)
Add more Redirect URIs if needed.
Click Save to complete the configuration.
Client Secret
A secret that is generated in the External Login Provider and is associated with the Client ID.
Authority
The URL for the External Login Provider. This can be found in the External Login Provider.
These are OpenID Connect scopes. These are the minimum requirements and will allow the app to authenticate and get the user's profile data, email, and name.
Default values: openid, profile, and email.
Auth Type
Currently only OpenIDConnect is available.
Default: OpenIdConnect
Default User Group
Choose which Umbraco User Group the user should be assigned to if nothing else is defined.
A custom User Group added to the backoffice will also be available.
Default Options:
AdministratorsWritersEditorsTranslatorsSensitive Data
Enforce User Group on login
A checkbox to choose whether each login will re-evaluate the user's role or if it should happen only on the first login.
N/A
User Group Mappings
Use this field to map roles within the login provider with Umbraco User Groups.
Example: A user with the "Content Editor" role in the login provider will be added to the Writer User Group in Umbraco.
Login Provider Role = Umbraco User Group
Entra ID: Object ID of User Group = Umbraco User Group
No User Group Found Behaviour
This defines what happens if the mapping for the user’s User Group hasn’t been defined. The options are to select the Default User Group or to disallow the user access to the backoffice.
Options: UseDefaultUserGroup, Unauthorized
User Group Claim Name
Your provider may assign users to specific roles (For example: Admin, Editor, Viewer).
The User Group Claim Name is the field in the authentication token (claim) that identifies these roles. The system reads this claim to determine a user’s permissions.
Example: If your provider sends roles in a claim named user_roles, you would set the User Group Claim Name to user_roles so the system can properly recognize user permissions.
NOTE: If the field is left blank, the system will default to use http://schemas.microsoft.com/ws/2008/06/identity/claims/role as the claim name.
Entra ID: groups
Metadata Address
If you need a special metadata address for your External Login Provider, you can set it here. By default, the system will resolve the metadata address from the Authority URL, which is why this property is optional.
A common scenario for using a special metadata address is when working with Entra ID and configuring claims mapping. In this case, you must set the metadata address to the following:https://login.microsoftonline.com/{tenant}/v2.0/.well-known/openid-configuration?appid={client-id}.
jobs:
cloud-sync:
uses: ./.github/workflows/cloud-sync.yml
secrets:
projectId: ${{ secrets.PROJECT_ID }} # change the part inside the curly braces
umbracoCloudApiKey: ${{ secrets.UMBRACO_CLOUD_API_KEY }} # change the part inside the curly braces
with:
targetEnvironmentAlias: ${{ vars.TARGET_ENVIRONMENT_ALIAS }} # change the part inside the curly braces
cloud-artifact:
uses: ./.github/workflows/cloud-artifact.yml
secrets:
projectId: ${{ secrets.PROJECT_ID }} # change the part inside the curly braces
umbracoCloudApiKey: ${{ secrets.UMBRACO_CLOUD_API_KEY }} # change the part inside the curly braces
cloud-deployment:
needs: cloud-sync
uses: ./.github/workflows/cloud-deployment.yml
secrets:
projectId: ${{ secrets.PROJECT_ID }} # change the part inside the curly braces
umbracoCloudApiKey: ${{ secrets.UMBRACO_CLOUD_API_KEY }} # change the part inside the curly braces
with:
targetEnvironmentAlias: ${{ vars.TARGET_ENVIRONMENT_ALIAS }} # change the part inside the curly braces
Follow this guide when upgrading your Cloud project to a new major version of Umbraco CMS.
Are you using custom packages or code on your Umbraco Cloud project?
Make sure any packages you use are compatible with the latest version of Umbraco. Additionally, confirm that your custom code works with the updated .NET version.
Breaking Changes
Be aware of any introduced in the latest version of Umbraco CMS to avoid issues during the upgrade.
Before you start the upgrade
Before upgrading your Umbraco Cloud project to the latest major version, you must consider the version your project is already on. This will impact the upgrade flow you will be following.
Upgrading from a Short-Term Supported (STS) version
When upgrading from an STS version, you must start by upgrading to the closest Long-term Support (LTS) major. If the version you are upgrading to is an STS version, you can upgrade to that version, directly from the closest LTS. You can upgrade directly if there are no LTS versions between the current one and the one you are upgrading to.
Refer to the to learn which versions are STS.
Example: Upgrading from Umbraco 11 (STS) to Umbraco 15 (STS)
Start by upgrading to the closest LTS. In this case, that is Umbraco 13. After that, you can upgrade directly from Umbraco 13 to Umbraco 15.
Upgrading from a Long-Term Supported (LTS) version
When upgrading from an LTS version, you must start by looking at the versions between yours and the one you are upgrading to. Is there another LTS version in that line, you need to upgrade to that version first.
Refer to the to learn which versions are LTS.
Skipping upgrades to STS versions, like 11 and 12, means you will not receive warnings about obsolete features. We recommend keeping the handy to avoid any surprises.
Example: Upgrading from Umbraco 10 (LTS) to Umbraco 15 (STS)
Between version 10 and 15, there is another LTS version: Umbraco 13. The first step is therefore to upgrade to Umbraco 13. After that, you can upgrade directly from Umbraco 13 to Umbraco 15.
Version-specific upgrade notes
Look for the "Upgrade from/to Umbraco xx" boxes. These boxes contain important information about any extra steps needed for a specific version.
Prerequisites
Follow the requirements for .
An Umbraco Cloud project running
The latest . is installed locally.
Do not perform major version upgrades directly in Umbraco Cloud.
Major upgrades involve significant database migrations that should be run locally, where you have full visibility into the migration process. Running major migrations directly on the Cloud can cause boot failures and 503 errors. These incomplete migrations are often difficult to diagnose.
Always perform the database upgrade locally first, verify that the backoffice loads successfully, and then deploy the upgraded project to Cloud. Follow the steps below for the recommended approach.
Step 1: Enable .NET
Before proceeding, you must determine whether the .NET Framework version needs to be updated for your project. If no changes to the .NET version are required, you can skip this step and proceed with Step 2.
Refer to the section to identify whether a .NET version update is necessary for your upgrade.
Go to the project in the Umbraco Cloud portal.
Navigate to Configuration -> Advanced.
Scroll down to the Runtime Settings section.
Step 2: Clone down your environment
Clone down the left-most mainline environment.
Build and run the .
Log in to the backoffice.
Restore content from your Cloud environment.
Step 3: Upgrade the project locally using Visual Studio
Open the csproj file located in the /src/UmbracoProject folder.
Determine if you need to update the .NET version based on the changes made in :
If the .NET version was updated: Update the <TargetFramework>
Upgrading to Umbraco 15 and above
The following packages are no longer needed on the Cloud platform:
Umbraco.Cloud.Cms.PublicAccess
Umbraco.Cloud.Identity.Cms
Go to Tools > NuGet Package Manager > Manage NuGet Packages for Solution.
Navigate to the Updates tab.
Select the version you are updating to and follow the instructions:
Update the following packages:
Umbraco.Forms.Deploy
Umbraco.Cms
Update all projects and packages in your solution to support the latest .NET.
Step 4: Finishing the Upgrade
Enable the feature.
Run the project locally.
Log in to the Umbraco backoffice to verify the upgrade has happened.
If you receive a missing deploy license error after upgrading, even though the license is valid, it may be due to browser caching. Google Chrome has an aggressive caching that can interfere with license validation during startup. To resolve this:
Open Chrome's Developer Tools (F12).
Right-click the reload button next to the address bar.
Ensure that the project runs locally without any errors.
Upgrading from Umbraco 13
In Umbraco 14, Smidge has been removed from the CMS.
In the _ViewImports.cshtml of your project, remove the following lines:
When upgrading from Umbraco 13, you need to be aware that UseInstallerEndpoints() no longer exists.
Upgrading from Umbraco 9
Update the Program class in the Program.cs file to the following:
using Umbraco.Cms.Web.Common.Hosting;
Re-enable the app settings IntelliSense by updating your schema reference in the appsettings.json file from:
To:
Apply this change to the following files as well:
Push the changes to the Cloud environment. See the article.
Test that everything works with the upgrade on the Cloud environment.
It is highly recommended to go through everything in your Cloud environment. This can help you identify any potential errors after the upgrade, and ensure that you are not deploying any issues onto your production environment.
Step 5: Deploy the upgrade
The next part is to deploy the upgrade through to the production environment.
For major upgrades that include content migrations, the process can be extensive. This is especially true for sites with a large amount of content. In these cases, it is recommended to:
Initiate a content freeze to prevent changes during the migration.
Rearrange your custom hostname(s) to minimize website downtime.
You can choose between two approaches based on your needs:
"With content freeze" - involves a more detailed upgrade process but helps reduce downtime on your live website.
"Without content freeze" - provides a more straightforward process that may result in longer downtime on your live website.
The following steps involve setting a content-freeze period on the project. It is recommended to coordinate this with your content editors before moving forward.
Delete any environments between your left-most and production environments.
Create a new environment from the production environment - call it Staging.
Both files should be in the root of your repository
Add the line **/git-patch.diff at the bottom of the .gitignore file.
Create a folder in the root and call it .github.
Create two additional folders within .github: workflows and powershell.
Copy the 4 YAML files from the github folder into the workflows folder.
Copy the PowerShell scripts from the powershell folder to the powershell folder.
Commit all changes and push to GitHub.
get_changes_by_id.sh
cloud-sync.yml
apply-patch.sh
cloud-artifact.yml
upload_artifact.sh
cloud-deployment.yml
start_deployment.sh
get_deployment_status.sh
Video tutorial on working locally with your Umbraco Cloud project.
A video tutorial guiding you through the steps of upgrading from version 8 to the latest version on Umbraco Cloud.
Learn how to clone your Umbraco Cloud project and work with it locally.
At least two environments on your Cloud project.
A backup of your project database.
Directly from your environment. See the Database backups article,
Or clone down, restore the project, and back up the local database.
Select the appropriate .NET version from the Change .NET framework runtime for your Umbraco install dropdown for each environment in your Cloud project.
to match the version set in your Cloud environment.
If the .NET version was not updated: Skip this step.
Delete the <PackageReference> entries for these packages.
Umbraco.Deploy.Cloud
Umbraco.Deploy.Contrib
Umbraco.Forms
Umbraco.Cloud.Cms
Umbraco.Cloud.StorageProviders.AzureBlob
Open the Licenses folder and delete all Umbraco-related .lic files.
Keep any .lic files needed for your third-party tools.
If the folder is empty after deleting the files, you can safely remove the entire Licenses folder as well.
[Optional] If using Deploy and Forms on Umbraco Cloud:
Locate and open the appsettings.json file (and any environment-specific variants).
Add the following section to Umbraco:Licenses:Products:<ProductName>:
This ensures the built-in Umbraco Cloud licenses are recognized after upgrading. Without these values, you may encounter license validation errors even though your project is on Umbraco Cloud.
[Optional] If you use InMemoryAuto models builder, or rely on Razor runtime compilation for editing templates via the backoffice, reference the Umbraco.Cms.DevelopmentMode.Backoffice package. For more information, see the article.
If you cannot login locally via Umbraco ID and URL shows /umbraco/authorizeupgrade?redir= then this is because of the Unattended Upgrades setting. It must be set to true and deployed to the environment before the upgrade.
Select Empty cache and hard reload.
It is recommended to clear the cache and cookies thoroughly in all browsers you're using to access the Umbraco backoffice. This step can help resolve unexpected startup issues after the upgrade.
If the issue persists and your project has CDN Caching and Optimization enabled, cached responses may interfere with license validation. In this case, try purging the cache and reloading the site.
Open the Program.cs file.
Remove u.UseInstallerEndpoints() from the app.UseUmbraco() method.
appsettings.Development.json
appsettings.Production.json
appsettings.Staging.json
Remove the following files and folders manually from your local project:
/wwwroot/umbraco
/umbraco/PartialViewMacros
/umbraco/UmbracoBackOffice
/umbraco/UmbracoInstall
/umbraco/UmbracoWebsite
/umbraco/config/lang
Remove the same files from the left-most environment. This should be done from the left-most environment through KUDU -> Debug Console -> CMD -> Site -> from both the repository and wwwroot folders.
Initiate content-freeze.
Import content using either of the following approaches:
You will find relevant examples using HTTP Request Syntax in the sections below.
How to enable the CI/CD Integrator in the Umbraco Cloud Portal
To authenticate with the Umbraco Cloud API, you'll need your Project ID and API Key. These credentials can be found under Configuration > CI/CD Flow in the Umbraco Cloud portal.
The two elements you need for the authentication are:
Cloud Project ID: The ID of your Umbraco project.
CI/CD API Key: Your unique identifier.
By including the API key header in your HTTP requests, you ensure secure access to your Umbraco Cloud project's resources.
For enhanced security, it's important to store the provided API key in a secure location. Options include a variable group in Azure DevOps or using the Secrets feature in GitHub Actions.
Each API key is tightly coupled with a specific Umbraco Cloud project and can only be used for deployments related to that project.
How to authenticate your requests
To authenticate your API requests, you'll need to include your API key in a custom HTTP header named Umbraco-Cloud-Api-Key.
Deployment Artifacts
In the following sections, you can learn more about the process of deploying artifacts.
Upload artifact
Artifacts are tied to a project. The uploaded artifact will be available to use in any deployment made to an environment on that project.
The artifact must be a zip file containing the source code required to build your website.
.
Once the file is uploaded, you will get a response that uses the following JSON schema:
List artifacts
It is possible to configure how the uploaded artifacts are listed. The endpoint is paged and accepts the options skip and take. If skip is not supplied, its value will default to 0. If take is not supplied, its value will default to 10.
The response would look like the following:
Deployments
The following sections cover how deployments are managed.
Start the deployment
The Create Deployment endpoint starts a new deployment and returns a unique deploymentId.
The following options are available to use in the request payload:
Parameter
Requirement
Description
Default value
The API response should be an HTTP 201 Created response including a deploymentId.
You can use the deploymentId to query the Get Deployment status endpoint.
Use skipPreserveUmbracoCloudJson with care. The Cloud platform uses the file to ensure your environments are correctly configured for content deployments.
Use skipVersionCheck with care. This setting exists to prevent version regression (overwriting newer Umbraco packages with older ones). Only set this to true if you intentionally need to deploy an older artifact.
Enabling the
Get Deployment status
To monitor the status of a deployment, you can periodically query the 'Get Deployment Status' API. This API endpoint is an HTTP GET request to the Umbraco Cloud API. It requires both the projectId and the deploymentId obtained from previous steps to be included in the path.
Deployments in Umbraco services can take varying amounts of time to complete. Therefore, it's advisable to poll this API regularly to stay updated on the deployment's current state.
For example, you might choose to poll the API every 25 seconds for 15 minutes. These figures are a starting point. The optimal polling frequency and duration may differ for your specific pipeline.
A query parameter is available to limit the deploymentStatusMessages. As a value for the query parameter, you can use the modifiedUtc value from a previous response.
Parameter
Requirement
Description
The response from this API call will return the same deployment object in JSON format as you would receive from other API interactions. Ultimately, the deploymentState field will indicate either 'Completed' or 'Failed'.
Should the deployment fail, check the deploymentStatusMessages for more information.
Query Deployments and fetch Changes
You can use the following sections to learn more about querying deployments and fetching changes.
Get Deployments
The endpoint retrieves a list of deployments that have created a change in the Git repository of the Cloud environment. A deployment can have the state Completed or Failed.
It only lists deployments that have been run through the API.
The API allows you to filter and limit the number of returned deployments using the following query parameters:
Parameter
Requirement
Description
With includenulldeployments set to true, you will get all completed deployments, including those that didn't change the Cloud repository.
The response from this API call will return an object containing a list of deployment objects. The deployment objects are consistent with the structure used in other API responses. Deployments are listed in descending order based on creation timestamp.
Get Deployment diff
Sometimes updates are done directly on the Umbraco Cloud repository. It is encouraged not to do any actual work there, but auto-upgrades and environment changes will affect the Umbraco Cloud git repositories.
To keep track of such changes, you can use the 'Get Deployment Diff' API. This API endpoint will provide you with a git-patch file detailing the changes between a specific deployment and the current state of the repository. To make this API call, you'll need to include both the projectId and the deploymentId of the deployment you want to check against. This is a standard HTTP GET request.
The required query parameter has been added to the endpoint:
Parameter
Requirement
Description
The API response will vary depending on whether there are changes to report. If no changes are detected, you'll receive an HTTP 204 No Content status. If there are changes, the API will return an HTTP 200 OK status along with a git-patch file as the content. This git-patch file can then be applied to your local repository to sync it with the changes.
It is only possible to generate git-patch files when the selected deploymentId points to a deployment where the targetEnvironmentAlias is the same as in this request.
Possible errors
When interacting with the Umbraco Cloud API, you may encounter HTTP status codes that indicate the success or failure of your API request. Below is a table summarizing the possible status codes, their corresponding errors, and basic root causes to guide your troubleshooting:
Status Code
Error
Basic Root Cause
Most errors have a response body that corresponds to this JSON, and the “detail” field will have a more complete error message.
The commit message you want stamped in the Umbraco Cloud environment repository.
-
skipPreserveUmbracoCloudJson
OPTIONAL
Setting to true will allow you to overwrite the umbraco-cloud.json with your incoming file.
false
noBuildAndRestore
OPTIONAL
An option to skip the restore and build in the isolated instance.
false
skipVersionCheck
OPTIONAL
An option to skip the version check in the isolated instance.
false
runSchemaExtraction
OPTIONAL
An option to control if schema extraction should run after deploying schema files.
true
noBuildAndRestore
only disables the restore and build inside the isolated instance. Once the system pushes the source code to the environment, a build and publish operation will run as usual. Enabling this option lets you save one or more minutes during the deployment process.
Disabling the runSchemaExtraction will prevent the Umbraco installation from automatically having its schema updated after a CI/CD flow deployment. This setting doesn't affect the left-most environment. Schema extraction can still be triggered from the backoffice.
curl -s -X GET https://api.cloud.umbraco.com/v2/projects/$projectId/deployments -H "Umbraco-Cloud-Api-Key: $apiKey"
@projectId = Get this value from the portal
@apiKey = Get this value from the portal
@description = my awesome optional description text
@version = my awesome optional version text
@file = path to file + filename
POST https://api.cloud.umbraco.com/v2/projects/{{projectId}}/deployments/artifacts
Umbraco-Cloud-Api-Key: {{apiKey}}
Content-Type: multipart/form-data; boundary=--TheFormDataBoundary
----TheFormDataBoundary
Content-Disposition: form-data; name="file"; filename="package.zip"
content-type: application/octet-stream
< {{file}}
----TheFormDataBoundary
Content-Disposition: form-data; name="description"
{{description}}
----TheFormDataBoundary
Content-Disposition: form-data; name="version"
{{version}}
----TheFormDataBoundary--
@skip = 0
@take = 10
@projectId = Get this value from the portal
@apiKey = Get this value from the portal
GET https://api.cloud.umbraco.com/v2/projects/{{projectId}}/deployments/artifacts?skip={{skip}}&take={{take}}
Umbraco-Cloud-Api-Key: {{apiKey}}
Content-Type: application/json
@projectId = Get this value from the portal
@apiKey = Get this value from the portal
@targetEnvironmentAlias = left-most or flexible environment alias
@artifactId = Use artifact id from recent upload
@commitMessage = My awesome commit message for cloud
@noBuildAndRestore = false
@skipVersionCheck = false
@skipPreserveUmbracoCloudJson = false
@runSchemaExtraction = true
POST https://api.cloud.umbraco.com/v2/projects/{{projectId}}/deployments
Umbraco-Cloud-Api-Key: {{apiKey}}
Content-Type: application/json
{
"commitMessage": {{commitMessage}},
"artifactId": {{artifactId}},
"targetEnvironmentAlias": {{targetEnvironmentAlias}},
"noBuildAndRestore": {{noBuildAndRestore}},
"skipVersionCheck": {{skipVersionCheck}},
"skipPreserveUmbracoCloudJson": {{skipPreserveUmbracoCloudJson}},
"runSchemaExtraction": {{runSchemaExtraction}}
}
@projectId = Get this value from the portal
@apiKey = Get this value from the portal
@deploymentId = Get this value from the response of the endpoint above
@lastModifiedUtc = Get this value from a previous call to this endpoint
GET https://api.cloud.umbraco.com/v2/projects/{{projectId}}/deployments/{{deploymentId}}?lastModifiedUtc={{lastModifiedUtc}}
Umbraco-Cloud-Api-Key: {{apiKey}}
Content-Type: application/json
@projectId = Get this value from the portal
@apiKey = Get this value from the portal
@skip = Defaults to zero
@take = Defaults to 100
@includeNullDeployments =
@targetEnvironmentAlias =
GET https://api.cloud.umbraco.com/v2/projects/{{projectId}}/deployments?skip={{skip}}&take={{take}}&includeNullDeployments={{includeNullDeployments}}&targetEnvironmentAlias={{targetEnvironmentAlias}}
Umbraco-Cloud-Api-Key: {{apiKey}}
Content-Type: application/json
@projectId = Get this value from the portal
@apiKey = Get this value from the portal
@deploymentId =
@targetEnvironmentAlias =
GET https://api.cloud.umbraco.com/v2/projects/{{projectId}}/deployments/{{deploymentId}}/diff?targetEnvironmentAlias={{targetEnvironmentAlias}}
Umbraco-Cloud-Api-Key: {{apiKey}}
Content-Type: application/json
A FAQ section addressing common technical questions about Umbraco Cloud.
This section provides answers to common technical questions about Umbraco Cloud, specifically for developers. If you're looking for general product information, visit the FAQ on our website.
General
Can I try Umbraco Cloud before purchasing?
Yes, you can with no obligation to buy.
Does Umbraco Cloud use a special version of Umbraco?
No, it runs on the latest publicly available version of Umbraco.
Can Umbraco Cloud handle high-traffic sites?
A well-built site with around 50,000 daily visitors (~1.5 million monthly) performs well on Umbraco Cloud. For business-critical, high-traffic sites, consider Umbraco Cloud Professional or Enterprise, possibly with a dedicated server.
Does Umbraco Cloud support auto-scaling or dedicated worker resources?
Auto-scaling is not available yet but is under consideration. However, we do offer dedicated worker resources. to learn more.
Can I set up a load-balanced site on Umbraco Cloud?
No, load balancing is not currently supported.
Can I migrate my site away from Umbraco Cloud?
Yes. Since Umbraco Cloud uses the standard Umbraco version, you can:
Clone your site.
Restore your data locally.
Delete your Umbraco Cloud project.
While leaving is unfortunate, choosing the best solution for your needs is always supported.
Can I move my existing site to Umbraco Cloud?
Umbraco Cloud works best as the foundation for a new project. While migration is possible, adjustments may be needed to align with Umbraco Cloud’s workflow. For more details, see the article.
What languages are available for content localization on Umbraco Cloud?
Umbraco Cloud uses Azure infrastructure for localization in Umbraco CMS. You can find the available languages in the dropdown below.
Languages Available in Umbraco Cloud
Technology
What server environment does an Umbraco Cloud site run on?
All Umbraco Cloud plans use P1V3 Azure App Service Plans as their underlying infrastructure, which includes:
2 CPU Cores
8GB of RAM
250 GB Disk space
How many resources are available for a website?
Quotas for different Umbraco Cloud plans can be found in the article.
Each plan also has hostname limitations, which are listed in the . Most Cloud sites operate within these limits, but solutions are available for those requiring additional resources.
Website usage and performance can be monitored through the and the pages.
The 'Usage' page provides details on bandwidth consumption.
The 'Availability & Performance' page allows monitoring of CPU and memory usage.
For questions about resource usage, contact the support team.
Can Cloudflare be used with Umbraco Cloud?
Yes. Hostnames managed in a customer's Cloudflare (CF) zone can be enrolled as DNS Only or via in the .
is the recommended approach for maximum control, as you get to keep full control of your Edge configuration. In an orange-to-orange configuration, any Umbraco Cloud Cloudflare provided features, such as Managed Challenge, Web Application Firewall (WAF), can be stacked or disabled and managed manually in the customer zone.
The DNS Only configuration is the recommended approach for minimum custom Cloudflare maintenance. In the DNS Only configuration, the customers' Cloudflare zone won't apply DDoS protection or Web Application Firewall, and the Umbraco Cloud Cloudflare features will continue working.
It is worth mentioning that Umbraco Cloud websites already provide many baseline Cloudflare features such as DDoS or Web Application Firewall by default.
Does Cloudflare add additional HTTP request headers?
All HTTP requests to custom hostnames on Umbraco Cloud pass through Cloudflare, which adds extra HTTP headers. These headers provide location-based information that can be useful for multilingual sites, redirections, or analytics.
Location headers:
cf-ipcity: Visitor's city
cf-ipcontinent: Visitor's continent
cf-iplatitude: Visitor's latitude
These headers are available for all custom hostnames added to Umbraco Cloud. However, they are not present on the default Umbraco Cloud hostname, such as project.euwest01.umbraco.io.
Which Umbraco versions are available on Umbraco Cloud?
All supported versions of Umbraco CMS are available on Umbraco Cloud. The page provides more details on supported versions.
Upgrades
When is Umbraco upgraded in different projects?
Upgrade occurs the first Tuesday after a new patch version of Umbraco CMS, Forms, or Deploy has been released.
How do automated upgrades work?
Cloud projects are automatically upgraded to the latest patch and minor version of Umbraco CMS, Forms, and Deploy. Each new patch version is first tested with a test suite, then on 10 test sites. If successful, the upgrade is rolled out in batches of 100 customer accounts.
Why didn’t my project receive the auto-upgrade?
Auto-upgrades are rolled out after verifying that all environments respond without errors. If any environment returns an HTTP status error, the upgrade process is aborted.
Other reasons for missing the upgrade:
A failed test after applying the auto-upgrade, which compares environment states before and after the upgrade. If discrepancies are found, the environment is rolled back.
Active deployments during the upgrade attempt.
Environments running different minor versions, such as one environment on 15.0.x and another on 15.1.x.
For more details, see the article.
Do pending commits between environments derail the upgrade process?
Pending commits do not stop the auto-upgrade.
Is it OK to do manual upgrades?
Yes, manual upgrades are fine, such as upgrading from 15.1.1 to 15.1.2 locally. If you need to upgrade before the scheduled service upgrade or if an automatic upgrade failed, you can perform a manual update. However, you will need to run the upgrade installer manually on each environment, including live.
Will customized files be overwritten during upgrades?
Any default Umbraco files may be overwritten during upgrades. This usually affects only files changed in the newest release, but there's no guarantee. For example, if you've customized the login page, it will likely be reverted after each upgrade.
Can I opt out of automated upgrades?
Yes. Both Minor and Patch upgrades can be toggled on or off in the Cloud Portal under Configuration -> Automatic Upgrades. See the article for full details.
Testing
Can I perform penetration tests on my Umbraco Cloud site?
Yes, you can conduct penetration tests on your Cloud site. However, inform Support beforehand so the team can monitor for any unusual activity.
Test results are welcome to help improve Umbraco's security. Contact Support via the chat button at the bottom right of the .
Is Denial of Service (DDoS) testing allowed on my Umbraco Cloud site?
No, DDoS attacks are strictly prohibited on Umbraco Cloud sites.
Can Umbraco Cloud support my website?
Umbraco Cloud’s ability to support your website depends on different factors, such as visitor volume and media storage requirements.
Performance needs vary by website based on its design and configuration. We recommend conducting a load test to determine if Umbraco Cloud can handle your specific website. This test simulates real-world traffic to assess the computational power and resources your site needs.
You can use tools like to run these tests and understand your website’s requirements.
Is load testing allowed on my Umbraco Cloud site?
It is recommended to discuss the load test plan with Support before proceeding. Contact Support via the chat button at the bottom right of the .
Security and Encryption
Can't find an answer to your question? Many security-related topics are covered in the article.
Does Umbraco Cloud support TLS/HTTPS?
Yes. Umbraco Cloud provides automatic Transport Layer Security (TLS)/HTTPS certificates for all hostnames added to a project's environment. These certificates, issued by Cloudflare, are valid for 90 days and automatically renewed as long as the hostname remains active.
Does Umbraco Cloud support custom certificates?
Yes. Professional and Enterprise Plans allow the use of custom certificates for custom hostnames, replacing the default certificates provided by Umbraco Cloud.
Learn more about how to use your own certificates in the article.
Does Umbraco Cloud support HTTP/2?
By default, Umbraco Cloud supports HTTP/2.
Why is there an ARRAffinity cookie on my site that isn't sent over HTTPS? Is this a security risk?
No, this is not a security risk. The ARRAffinity cookie is set by the load balancer (LB) to track which server the site is on. It is a built-in feature of Azure App Service and is only useful when scaling to multiple servers. Since Umbraco Cloud does not scale sites across multiple servers, this cookie remains unused.
Learn more in our article.
Can wildcard, EV, DV, or OV certificates be used on Umbraco Cloud?
Yes, any valid certificate can be used on Umbraco Cloud.
Why do I see a "Your connection is not private" warning with a certificate for *.umbraco.io?
This warning appears when domain bindings are not set up correctly. Check bindings in the under the Manage hostnames section.
Can backoffice access be restricted using IP filtering?
Yes. IP filtering can be added to control access. However, Umbraco Deploy must still communicate between environments, and the site should remain accessible locally.
Learn more and how to set it up in the article.
Does Umbraco Cloud use Transparent Data Encryption (TDE) for databases?
Yes, TDE is enabled by default for sites created after May 2, 2017. For older sites, this feature can be enabled upon request.
Building and Deploying
Can a shared SQL Server be used for a development team instead of the SQL/LocalDb database created by Umbraco Cloud?
No, a shared database should not be used. Umbraco Cloud is designed so each team member can safely make changes locally and push them to the Cloud environment. Other developers can do the same, allowing changes to be tested in a structured way. Once changes are confirmed, developers can pull updates and continue working on new features.
Using a shared database can cause two major issues:
automatically activates when multiple developers share a database. Without proper load balancing setup, changes made by one developer may not be visible to others, leading to potential data overwrites.
The deployment engine (Umbraco Deploy) is not designed for shared databases. Local sites may quickly fall out of sync, causing errors and mismatches when changes are pushed to the Cloud instance.
Can custom .NET code be used?
Yes, custom .NET assemblies can be used in Umbraco implementations.
Umbraco Cloud sites run on IIS 8.5, so most configurations that work on IIS will work on Umbraco Cloud. However, components that require server installation are not supported. If the component can be deployed in the bin folder, it should generally work.
Umbraco Cloud operates similarly to Azure Web Apps. If a solution runs on Azure Web Apps, it should work on Umbraco Cloud.
Can custom DLLs be added to extend the Umbraco Backoffice?
Yes, Umbraco Cloud projects function like standard Umbraco websites, with multiple environments and deployment options for code and content.
The best way to add custom code (templates, .cs files, packages, DLLs, etc.) is to run the site locally using Git.
Can custom tables be added to the Umbraco Cloud database?
Yes, custom tables can be created in the database. Connection strings for different environments are available on the Connection Details page in the Settings menu.
Custom tables and data do not automatically replicate across Cloud environments. Consider using Umbraco Migrations and the PetaPoco data layer to automate deployment of custom data.
Are WebSockets supported?
Yes, WebSockets are enabled on all sites.
Why are deletions not applied when deploying to the next environment?
When content, media, or schema is deleted in one environment, the deletion is not automatically applied when deploying to another environment.
This is intentional behavior.
Only files are deleted—database entries remain to prevent accidental data loss in Live/Production environments.
Learn more in the article.
Package Support
Does Umbraco Cloud support package "X"?
Umbraco Cloud runs on Azure App Service Plans, a standard platform for hosting web applications. Most packages that work in local development or on other hosting platforms will also work on Umbraco Cloud.
The main exception is packages that store custom data in the Umbraco database. Most packages either extend functionality without storing data or use existing Umbraco services for storage.
If a package does save data in custom database tables, it will still function on Umbraco Cloud. However, unless the package developer has added support for data transfers, saved information will not move between environments.
This may not be an issue for packages designed to work within a single environment. For example, , which typically runs on staging or production. However, if you need to move data between environments (for example, from staging to production or for local debugging), check whether the package supports this.
If data transfer between environments is not working, contact the package developer to ask about support.
How can I make my package support Umbraco Cloud?
Most packages work on Umbraco Cloud without modification. However, if a package saves data in custom database tables, an extra step is needed for seamless data transfer between environments.
Umbraco Cloud uses to transfer Umbraco schema (for example, document types) and content (for example, media, pages) between environments. To support custom data transfer, package developers must create a Deploy Connector, which tells Umbraco Deploy how to handle the package’s data.
Key challenges when handling custom data
ID Mismatches – If a package references an integer ID (for example, a content node with ID 1023), the same content in another environment may have a different ID (for example, 1039). The Deploy Connector must map IDs correctly.
Missing Dependencies – If a package references a content item (1023) that does not exist in the target environment, deployment errors may occur.
Resources for building a Deploy Connector
- An open-source example of Connectors.
– Pre-installed on all Cloud sites and is updated regularly.
- Step-by-step guide on building a Deploy Connector.
If you need help, reach out to Support for guidance.
Regions
Can I choose a region for my projects?
Yes, you can select from:
West Europe
East US
South UK
East Australia
Can I move an existing project created in the EU region to another region?
Yes, projects created in the EU region can be moved to another region. For more details, see the article.
How do I select a region when creating a project?
You can choose a region from the Region drop-down list when creating a new project.
Can a Baseline master project be in one region and a child project in another?
No. Baseline projects must remain within the same region.
Will sites in different regions receive automatic CMS, Deploy, and Forms updates?
Yes. The update process works the same across all regions.
Can I create Umbraco Heartcore projects outside the EU?
Not currently.
Are all Umbraco Cloud features available in the US and UK regions?
Everything except Baseline functionality is available.
Are you planning to add other regions in the future?
Yes. Once we have specific plans, we will announce them publicly.
How can I check which region my project is hosted in?
You can check the region in the project's Summary page on the cloud Portal.
The hostnames contain the region your project is hosted on. Currently, the following regions are available:
West Europe (euwest01). For example, https://west-europe-project.euwest01.umbraco.io/
East US (useast01). For example, https://east-us-project.useast01.umbraco.io/
South UK (uksouth01). For example, https://south-uk-project.uksouth01.umbraco.io/
Backups and Data Retention
What backup and restore options are available on Umbraco Cloud?
Database
By default, a 35-day point-in-time database restore is available for your projects. It is also possible to restore a .bacpac file to your cloud environments.
You can read more about database backups and restores and how to perform these on Umbraco Cloud in the .
Filesystem
Umbraco Cloud keeps 30 days of filesystem snapshots for disaster recovery purposes.
Blob Storage containers
Umbraco Cloud keeps 35 days of Blob Storage container snapshots for disaster recovery purposes.
1,920 Transmission Control Protocol (TCP) connections
cf-iplongitude: Visitor's longitude
uc-ipcountry: Visitor’s country (identical to ).
Central Canada
East Australia (aueast01). For example, https://east-australia-project.aueast01.umbraco.io/
Central Canada (cacent01). For example, https://central-canada-project.cacent01.umbraco.io/
Afar
Afar (Djibouti)
Afar (Eritrea)
Afar (Ethiopia)
Afrikaans
Afrikaans (Namibia)
Afrikaans (South Africa)
Aghem
Aghem (Cameroon)
Akan
Akan (Ghana)
Albanian
Albanian (Albania)
Albanian (Kosovo)
Albanian (North Macedonia)
Amharic
Amharic (Ethiopia)
Arabic
Arabic (Algeria)
Arabic (Bahrain)
Arabic (Chad)
Arabic (Comoros)
Arabic (Djibouti)
Arabic (Egypt)
Arabic (Eritrea)
Arabic (Iraq)
Arabic (Israel)
Arabic (Jordan)
Arabic (Kuwait)
Arabic (Lebanon)
Arabic (Libya)
Arabic (Mauritania)
Arabic (Morocco)
Arabic (Oman)
Arabic (Palestinian Authority)
Arabic (Qatar)
Arabic (Saudi Arabia)
Arabic (Somalia)
Arabic (South Sudan)
Arabic (Sudan)
Arabic (Syria)
Arabic (Tunisia)
Arabic (United Arab Emirates)
Arabic (World)
Arabic (Yemen)
Armenian
Armenian (Armenia)
Assamese
Assamese (India)
Asturian
Asturian (Spain)
Asu
Asu (Tanzania)
Azerbaijani
Azerbaijani (Cyrillic, Azerbaijan)
Azerbaijani (Cyrillic)
Azerbaijani (Latin, Azerbaijan)
Azerbaijani (Latin)
Bafia
Bafia (Cameroon)
Bamanankan
Bamanankan (Mali)
Bangla
Bangla (Bangladesh)
Bangla (India)
Basaa
Basaa (Cameroon)
Bashkir
Bashkir (Russia)
Basque
Basque (Spain)
Belarusian
Belarusian (Belarus)
Bemba
Bemba (Zambia)
Bena
Bena (Tanzania)
Blin
Blin (Eritrea)
Bodo
Bodo (India)
Bosnian
Bosnian (Cyrillic, Bosnia & Herzegovina)
Bosnian (Cyrillic)
Bosnian (Latin, Bosnia & Herzegovina)
Bosnian (Latin)
Breton
Breton (France)
Bulgarian
Bulgarian (Bulgaria)
Burmese
Burmese (Myanmar)
Catalan
Catalan (Andorra)
Catalan (France)
Catalan (Italy)
Catalan (Spain)
Cebuano
Cebuano (Philippines)
Central Atlas Tamazight
Central Atlas Tamazight (Algeria)
Central Atlas Tamazight (Arabic, Morocco)
Central Atlas Tamazight (Arabic)
Central Atlas Tamazight (Morocco)
Central Atlas Tamazight (Tifinagh, Morocco)
Central Atlas Tamazight (Tifinagh)
Central Kurdish
Central Kurdish (Iran)
Central Kurdish (Iraq)
Chakma
Chakma (Bangladesh)
Chakma (India)
Chechen
Chechen (Russia)
Cherokee
Cherokee (United States)
Chiga
Chiga (Uganda)
Chinese
Chinese (Simplified, China)
Chinese (Simplified, Hong Kong SAR)
Chinese (Simplified, Macao SAR)
Chinese (Simplified, Singapore)
Chinese (Simplified)
Chinese (Traditional, Hong Kong SAR)
Chinese (Traditional, Macao SAR)
Chinese (Traditional, Taiwan)
Chinese (Traditional)
Church Slavic
Church Slavic (Russia)
Colognian
Colognian (Germany)
Cornish
Cornish (United Kingdom)
Corsican
Corsican (France)
Croatian
Croatian (Bosnia & Herzegovina)
Croatian (Croatia)
Czech
Czech (Czechia)
Danish
Danish (Denmark)
Danish (Greenland)
Divehi
Divehi (Maldives)
Dogri
Dogri (India)
Duala
Duala (Cameroon)
Dutch
Dutch (Aruba)
Dutch (Belgium)
Dutch (Bonaire, Sint Eustatius and Saba)
Dutch (Curaçao)
Dutch (Netherlands)
Dutch (Sint Maarten)
Dutch (Suriname)
Dzongkha
Dzongkha (Bhutan)
Edo
Edo (Nigeria)
Embu
Embu (Kenya)
English
English (American Samoa)
English (Anguilla)
English (Antigua & Barbuda)
English (Australia)
English (Austria)
English (Bahamas)
English (Barbados)
English (Belgium)
English (Belize)
English (Bermuda)
English (Botswana)
English (British Indian Ocean Territory)
English (British Virgin Islands)
English (Burundi)
English (Cameroon)
English (Canada)
English (Caribbean)
English (Cayman Islands)
English (Christmas Island)
English (Cocos [Keeling] Islands)
English (Cook Islands)
English (Cyprus)
English (Denmark)
English (Dominica)
English (Eritrea)
English (Eswatini)
English (Europe)
English (Falkland Islands)
English (Fiji)
English (Finland)
English (Gambia)
English (Germany)
English (Ghana)
English (Gibraltar)
English (Grenada)
English (Guam)
English (Guernsey)
English (Guyana)
English (Hong Kong SAR)
English (India)
English (Indonesia)
English (Ireland)
English (Isle of Man)
English (Israel)
English (Jamaica)
English (Jersey)
English (Kenya)
English (Kiribati)
English (Lesotho)
English (Liberia)
English (Macao SAR)
English (Madagascar)
English (Malawi)
English (Malaysia)
English (Malta)
English (Marshall Islands)
English (Mauritius)
English (Micronesia)
English (Montserrat)
English (Namibia)
English (Nauru)
English (Netherlands)
English (New Zealand)
English (Nigeria)
English (Niue)
English (Norfolk Island)
English (Northern Mariana Islands)
English (Pakistan)
English (Palau)
English (Papua New Guinea)
English (Philippines)
English (Pitcairn Islands)
English (Puerto Rico)
English (Rwanda)
English (Samoa)
English (Seychelles)
English (Sierra Leone)
English (Singapore)
English (Sint Maarten)
English (Slovenia)
English (Solomon Islands)
English (South Africa)
English (South Sudan)
English (St Helena, Ascension, Tristan da Cunha)
English (St. Kitts & Nevis)
English (St. Lucia)
English (St. Vincent & Grenadines)
English (Sudan)
English (Sweden)
English (Switzerland)
English (Tanzania)
English (Tokelau)
English (Tonga)
English (Trinidad & Tobago)
English (Turks & Caicos Islands)
English (Tuvalu)
English (U.S. Outlying Islands)
English (U.S. Virgin Islands)
English (Uganda)
English (United Arab Emirates)
English (United Kingdom)
English (United States, Computer)
English (United States)
English (Vanuatu)
English (World)
English (Zambia)
English (Zimbabwe)
Esperanto
Esperanto (World)
Estonian
Estonian (Estonia)
Ewe
Ewe (Ghana)
Ewe (Togo)
Ewondo
Ewondo (Cameroon)
Faroese
Faroese (Denmark)
Faroese (Faroe Islands)
Filipino
Filipino (Philippines)
Finnish
Finnish (Finland)
French
French (Algeria)
French (Belgium)
French (Benin)
French (Burkina Faso)
French (Burundi)
French (Cameroon)
French (Canada)
French (Caribbean)
French (Central African Republic)
French (Chad)
French (Comoros)
French (Congo [DRC])
French (Congo)
French (Côte d’Ivoire)
French (Djibouti)
French (Equatorial Guinea)
French (France)
French (French Guiana)
French (French Polynesia)
French (Gabon)
French (Guadeloupe)
French (Guinea)
French (Haiti)
French (Luxembourg)
French (Madagascar)
French (Mali)
French (Martinique)
French (Mauritania)
French (Mauritius)
French (Mayotte)
French (Monaco)
French (Morocco)
French (New Caledonia)
French (Niger)
French (Réunion)
French (Rwanda)
French (Senegal)
French (Seychelles)
French (St. Barthélemy)
French (St. Martin)
French (St. Pierre & Miquelon)
French (Switzerland)
French (Syria)
French (Togo)
French (Tunisia)
French (Vanuatu)
French (Wallis & Futuna)
Friulian
Friulian (Italy)
Fulah
Fulah (Adlam, Burkina Faso)
Fulah (Adlam, Cameroon)
Fulah (Adlam, Gambia)
Fulah (Adlam, Ghana)
Fulah (Adlam, Guinea-Bissau)
Fulah (Adlam, Guinea)
Fulah (Adlam, Liberia)
Fulah (Adlam, Mauritania)
Fulah (Adlam, Niger)
Fulah (Adlam, Nigeria)
Fulah (Adlam, Senegal)
Fulah (Adlam, Sierra Leone)
Fulah (Adlam)
Fulah (Latin, Burkina Faso)
Fulah (Latin, Cameroon)
Fulah (Latin, Gambia)
Fulah (Latin, Ghana)
Fulah (Latin, Guinea-Bissau)
Fulah (Latin, Guinea)
Fulah (Latin, Liberia)
Fulah (Latin, Mauritania)
Fulah (Latin, Niger)
Fulah (Latin, Nigeria)
Fulah (Latin, Senegal)
Fulah (Latin, Sierra Leone)
Fulah (Latin)
Galician
Galician (Spain)
Ganda
Ganda (Uganda)
Georgian
Georgian (Georgia)
German
German (Austria)
German (Belgium)
German (Germany)
German (Italy)
German (Liechtenstein)
German (Luxembourg)
German (Switzerland)
Greek
Greek (Cyprus)
Greek (Greece)
Guarani
Guarani (Paraguay)
Gujarati
Gujarati (India)
Gusii
Gusii (Kenya)
Hausa
Hausa (Ghana)
Hausa (Niger)
Hausa (Nigeria)
Hawaiian
Hawaiian (United States)
Hebrew
Hebrew (Israel)
Hindi
Hindi (India)
Hungarian
Hungarian (Hungary)
Ibibio
Ibibio (Nigeria)
Icelandic
Icelandic (Iceland)
Igbo
Igbo (Nigeria)
Inari Sami
Inari Sami (Finland)
Indonesian
Indonesian (Indonesia)
Interlingua
Interlingua (World)
Inuktitut
Inuktitut (Canada)
Inuktitut (Latin, Canada)
Inuktitut (Latin)
Invariant Language (Invariant Country)
Irish
Irish (Ireland)
Irish (United Kingdom)
isiXhosa
isiXhosa (South Africa)
isiZulu
isiZulu (South Africa)
Italian
Italian (Italy)
Italian (San Marino)
Italian (Switzerland)
Italian (Vatican City)
Japanese
Japanese (Japan)
Javanese
Javanese (Indonesia)
Javanese (Javanese, Indonesia)
Javanese (Javanese)
Jola-Fonyi
Jola-Fonyi (Senegal)
Kabuverdianu
Kabuverdianu (Cabo Verde)
Kabyle
Kabyle (Algeria)
Kako
Kako (Cameroon)
Kalaallisut
Kalaallisut (Greenland)
Kalenjin
Kalenjin (Kenya)
Kamba
Kamba (Kenya)
Kannada
Kannada (India)
Kanuri
Kanuri (Latin, Nigeria)
Kanuri (Latin)
Kashmiri
Kashmiri (Arabic, India)
Kashmiri (Arabic)
Kashmiri (Devanagari, India)
Kashmiri (Devanagari)
Kazakh
Kazakh (Kazakhstan)
Khmer
Khmer (Cambodia)
Kikuyu
Kikuyu (Kenya)
Kinyarwanda
Kinyarwanda (Rwanda)
Kiswahili
Kiswahili (Congo [DRC])
Kiswahili (Kenya)
Kiswahili (Tanzania)
Kiswahili (Uganda)
Konkani
Konkani (India)
Korean
Korean (Korea)
Korean (North Korea)
Koyra Chiini
Koyra Chiini (Mali)
Koyraboro Senni
Koyraboro Senni (Mali)
Kwasio
Kwasio (Cameroon)
Kyrgyz
Kyrgyz (Kyrgyzstan)
Kʼicheʼ
Kʼicheʼ (Guatemala)
Lakota
Lakota (United States)
Langi
Langi (Tanzania)
Lao
Lao (Laos)
Latin
Latin (Vatican City)
Latvian
Latvian (Latvia)
Lingala
Lingala (Angola)
Lingala (Central African Republic)
Lingala (Congo [DRC])
Lingala (Congo)
Lithuanian
Lithuanian (Lithuania)
Low German
Low German (Germany)
Low German (Netherlands)
Lower Sorbian
Lower Sorbian (Germany)
Luba-Katanga
Luba-Katanga (Congo [DRC])
Lule Sami
Lule Sami (Norway)
Lule Sami (Sweden)
Luo
Luo (Kenya)
Luxembourgish
Luxembourgish (Luxembourg)
Luyia
Luyia (Kenya)
Macedonian
Macedonian (North Macedonia)
Machame
Machame (Tanzania)
Maithili
Maithili (India)
Makhuwa-Meetto
Makhuwa-Meetto (Mozambique)
Makonde
Makonde (Tanzania)
Malagasy
Malagasy (Madagascar)
Malay
Malay (Brunei)
Malay (Indonesia)
Malay (Malaysia)
Malay (Singapore)
Malayalam
Malayalam (India)
Maltese
Maltese (Malta)
Manipuri
Manipuri (Bangla, India)
Manipuri (Bangla)
Manx
Manx (Isle of Man)
Maori
Maori (New Zealand)
Mapuche
Mapuche (Chile)
Marathi
Marathi (India)
Masai
Masai (Kenya)
Masai (Tanzania)
Mazanderani
Mazanderani (Iran)
Meru
Meru (Kenya)
Metaʼ
Metaʼ (Cameroon)
Mohawk
Mohawk (Canada)
Mongolian
Mongolian (Mongolia)
Mongolian (Mongolian, China)
Mongolian (Mongolian, Mongolia)
Mongolian (Mongolian)
Morisyen
Morisyen (Mauritius)
Mundang
Mundang (Cameroon)
N’Ko
N’Ko (Guinea)
Nama
Nama (Namibia)
Nepali
Nepali (India)
Nepali (Nepal)
Ngiemboon
Ngiemboon (Cameroon)
Ngomba
Ngomba (Cameroon)
Nigerian Pidgin
Nigerian Pidgin (Nigeria)
North Ndebele
North Ndebele (Zimbabwe)
Northern Luri
Northern Luri (Iran)
Northern Luri (Iraq)
Northern Sami
Northern Sami (Finland)
Northern Sami (Norway)
Northern Sami (Sweden)
Norwegian Bokmål
Norwegian Bokmål (Norway)
Norwegian Bokmål (Svalbard & Jan Mayen)
Norwegian Nynorsk
Norwegian Nynorsk (Norway)
Nuer
Nuer (South Sudan)
Nyankole
Nyankole (Uganda)
Occitan
Occitan (France)
Odia
Odia (India)
Oromo
Oromo (Ethiopia)
Oromo (Kenya)
Ossetic
Ossetic (Georgia)
Ossetic (Russia)
Papiamento
Papiamento (Caribbean)
Pashto
Pashto (Afghanistan)
Pashto (Pakistan)
Persian
Persian (Afghanistan)
Persian (Iran)
Polish
Polish (Poland)
Portuguese
Portuguese (Angola)
Portuguese (Brazil)
Portuguese (Cabo Verde)
Portuguese (Equatorial Guinea)
Portuguese (Guinea-Bissau)
Portuguese (Luxembourg)
Portuguese (Macao SAR)
Portuguese (Mozambique)
Portuguese (Portugal)
Portuguese (São Tomé & Príncipe)
Portuguese (Switzerland)
Portuguese (Timor-Leste)
Prussian
Prussian (World)
Punjabi
Punjabi (Arabic, Pakistan)
Punjabi (Arabic)
Punjabi (Gurmukhi, India)
Punjabi (Gurmukhi)
Quechua
Quechua (Bolivia)
Quechua (Ecuador)
Quechua (Peru)
Romanian
Romanian (Moldova)
Romanian (Romania)
Romansh
Romansh (Switzerland)
Rombo
Rombo (Tanzania)
Rundi
Rundi (Burundi)
Russian
Russian (Belarus)
Russian (Kazakhstan)
Russian (Kyrgyzstan)
Russian (Moldova)
Russian (Russia)
Russian (Ukraine)
Rwa
Rwa (Tanzania)
Saho
Saho (Eritrea)
Sakha
Sakha (Russia)
Samburu
Samburu (Kenya)
Sango
Sango (Central African Republic)
Sangu
Sangu (Tanzania)
Sanskrit
Sanskrit (India)
Santali
Santali (Ol Chiki, India)
Santali (Ol Chiki)
Scottish Gaelic
Scottish Gaelic (United Kingdom)
Sena
Sena (Mozambique)
Serbian
Serbian (Cyrillic, Bosnia & Herzegovina)
Serbian (Cyrillic, Kosovo)
Serbian (Cyrillic, Montenegro)
Serbian (Cyrillic, Serbia)
Serbian (Cyrillic)
Serbian (Latin, Bosnia & Herzegovina)
Serbian (Latin, Kosovo)
Serbian (Latin, Montenegro)
Serbian (Latin, Serbia)
Serbian (Latin)
Sesotho
Sesotho (Lesotho)
Sesotho (South Africa)
Sesotho sa Leboa
Sesotho sa Leboa (South Africa)
Setswana
Setswana (Botswana)
Setswana (South Africa)
Shambala
Shambala (Tanzania)
Shona
Shona (Zimbabwe)
Sindhi
Sindhi (Arabic, Pakistan)
Sindhi (Arabic)
Sindhi (Devanagari, India)
Sindhi (Devanagari)
Sinhala
Sinhala (Sri Lanka)
siSwati
siSwati (Eswatini)
siSwati (South Africa)
Skolt Sami
Skolt Sami (Finland)
Slovak
Slovak (Slovakia)
Slovenian
Slovenian (Slovenia)
Soga
Soga (Uganda)
Somali
Somali (Djibouti)
Somali (Ethiopia)
Somali (Kenya)
Somali (Somalia)
South Ndebele
South Ndebele (South Africa)
Southern Sami
Southern Sami (Norway)
Southern Sami (Sweden)
Spanish
Spanish (Argentina)
Spanish (Belize)
Spanish (Bolivia)
Spanish (Brazil)
Spanish (Chile)
Spanish (Colombia)
Spanish (Costa Rica)
Spanish (Cuba)
Spanish (Dominican Republic)
Spanish (Ecuador)
Spanish (El Salvador)
Spanish (Equatorial Guinea)
Spanish (Guatemala)
Spanish (Honduras)
Spanish (Latin America)
Spanish (Mexico)
Spanish (Nicaragua)
Spanish (Panama)
Spanish (Paraguay)
Spanish (Peru)
Spanish (Philippines)
Spanish (Puerto Rico)
Spanish (Spain)
Spanish (United States)
Spanish (Uruguay)
Spanish (Venezuela)
Standard Moroccan Tamazight
Standard Moroccan Tamazight (Morocco)
Sundanese
Sundanese (Latin, Indonesia)
Sundanese (Latin)
Swedish
Swedish (Åland Islands)
Swedish (Finland)
Swedish (Sweden)
Swiss German
Swiss German (France)
Swiss German (Liechtenstein)
Swiss German (Switzerland)
Syriac
Syriac (Syria)
Tachelhit
Tachelhit (Latin, Morocco)
Tachelhit (Latin)
Tachelhit (Tifinagh, Morocco)
Tachelhit (Tifinagh)
Taita
Taita (Kenya)
Tajik
Tajik (Tajikistan)
Tamil
Tamil (India)
Tamil (Malaysia)
Tamil (Singapore)
Tamil (Sri Lanka)
Tasawaq
Tasawaq (Niger)
Tatar
Tatar (Russia)
Telugu
Telugu (India)
Teso
Teso (Kenya)
Teso (Uganda)
Thai
Thai (Thailand)
Tibetan
Tibetan (China)
Tibetan (India)
Tigre
Tigre (Eritrea)
Tigrinya
Tigrinya (Eritrea)
Tigrinya (Ethiopia)
Tongan
Tongan (Tonga)
Turkish
Turkish (Cyprus)
Turkish (Turkey)
Turkmen
Turkmen (Turkmenistan)
Ukrainian
Ukrainian (Ukraine)
Upper Sorbian
Upper Sorbian (Germany)
Urdu
Urdu (India)
Urdu (Pakistan)
Uyghur
Uyghur (China)
Uzbek
Uzbek (Arabic, Afghanistan)
Uzbek (Arabic)
Uzbek (Cyrillic, Uzbekistan)
Uzbek (Cyrillic)
Uzbek (Latin, Uzbekistan)
Uzbek (Latin)
Vai
Vai (Latin, Liberia)
Vai (Latin)
Vai (Vai, Liberia)
Vai (Vai)
Venda
Venda (South Africa)
Vietnamese
Vietnamese (Vietnam)
Volapük
Volapük (World)
Vunjo
Vunjo (Tanzania)
Walser
Walser (Switzerland)
Welsh
Welsh (United Kingdom)
Western Frisian
Western Frisian (Netherlands)
Wolaytta
Wolaytta (Ethiopia)
Wolof
Wolof (Senegal)
Xitsonga
Xitsonga (South Africa)
Yangben
Yangben (Cameroon)
Yi
Yi (China)
Yiddish
Yiddish (World)
Yoruba
Yoruba (Benin)
Yoruba (Nigeria)
Zarma
Zarma (Niger)


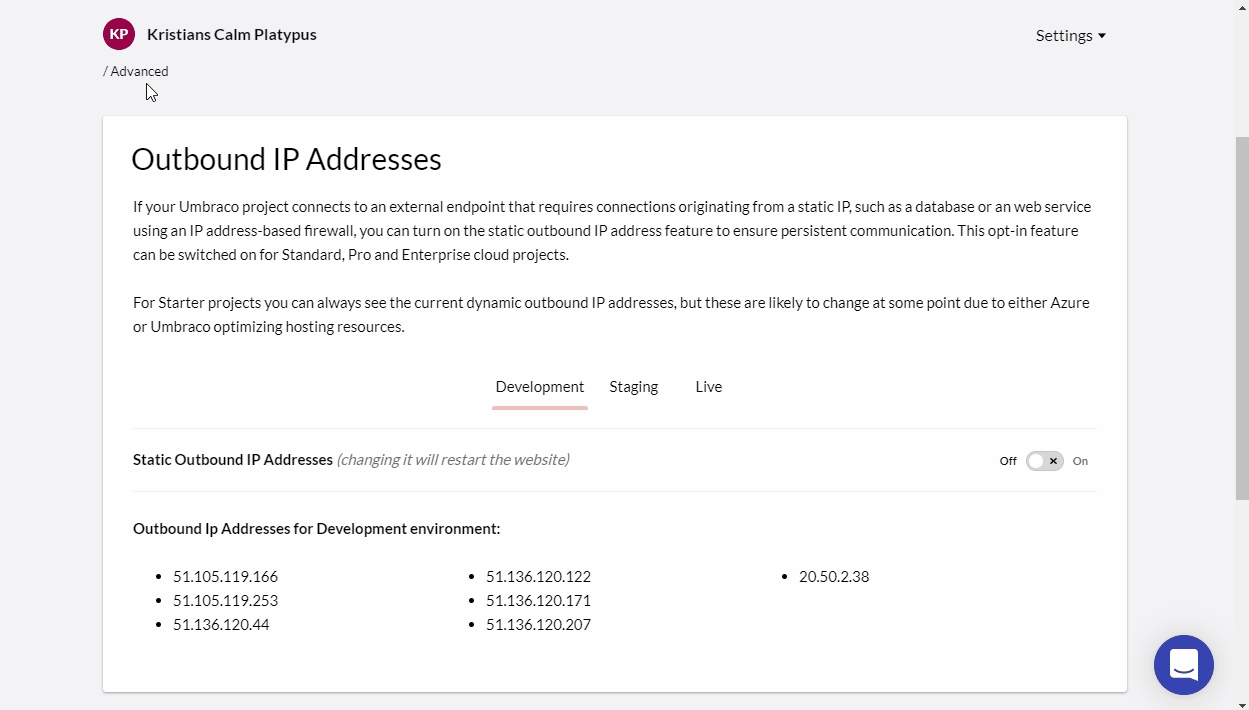


