> For the complete documentation index, see [llms.txt](https://docs.umbraco.com/llms.txt). Markdown versions of documentation pages are available by appending `.md` to page URLs; this page is available as [Markdown](https://docs.umbraco.com/umbraco-cms/13.latest/tutorials/creating-a-basic-website/creating-master-template-part-2.md).
# Creating Pages and Using the Master Template
## Creating a Contact Us Page
We are now going to create a page where we put our contact details. For added functionality, you might want to look at replacing this with a fully fledged contact us form.
Some potential solutions:
* If you're not a programmer you can use the Umbraco built-in package - Umbraco Forms. Umbraco Forms has the added benefit that editors can also create their own forms. Find more information and purchase the product on [Umbraco.com](https://umbraco.com/products/umbraco-forms/).
* Build your own contact form using [Surface Controllers](/umbraco-cms/13.latest/fundamentals/code/creating-forms.md).
### Creating the Document Type and Template
Let's create a content-only contact page where we can provide a title and some rich text.
1. Go to **Settings**.
2. Select the **...** next to the **Document Types** in the **Settings** tree.
3. Select **Document Type with Template**. The Document Type opens in the content editor.
4. Select an **Icon** from the list of icons.
5. Enter a **Name**. Let's call it *Simple Content Page*.
6. Enter a Description.
7. Let's add two fields with the following specifications:
| Group | Field Name | Alias | Data Type |
| ------- | ---------- | --------- | ---------------- |
| Content | Page Title | pageTitle | Textstring |
| Content | Body Text | bodyText | Rich Text Editor |

8. Click **Save**.
9. Go to **Templates** to view your *Simple Content Page* template that was created automatically with the Document Type.
10. Select the **Simple Content Page** template and then select **Master** as the **Master template**.
11. Add the following HTML to the **Simple Content Page** template and click **Save**.
```html
Umbraco Support
Are you a developer?
Are you a marketer?
Are you working at an agency?
Let Umbraco unleash your talent
```
12. Click **Save**.
### Updating the Document Type Permissions
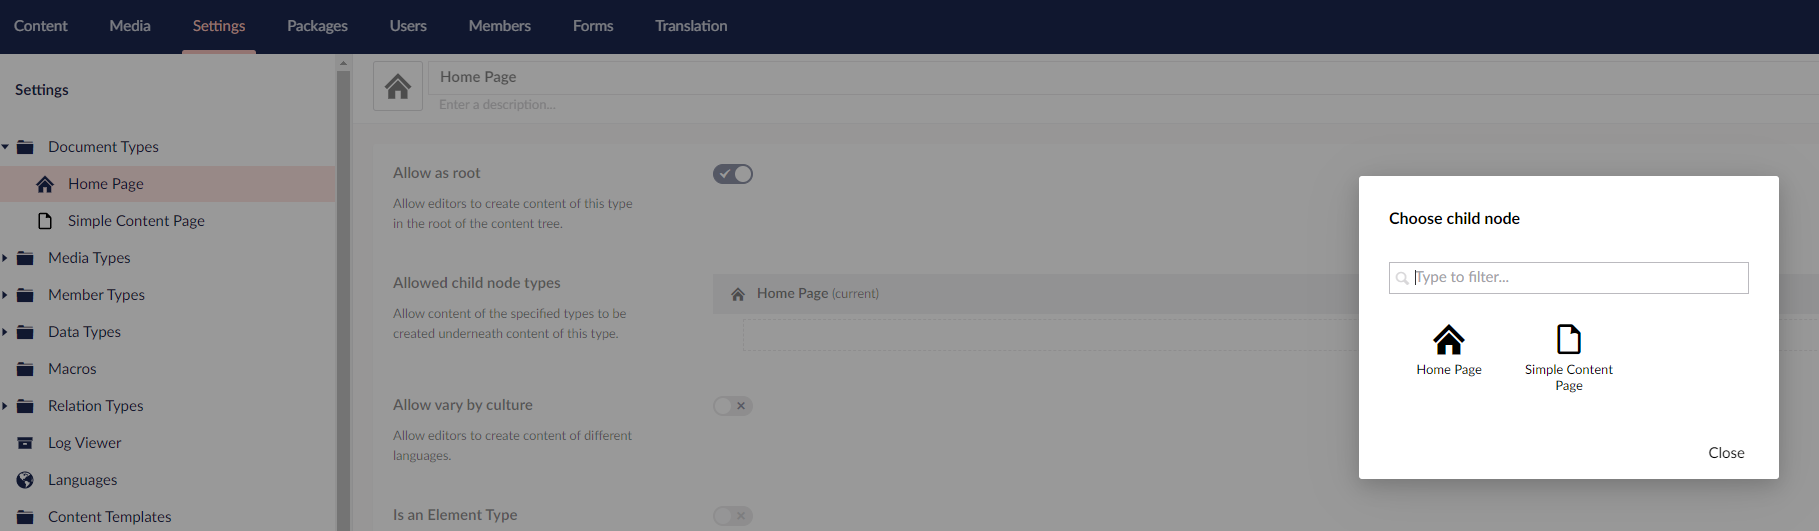
We now need to update the Document Type permissions to specifically add child nodes under the root content node.
To update the Document Type permissions:
1. Go to **Settings**.
2. Open the **Homepage** Document Type and go to the **Permissions** tab.
3. Select **Add child** in the **Allowed child node types**. The **Choose child node** dialog opens.
4. Select **Simple Content Page** and click **Save**.
### Creating the content node
To create a content node:
1. Go to **Content**.
2. Select **...** next to the **Homepage** and select **Simple Content Page**.
3. Enter a name for the Document Type. Let's call it *Contact Us*.
4. Fill in details for the **Page Title** and **Body Text**.
5. Click **Save and Publish**.
### Adding the Document Type Properties
To add the Document Type properties:
1. Go to **Settings**.
2. Select **Templates** from the **Templating** section.
3. Go to **Master** and open the **Simple Content Page** template.
4. Scroll to the `` (around line 8) section and highlight the text `“Umbraco Support”` (around line 11).
5. Click **Insert** and select **Value**.
6. Select the **pageTitle** field from the drop-down list and click **Submit**.
7. Repeat the same process for the `
` tag:
* Highlight the content from the `
` tag (around line 19) to the end of the `
` tag (around line 22).
* Click **Insert** and select **Value**.
* Select **bodyText** field from the drop-down list.
* Click **Submit**.
8. Click **Save**.
### Viewing the Contact Us Page
To view the **Contact Us** Page:
1. Go to **Content**.
2. Select the **Contact Us** page.
3. Go to the **Info** tab.
4. Click the link to view the page.
## Using Document Type Properties from the Homepage
You may notice that the footer is now empty - we don't have the content from our Homepage node.
To use the Document Type properties from the homepage, do the following:
1. Go to **Settings**.
2. Select **Templates** from the **Templating** section, and open the **Master** template.
3. Highlight `@Model.Value("footerText")` in the footer (around line 52) and click **Insert**.
4. Select **Value** and choose the **footerText** again from the **Choose field** dropdown.
5. Select **Yes, make it recursive** checkbox. This notifies Umbraco to look up the content tree if the field doesn't exist at the node level for the page we're requesting.
6. Click **Submit**.
7. Click **Save**.
Reload the *Contact Us* page to view the content with the footer.
---
# Agent Instructions
This documentation is published with GitBook. GitBook is the documentation platform designed so that both humans and AI agents can read, navigate, and reason over technical content effectively. Learn more at gitbook.com.
## Querying This Documentation
If you need additional information that is not directly available in this page, you can query the documentation by asking a question.
Perform an HTTP GET request on the following URL with the `ask` and `goal` query parameters:
```
GET https://docs.umbraco.com/umbraco-cms/13.latest/tutorials/creating-a-basic-website/creating-master-template-part-2.md?ask=&goal=
```
`ask` is the immediate question: it should be specific, self-contained, and written in natural language.
`goal` is what the user is ultimately trying to achieve, the reason they need the answer. Sharing it helps GitBook give you a better, more relevant answer. A goal is most helpful when it describes the outcome the user wants rather than restating the question. For example, with `ask=how do I create an API token`, a goal like `automate deployments from our CI pipeline` lets GitBook tailor the answer to that use case.
The response will contain a direct answer to the question and relevant excerpts and sources from the documentation.
Use this mechanism when the answer is not explicitly present in the current page, you need clarification or additional context, or you want to retrieve related documentation sections.